background image

ASSEMBLY

STEP 4

Place Chair on a flat level surface to ensure it is level.
If it is uneven, adjust either the Seat (B) or Front Legs (E) and (F).
Ensure the Chair is level and then fully tighten all bolts.  

Summary of Contents for WyndenHall brooklin+max AXCDCHR-003-LML

Page 1: ...DINING CHAIR MODEL AXCDCHR 003 LML EZRA HAWTHORNE KENTVILLE ...

Page 2: ...LP For help with assembly or if you are missing a part Please call customer service at 1 866 518 0120 ext 262 9 am to 4 pm EST A CHAIR BACK QTY 1 SEAT QTY 1 LEFT STRETCHER QTY 1 B C D E F RIGHT STRETCHER QTY 1 LEFT FRONT LEG QTY 1 RIGHT FRONT LEG QTY 1 ...

Page 3: ... a part Please call customer service at 1 866 518 0120 ext 262 9 am to 4 pm EST 1 ALLEN KEY SCREW M8 x 45 MM QTY 1 ALLEN KEY SCREW M8 x 60 MM QTY 4 ALLEN KEY SCREW M8 x 90 MM QTY 4 ALLEN KEY 5 MM QTY 1 FLAT WASHER Ø22 MM QTY 9 LOCK WASHER Ø13 MM QTY 9 2 3 4 5 6 7 SELF TAPPING SCREW Ø3 5 X 40 MM QTY 4 ...

Page 4: ...ASSEMBLY STEP 1 Align Seat B into pre drilled holes on Chair Back A Attach Seat B to Chair Back A using Allen Key Screw 1 and one Washer each of 4 and 7 Use Allen Key 6 tighten Do not over tighten ...

Page 5: ...ASSEMBLY STEP 2 Attach Seat B to Chair Back A using Allen Key Screws 3 and four Washers each of 4 and 7 Use Allen Key 6 tighten Do not over tighten ...

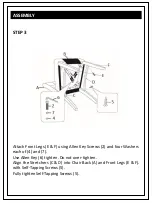
Page 6: ...gs E F using Allen Key Screws 2 and four Washers each of 4 and 7 Use Allen Key 6 tighten Do not over tighten Align the Stretchers C D into Chair Back A and Front Legs E F with Self Tapping Screws 5 Fully tighten Self Tapping Screws 5 ...

Page 7: ...ASSEMBLY STEP 4 Place Chair on a flat level surface to ensure it is level If it is uneven adjust either the Seat B or Front Legs E and F Ensure the Chair is level and then fully tighten all bolts ...

Page 8: ...ASSEMBLY STEP 5 Use the zipper to close the fabric on the bottom of the Chair ...

Reviews: