background image

EZRA 9 PC DINING SET

MODEL # 

AXCDS9EZ-SGL

EZRA / HAWTHORNE / KENTVILLE

Summary of Contents for Wyndenhall Brooklyn + Max EASTWOOD 3AXCDNT-002

Page 1: ...EZRA 9 PC DINING SET MODEL AXCDS9EZ SGL EZRA HAWTHORNE KENTVILLE...

Page 2: ...tomer Service at 1 866 518 0120 ext 262 Monday to Friday between 9 am 4 pm EST or go to www simpli home com parts request In order to assist you in a timely manner please have the following informatio...

Page 3: ...id scratches If using power tools set the tool to low torque to avoid damage Requires 2 people for ease of assembly SAFETY INFORMATION CARE and MAINTENANCE Wipe regularly with clean water and a damp c...

Page 4: ...st importantly have a good working humidifier for your home A humidistat automatically works to balance the humidity in your home so it is constant Dry indoor air can suck enough moisture from its sur...

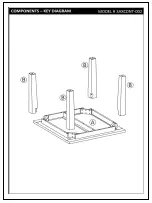
Page 5: ...EASTWOOD COLBURN HALSTEAD SQUARE DINING TABLE MODEL 3AXCDNT 002...

Page 6: ......

Page 7: ......

Page 8: ......

Page 9: ......

Page 10: ...DINING CHAIR MODEL AXCDCHR 003 SGL EZRA HAWTHORNE KENTVILLE...

Page 11: ...P For help with assembly or if you are missing a part Please call customer service at 1 866 518 0120 ext 262 9 am to 4 pm EST A CHAIR BACK QTY 1 SEAT QTY 1 LEFT STRETCHER QTY 1 B C D E F RIGHT STRETCH...

Page 12: ...g a part Please call customer service at 1 866 518 0120 ext 262 9 am to 4 pm EST 1 ALLEN KEY SCREW M8 x 45 MM QTY 1 ALLEN KEY SCREW M8 x 60 MM QTY 4 ALLEN KEY SCREW M8 x 90 MM QTY 4 ALLEN KEY 5 MM QTY...

Page 13: ...ASSEMBLY STEP 1 Align Seat B into pre drilled holes on Chair Back A Attach Seat B to Chair Back A using Allen Key Screw 1 and one Washer each of 4 and 7 Use Allen Key 6 tighten Do not over tighten...

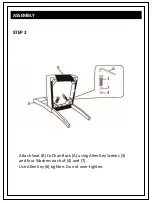
Page 14: ...ASSEMBLY STEP 2 Attach Seat B to Chair Back A using Allen Key Screws 3 and four Washers each of 4 and 7 Use Allen Key 6 tighten Do not over tighten...

Page 15: ...s E F using Allen Key Screws 2 and four Washers each of 4 and 7 Use Allen Key 6 tighten Do not over tighten Align the Stretchers C D into Chair Back A and Front Legs E F with Self Tapping Screws 5 Ful...

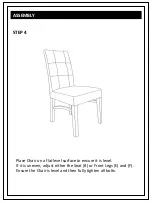
Page 16: ...ASSEMBLY STEP 4 Place Chair on a flat level surface to ensure it is level If it is uneven adjust either the Seat B or Front Legs E and F Ensure the Chair is level and then fully tighten all bolts...

Page 17: ...ASSEMBLY STEP 5 Use the zipper to close the fabric on the bottom of the Chair...

Page 18: ...e line at 1 866 518 0120 ext 262 from 9 am to 4 pm Monday to Friday Eastern Standard Time or by email at customerservice simpli home com We reserve the right to repair or replace the defective product...

Reviews: