background image

Features & Controls

9

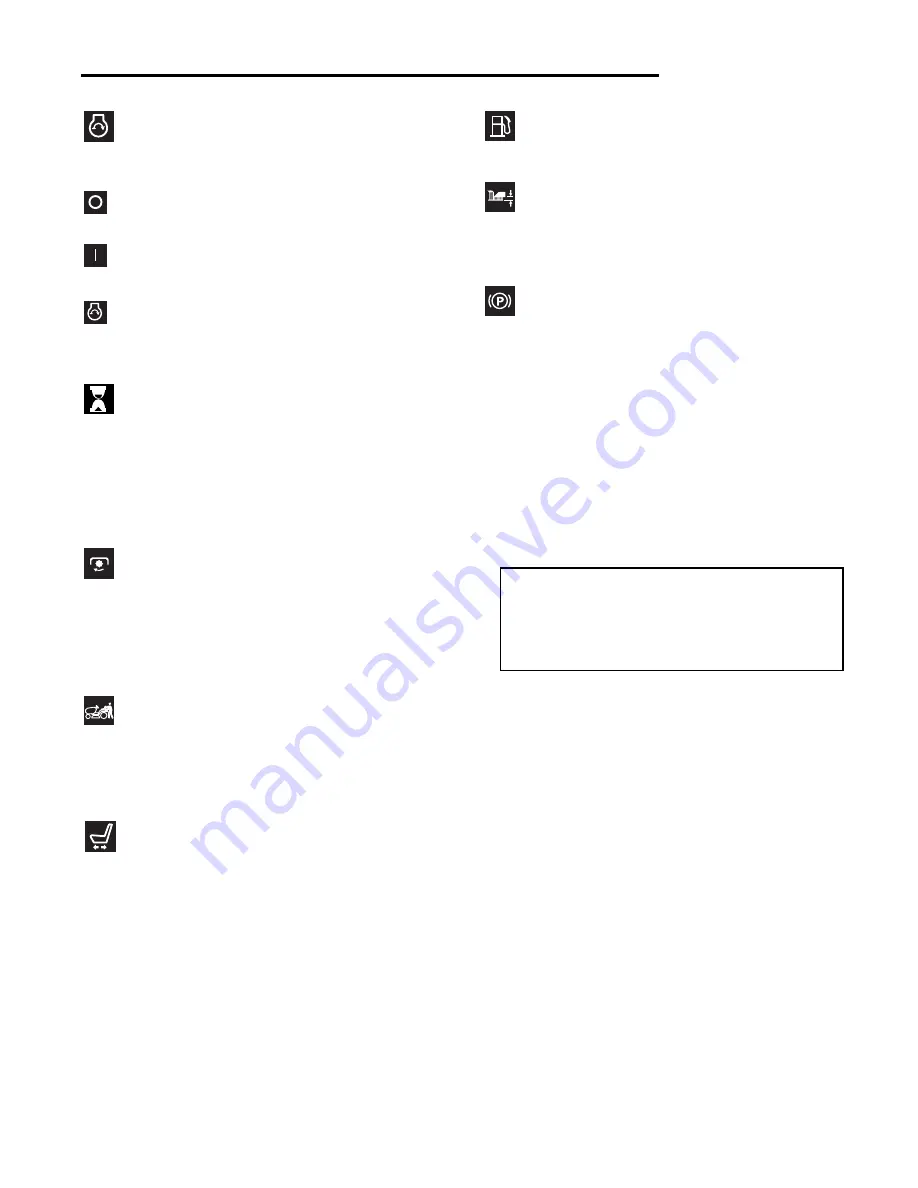
Ignition Switch 

The ignition switch starts and stops the engine; it has
three positions:

OFF

Stops the engine and shuts off the 
electrical system.

RUN

Allows the engine to run and powers the 
electrical system.

START

Cranks the engine for starting.

NOTE: Never leave the ignition switch in the RUN posi-
tion with the engine stopped–this drains the battery.

Hour Meter

The hour meter measures the number of hours the key
has been in the RUN position.

Note: The hour meter will register the passage of time
when the engine is running. The hour meter has a self
contained power source so the total hours are always
visible.

PTO Switch

The PTO (Power Take-Off) switch engages and disen-
gages the mower blade clutch. To engage the PTO, pull
UP on the switch. Push DOWN to disengage. Note that
the operator must be seated firmly in the rider seat for
the PTO to function.

Transmission Release Valves 

The transmission release valves deactivate the transmis-
sions so that the unit can be pushed by hand. See
PUSHING THE UNIT BY HAND for operational informa-
tion.

Seat Adjustment Knobs

The seat can be adjusted forward and backward. See
SEAT ADJUSTMENTS for adjustment information.

Fuel Tank  Cap

To remove the cap, turn counterclockwise.

Mower Cutting Height Adjustment Lever

The mower cutting height is adjustable from 1-1/2” to 4”, in
1/2” increments. See CUTTING HEIGHT ADJUSTMENT
for adjustment information.

Parking Brake 

The parking brake is incorporated into the left motion con-
trol lever. Locking the lever into the neutral locked position
engages the parking brake; moving the lever out from the
neutral locked position disengages the brake.

Note: Both motion control levers must be locked into the
neutral lock position together, or the unit will stall.

IMPORTANT

The figures and illustrations in this manual are
provided for reference only and may differ
from your specific model. Contact your dealer
if you have questions.

Summary of Contents for 7800071

Page 1: ...e immediately after the front cover The part number for this manual typically a 172_____ number is located on the front cover This file may contain several manuals which differ only by their covers See the part number at the bottom of the cover page Body The body for all manuals is identical regardless of the cover Odd number pages are always right hand pages even number pages are always left hand...

Page 2: ...THIS PAGE INTENTIONALLY BLANK FOR PLACEMENT ONLY DO NOT PRINT ...

Page 3: ...iption 7800072 ERZT185440BVE 18 5HP European Zero Turn Rider with 44 Mower Javelin Series Simplicity Mfg No Description 7800071 ERZT185440BVE 18 5HP European Zero Turn Rider with 44 Mower Form No 7100544 Revision 00 Rev Date 1 2006 TP 100 5147 00 HZ SN ...

Page 4: ... INC 500 N Spring Street PO Box 997 Port Washington WI 53074 0997 www simplicitymfg com Copyright 2006 Simplicity Manufacturing Inc All Rights Reserved Printed in USA PRODUCTS INC McDonough GA 30253 www snapper com ...

Page 5: ...as seen from the operating position WARNING You must read understand and comply with all safety and operating instructions in this manual before attempting to set up and operate your machine Failure to comply with all safety and operating instructions can result in loss of machine control serious personal injury to you and or bystanders and risk of equipment and property damage The triangle in the...

Page 6: ...ndling and the stability of the machine 1 DO NOT operate machine on slopes exceeding 10 degrees 18 grade 2 Exercise EXTREME CAUTION on slopes Turn blades OFF when traveling uphill Use a slow speed and avoid sudden or sharp turns 3 DO NOT operate machine back and forth across face of slopes Operate up and down Practice on slopes with blades off 4 AVOID starting stopping or turning on slopes If mach...

Page 7: ...hange clothing immediately 11 Never overfill a fuel tank Replace fuel cap and tighten securely OPERATION 1 Mount and dismount machine from left side Keep clear of discharge opening at all times 2 Start engine from operator s seat if possible Make sure blades are OFF and parking brake is set 3 DO NOT leave machine with engine running STOP engine STOP blades SET brake and Remove key before leaving o...

Page 8: ...provide adequate ventilation when running engine Exhaust gases contain carbon monoxide an odorless and deadly poison 7 Disconnect negative black cable from battery before per forming maintenance or service Cranking engine could cause injury 8 DO NOT work under machine without safety blocks 9 Service engine and make adjustments only when engine is stopped Remove spark plug wire s from spark plug s ...

Page 9: ...Number Dealer Name Date Purchased Engine Make Engine Type Spec Engine Model Engine Code Serial Number Mower Deck MFG Number Mower Deck SERIAL Number Identification Numbers Unit ID Tag CE IDENTIFICATION TAG MARKINGS A Manufacturer s Identification Number Part Number B Manufacturer s Serial Number C Power Rating in Kilowatts D Maximum Engine Speed in Rotations per Minute E Manufacturer s Address F Y...

Page 10: ... be carefully read and obeyed Personal bodily injury can result when these instructions are not followed The information is for your safety and it is important The safety decals below are on your rider and mower If any of these decals are lost or damaged replace them at once See your local dealer for replacements These labels are easily applied and will act as a constant visual reminder to you and...

Page 11: ...ontrol levers not locked in their neutral locked positions OR With operator seated right motion control lever is moved out of its neutral locked position before left motion control lever TEST 4 BLADE BRAKE CHECK The mower blades and mower drive belt should come to a complete stop within five seconds after the electric PTO switch is turned off or operator rises off seat If mower drive belt does not...

Page 12: ...peed Control The engine speed control controls engine speed Move the engine speed control forward to increase engine speed and back to decrease engine speed Always operate at FULL engine speed Choke Close the choke for cold starting Open the choke once the engine starts A warm engine may not require chok ing Move the lever forward to close the choke Move the lever back to open the choke CONTROL FU...

Page 13: ...TO to function Transmission Release Valves The transmission release valves deactivate the transmis sions so that the unit can be pushed by hand See PUSHING THE UNIT BY HAND for operational informa tion Seat Adjustment Knobs The seat can be adjusted forward and backward See SEAT ADJUSTMENTS for adjustment information Fuel Tank Cap To remove the cap turn counterclockwise Mower Cutting Height Adjustm...

Page 14: ...Never allow passengers to ride on the unit Before leaving the operator s position for any reason lock the motion control levers in the neutral locked position disengage the PTO stop the engine and remove the key To reduce fire hazard keep the engine rider and mower free of grass leaves and excess grease Do not stop or park rider over dry leaves grass or combustible materials Gasoline is highly fla...

Page 15: ...Start the engine see STARTING THE ENGINE 3 Set the mower cutting height see CUTTING HEIGHT ADJUSTMENT 4 Set the engine speed control to FULL 5 Engage the PTO by pulling up on the switch 6 Move the motion control levers from neutral locked position to neutral drive position in toward the opera tor 7 Begin mowing See Safety Rules Information for tips on safe mowing practices 8 When finished shut off...

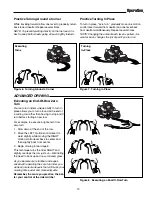
Page 16: ...d Travel Practice Gradually move both motion control levers evenly FORWARD from neutral Slow down and repeat NOTE Straight forward travel takes practice If neces sary top speed can be balance adjusted see the Speed Balancing Adjustment in the Adjustments section near the back of this manual Reverse Travel Practice LOOK DOWN BEHIND then gradually move both motion control levers evenly BACK from neu...

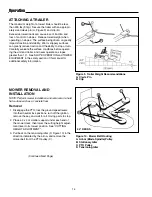
Page 17: ...eri enced with operating the zero turn rider you will learn more maneuvers that will make your mowing time easier and more enjoyable Remember the more you practice the bet ter your control of the rider will be Practice Turning Around a Corner While traveling forward allow one lever to gradually return back toward neutral Repeat several times NOTE To prevent pivoting directly on the tire tread it i...

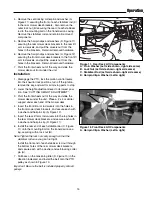
Page 18: ...outing A Arbor Blade Spindle Pulley B Stationary Idler C PTO Pulley D Tensioning Idler Figure 9 Trailer Weight Recommendations A Clevis Pin B Clip A B ATTACHING A TRAILER The maximum weight of a towed trailer should be less than 200 lbs 91kg Secure the trailer with an appropri ately sized clevis pin A Figure 9 and clip B Excessive towed loads can cause loss of traction and loss of control on slope...

Page 19: ...their neutral lock positions turn off the ignition remove the key and wait for all moving parts to stop 2 Lower the height adjustment lever to its lowest posi tion See CUTTING HEIGHT ADJUSTMENT 3 Pivot the front wheels out of the way and slide the mower deck under the unit Place a 2 x 4 or similar support under each end of the mower deck 4 Insert the front lift arm rod swivels into the holes in th...

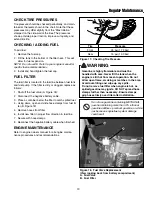
Page 20: ...rs Every 25 Hours Every 100 Hours Every 250 Hours Spring Fall Check Rider Mower for loose hardware Check Clean Engine Cooling Fins Check Adjust PTO Clutch Lubricate Rider Mower Clean Battery Cables Check Tire Pressure Clean Deck Check Replace Mower Blades ENGINE MAINTENANCE ITEMS Before Each Use Every 5 Hours Every 25 Hours Every 100 Hours Every 250 Hours Spring Fall Check Engine Oil Level Check C...

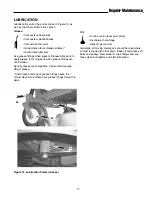
Page 21: ...he points shown in Figure 13 as well as the others listed in this section Grease front caster wheel axles front caster spindle bosses front axle center pivot mower deck arbors blade spindles mower deck idler arm Use grease fittings when present Disassemble parts to apply grease to moving parts when grease fittings are not installed Not all greases are compatible Use automotive type lithium grease ...

Page 22: ...will remain level 6 Reinstall the blade Figure 16 with the tabs pointing up toward the mower deck as shown 7 Reinstall the blade washers B Figure 16 concave side up and nut C Use a wooden block A to pre vent blade rotation while tightening the hardware Torque hardware to 80 90 ft lbs WARNING For your personal safety do not handle the sharp mower blades with bare hands Careless or improper handling...

Page 23: ...er B Figure 18 5 Remove hoses from filter 6 Install new filter in proper flow direction in fuel line 7 Secure with hose clamps 8 Reconnect the negative battery cable when finished ENGINE MAINTENANCE Refer to engine owners manual for all engine mainte nance procedures and recommendations WARNING Gasoline is highly flammable and must be handled with care Never fill the tank when the engine is still ...

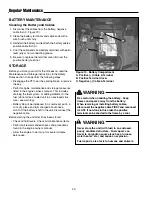
Page 24: ... an enclosed struc ture see warning Battery life will be increased if it is removed put in a cool dry place and fully charged about once a month If the battery is left in the unit disconnect the negative cable Before starting the unit after it has been stored Check all fluid levels Check all maintenance items Perform all recommended checks and procedures found in the engine owner s manual Allow th...

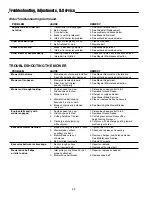
Page 25: ...efill the fuel tank 4 Fuel valve closed 4 Open fuel valve 5 Engine flooded 5 Open the choke 6 Gas is old or stale 6 Drain fuel replace with fresh fuel 7 Battery terminals require 7 Clean the battery terminals cleaning 8 Battery discharged or dead 8 Recharge or replace 9 Wiring loose or broken 9 Visually check wiring replace broken or frayed wires Tighten loose connections 10 Solenoid or starter mo...

Page 26: ...wer cut is rough looking 1 Engine speed too slow 1 Set engine speed control to full 2 Ground speed too fast 2 Decrease Ground Speed 3 Blades are dull 3 Sharpen or replace blades See Mower Blade Service 4 Mower drive belt slipping 4 Clean or replace belt as necessary because it is oily or worn 5 Blades not properly fastened 5 See Servicing the Mower Blades to arbors Engine stalls easily with 1 Engi...

Page 27: ... end spacing Note The bottom bolt may be accessed from beneath the fender To Adjust the Handle Height Remove the motion con trol lever mounting hardware A Figure 21 and reposi tion the lever either up or down from its original position You may need to readjust the handle placement as described above Figure 20 Seat Adjustment A Adjustment Knobs B Support bolts Figure 21 Motion Control Lever Adjustm...

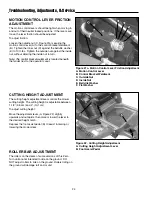
Page 28: ... DO NOT adjust rollers to ride on the ground Rollers riding on the ground will damage turf and or unit MOTION CONTROL LEVER FRICTION ADJUSTMENT The motion control levers should be tight when moving in and out of their neutral locked positions If the levers are loose the lever friction should be adjusted To adjust friction Loosen the outside nut C Figure 21a securing the motion control lever A to t...

Page 29: ...e PTO lock the motion control levers into their neutral locked positions turn the engine off remove the key and wait for all moving parts to stop 3 Remove the hardware C Figure 23 connecting the rod end B to the control bracket weldment A Note The rod end is located under the fender beside the operator seat 4 Loosen the rod end jam nut B If the transmission is creeping forward turn the rod end in ...

Page 30: ...ion control levers moved from their neutral locked positions measure the length of the compression spring F The measurement should be between 2 1 2 and 2 3 4 If not tighten or loosen the brake rod adjust ment nut C until the correct measurement is achieved C INCREASE DECREASE Figure 24 Front Suspension Adjustment A Pre Load Adjustment Collar FRONT SUSPENSION ADJUSTMENT SELECT MODELS The shock asse...

Page 31: ...ment nuts B Figure 25 until the rotor face and armature face just contacts the gauge 5 Check the windows for an equal amount of tension when the gauge is inserted and removed and make any necessary adjustments by tightening or loosen ing the adjustment nuts NOTE The actual air gap between the rotor and arma ture may vary even after performing the adjustment pro cedure This is due to dimensional va...

Page 32: ...mm If there is more than 1 8 3mm difference between the measurements on each side proceed to step 5 If the difference is 1 8 3mm or less proceed to step 6 5 Use the rear leveling nuts A Figure 29 to adjust the side to side leveling of the deck Repeat step 4 if necessary FRONT TO BACK LEVELING 6 Arrange the blades so they face front to back Figure 30 7 Measure the distance from the ground to the fr...

Page 33: ...rdware on the right side of the mower deck A Figure 32 Loosen the hardware and raise or lower the roller bar until the correct level is achieved then tighten the hardware Repeat steps 4 5 if necessary Figure 32 Roller Bar Leveling A Leveling Hardware Figure 31 Mower Leveling Front to Back A Front Leveling Nuts A 8 To adjust the front of the mower deck use the adjust ing nuts on the front deck lift...

Page 34: ...RY CHARGING A dead battery or one too weak to start the engine may be the result of a defect in the charging system or other electrical component If there is any doubt about the cause of the problem see your dealer If you need to replace the battery follow the steps under Cleaning the Battery Cables in the Regular Maintenance Section To charge the battery follow the instructions provided by the ba...

Page 35: ...firmly on the belt tensioning idler E Figure 34 in the direction indicated and remove the belt from the left arbor pulley A 5 Remove the old belt from the remaining pulleys 6 Reversing steps 4 5 install the new belt following the routing in Figure 34 Be sure to replace the belt guards Troubleshooting Adjustments Service To avoid damaging belts DO NOT PRY BELTS OVER PULLEYS Figure 34 Mower Belt Rou...

Page 36: ...igure 36 is located on the right side of the rear seat support 3 Remove and check the suspected fuse or fuses If blown replace with a fuse with a rating equal to the ratings indicated in Figure 37 A Figure 36 Fuse Replacement View looking back from under raised seat A Fuse Block WARNING Do not use a fuse with a rating other than that specified Serious equipment damage may result A Figure 37 Fuse D...

Page 37: ... h Specified rpm Reverse 0 3 MPH 0 4 83 km h Continuous Torque 115 ft lbs 155 N m Output Maximum Weight 340 lbs 154 Kg per Axle on Axle DIMENSIONS Overall Length 72 182 9 cm Overall Width 55 139 7 cm Height 38 96 5 cm Weight apx Snapper 601 lbs 273 kg Simplicity 617 lbs 280 kg NOTE Specifications are correct at time of printing and are subject to change without notice Actual sustained equipment ho...

Page 38: ...y notes and and torque values are also included For applicable manuals currently available for your model contact our Customer Publications Department at 262 284 8519 Have the information listed in the box below available when phoning in your request Technical manuals can be downloaded from www simplicitymfg com or www snapper com Engine Oil Touch Up Paint Grease Gun Kit 8 oz Grease Tube Tire Seal...

Reviews: