background image

14

15

How To

Change the Belt - Models F3300, F3500, 
F3600, F3300C and F3500C

CAUTION: First, unplug the vacuum cleaner 

from the electrical outlet.

1.  Turn the unit over and remove the 

bottom plate (see “How to Remove 
Bottom Plate”). 

2.  Remove the brushroll and the worn or 

broken belt from the brushroll pulley and 
the motor drive shaft (figure 19).

3.  Loop the new belt around the  

motor drive shaft and the brushroll  
(figure 20). 

4.  Reinstall the brushroll back into the 

housing. Turn the brushroll by hand, 
making sure the belt is not twisted  
and all rotating parts move smoothly 
(figure 21). 

5.  Reinstall the bottom plate (see “How to 

Install Bottom Plate”).

NOTE: To ensure maximum cleaning 

efficiency, the belt should be checked 
regularly to be sure it is in good condition. 
Check to see if the belt is stretched, 

cracked, or if excessive slipping is occuring. 

Replace if needed.

Fig. 19

Fig. 20

Fig. 21

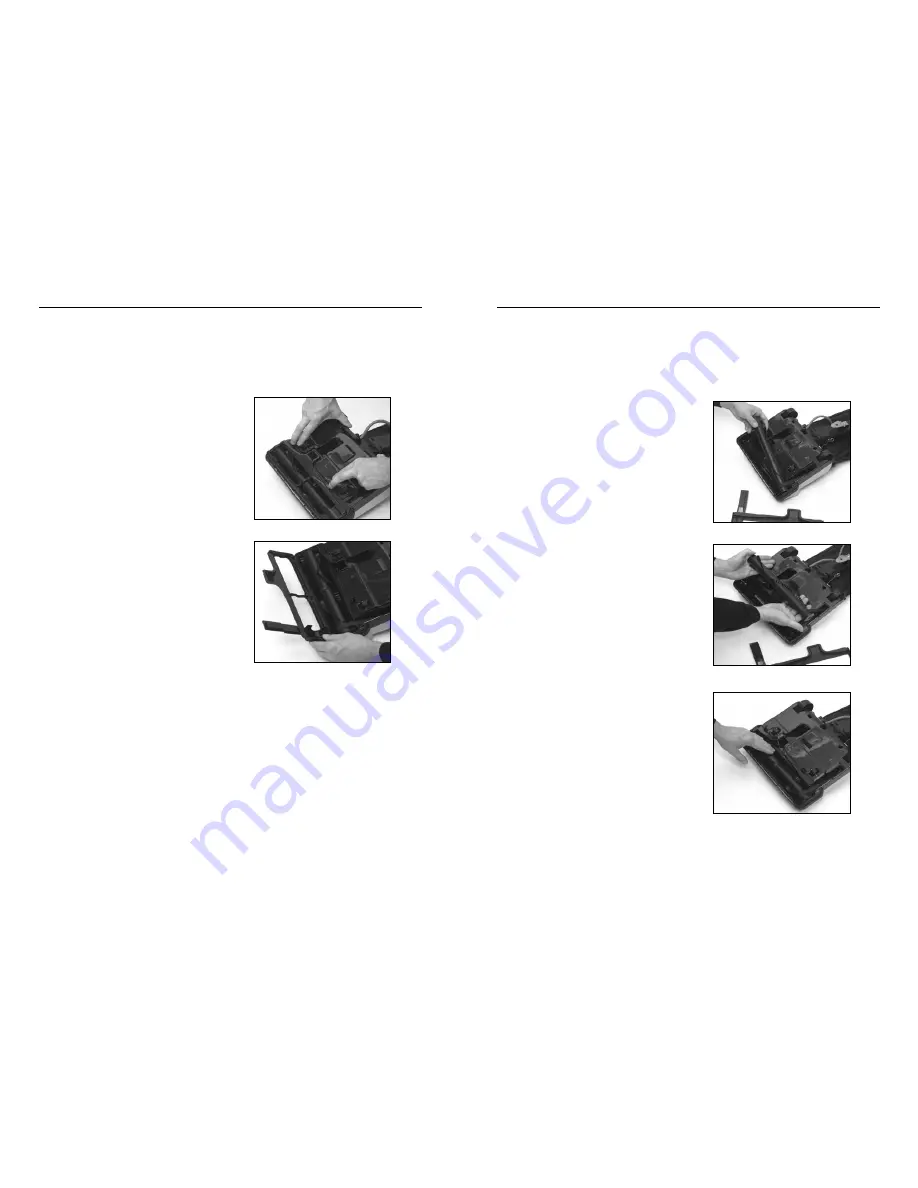
How To

Remove/Install the Bottom Plate

CAUTION: First, unplug the vacuum cleaner 

from the electrical outlet.

To remove bottom plate:

1.  After unplugging the power cord, turn 

the vacuum cleaner over, exposing the 

underside. 

2.  Press the two holding tabs inward (figure 

17) releasing the bottom plate. Remove 
the bottom plate. 

To install bottom plate:

1.   Install bottom plate, making sure 

bottom plate hinges are in place before 
setting the plate (figure 18). 

2.  Press plate into position until the plate 

“clicks” on both sides. 

Fig. 17

Fig. 18

Summary of Contents for Freedom F3300

Page 1: ... The chances are you re never going to read me Owner s Manual www simplicityvac com models F3300 F3500 F3600 F3700 F3300C F3500C and F3700C ...

Page 2: ...thorized Retailers to serve you To locate your closest Authorized Retailer regarding warranty work questions bags and accessories please call 1 888 9 SIMPLY or visit our website www simplicityvac com IMPORTANT To activate your warranty within 30 days of purchase please fill out and return the warranty postcard Please fill out warranty information located on page 18 and keep it for your records Key...

Page 3: ...se attention is necessary when used by or near children Use only as described in this manual Use only manufacturer s recommended attachments Do not use with damaged cord or plug If appliance is not working as it should has been dropped damaged left outdoors or dropped into water return it to your Authorized Retailer for service Do not pull or carry by cord use cord as a handle close a door on the ...

Page 4: ... Quick Cord Release F3300 and F3300C Handle F3500 F3500C F3600 F3700 and F3700C Handle Commercial Models F3300C F3500C and F3700C This vacuum cleaner must be grounded If it should malfunction or break down grounding provides a path of least resistance for electric current to reduce the risk of electric shock This vacuum cleaner is equipped with a cord having an equipment grounding conductor and gr...

Page 5: ...k proceed with wrapping the cord Fig 3 Fig 4 Fig 5 Assembling the Vacuum Models F3500 F3500C F3600 F3700 and F3700C The vacuum cleaner handle is packed as a separate component that requires assembly Installing the Handle 1 Release the handle bracket from the handle tube by removing the two screws figure 6 2 Place handle onto the handle tube aligning holes with pegs figure 7 3 Place the handle brac...

Page 6: ...rward position is for maximum power see figure 12 Use the maximum power setting for carpet cleaning and the on setting for cleaning bare floors and throw rugs Fig 10 Fig 11 Fig 12 Vacuum Features On Off two speed switch on handle cont Pull the switch backward to turn the vacuum on Push the switch halfway back to turn the vacuum off Push the switch all the way forward to use the maximum power setti...

Page 7: ...g or article of clothing is ever picked up into your vacuum the vacuum will sense this jammed brushroll condition and turn off the brushroll When this happens the brushroll warning light on the top of the nozzle will flash in red Turn off the vacuum and remove the cause of the jam Turn vacuum back on If the brushroll is free of any object and the brushroll warning light is still flashing it s like...

Page 8: ...plate see How to Install Bottom Plate NOTE To ensure maximum cleaning efficiency the belt should be checked regularly to be sure it is in good condition Check to see if the belt is stretched cracked or if excessive slipping is occuring Replace if needed Fig 19 Fig 20 Fig 21 How To Remove Install the Bottom Plate CAUTION First unplug the vacuum cleaner from the electrical outlet To remove bottom pl...

Page 9: ...rcuit Breaker Reset Button figure 27 plug in power cord and turn unit on If the unit fails to turn on return it to an Authorized Simplicity Retailer for service Fig 27 Circuit breaker reset button Fig 26 How To Replace the Headlight Bulb WARNING To reduce the risk of electric shock and injury from moving parts unplug vacuum before cleaning or servicing 1 First remove the nozzle housing Turn the un...

Page 10: ...ave other rights which vary from state to state The model and serial number of this product may be found on the back side of the unit You should note the model and serial number of your unit in the spaces provided below and retain this book as a permanent record of your purchase Date of purchase _____________________________________________________ Serial number ___________________________________...

Page 11: ...B503 2800B 1 888 9 SIMPLY www simplicityvac com ...

Reviews: