2.2.2
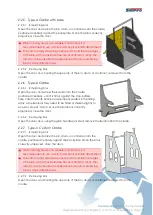
Type-E Cradle
2.2.2.1
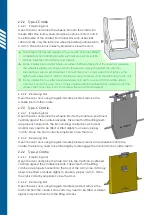
Emplacing bins
Open the door and place the wheelie bin onto the cradle. For
full-size 240L bins, both wheels should be positioned into a catch
(on either side of the cradle). For smaller bins such as 60L, 80L,
120L and 140L, only the left-hand wheel needs be positioned into
a catch. Once the bin is correctly emplaced, close the door.
The wheel catches are designed to work with standard EN840
wheelie bins from leading brands such as Europlast, Sulo, ESE,
Weber, Craemer, OnePlastics and Trident.
Some smaller bin manufacturers use axles of different lengths. If the distance between
the wheels is slightly too large or small, the wheels may jam against the catches,
preventing a secure emplacement. Should this occur, simply unbolt and remove the
right-hand wheel catch. All bins can be securely retained using the left-hand catch only.
Some smaller bin manufacturers use tyres which are too wide to fit inside the wheel
catches. Should this issue occur, simply insert additional packers (flat washers) onto the
wheel catch mounting bolts, to increase the spacing as needed.
2.2.2.2
Removing bins
Open the door and, using the grab-handle provided, remove the
wheelie bin from the cradle.
2.2.3
Type-C Cradle
2.2.3.1
Emplacing bins
Open the door and place the wheelie bin into the machine, positioned
centrally against the cradle backplate. Take care that the lifting teeth
are properly hooked into the bin combing; smaller bins such as 60L
and 80L may need to be tilted or lifted slightly to ensure a proper
‘catch’. Once the bin is correctly emplaced, close the door.
2.2.3.2
Removing bins
Open the door and, using the grab-handle provided, remove the wheelie bin from the
cradle. The bin may need to be tilted slightly to disengage the comb
from the cradle ‘
teeth
’
.
2.2.4
Type-A Cradle
2.2.4.1
Emplacing bins
Open the door and place the trash cart into the machine, positioned
centrally against the cradle backplate. Take care that the lifting
catches are properly hooked into the front of the cart; some carts may
need to be tilted or shaken slightly to ensure a proper ‘catch’. Once
the cart is correctly emplaced, close the door.
2.2.4.2
Removing bins
Open the door and, using the grab-handles provided, remove the
trash cart from the cradle. Some carts may need to be tilted or shaken
slightly to detach them from the lifting catches.
Summary of Contents for DUMPMASTER DM0700
Page 1: ...User Manual Simpro Dumpmaster Original Instructions English v119 0 October 2022 USER MANUAL...
Page 53: ...User Manual Simpro Dumpmaster Original Instructions English v119 0 October 2022 Page 52...
Page 58: ......
Page 59: ...User Manual Simpro Dumpmaster Original Instructions English v119 0 October 2022 Page 58...


