19
1.
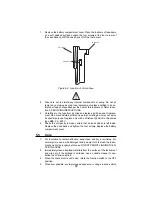
Remove the battery compartment cover. Place the Instrument face-down
on a soft, padded surface. Loosen the four screws at the four corners of
the case back and lift the case back off of the Instrument.
Figure 5-2. Location of 2 Amp Fuse
2.
Take care not to disturb any internal components or wiring. Do not at-
tempt any servicing beyond fuse replacement unless qualified to do so.
Improper repairs may endanger the user of this Instrument. Refer to sec-
tion 5, SERVICING INSTRUCTIONS.
3.
Carefully pry the fuse from its clips and replace it with an exact replace-
ment. Do not substitute a different type fuse or rating as it may not serve
its special purpose. Replace only with a Littlefuse Type BLS or Bussman
type BBS, 2 A, 600 V.
4
Shake the unit gently to make certain that no loose debris is left inside.
Replace the case back and tighten the four screws. Replace the battery
compartment cover.
5.5
Care
1.
For insulation to remain effective, keep clean and dry at all times. For
normal grime, use a mild detergent and a damp cloth to clean the Instru-
ment and dry thoroughly before use. DO NOT PERMIT LIQUIDS TO EN-
TER THE CASE.
2.
Immediately clean all spilled materials from the surface of the Instrument
and wipe dry. If the spillage is corrosive, use a suitable cleaner to neu-
tralize the corrosive action.
3.
When the Instrument is not in use, rotate the function switch to the OFF
position.
4.
Whenever possible, avoid prolonged exposure or usage in areas which
15V Battery
Front Panel
2 Amp Fuse
!
Summary of Contents for 14510-2
Page 1: ...Simpson 14510 2 Volt Ohm Milliammeter OPERATOR S MANUAL...
Page 4: ...4 NOTES...
Page 5: ...5 NOTES...
Page 23: ...23 NOTES...


