419050/B
503
Unpacking standard parts and units
Prior to installation or use, parts and units must be inspected, and then unpacked from
their transport boxes. It is important that this unpacking is done without inflicting
damage to the equipment.
Context
This procedure provides the basic tasks of unpacking units (main unit, spare parts etc)
from boxes shipped from Kongsberg Maritime.
Note
If the unit in question is not unpacked for immediate use, you may consider storing it
unopened in its original box. However, it may be useful to open the box to check its
contents for damage and retrieve any accompanying documentation.
Do not use a knife to open cardboard boxes - the contents may be located close to the
surface, and can then be damaged by the blade.
Procedure
1
Check the carton before opening it to ensure it shows no signs of dropping,
immersion in water or other mishandling.
1
If external damage is detected, open the box to check its contents.
2
Request that a representative of the carrier to be present while the box is
opened, so any transportation damage can be identified and documented.
3
If a unit has been damaged, prepare an inspection report stating the condition
of the unit and actions taken.
Describe the damage, and collect photographic evidence if possible. Return
the inspection report to Kongsberg Maritime as soon as possible.
2
Place the box on a stable work bench or on the floor with the top of the box facing
upwards.
3
In the absence of other instructions, always open the top of the carton first.
The contents of the box will normally have been lowered into the carton from
above, so this will usually be the easiest route to follow. Be careful when you open
the box, and make sure that the contents are not damaged. Do not use a knife to
open cardboard boxes.
4
If the box has been closed using staples, remove the staples from the carton as
you open it.
This will reduce the possibilities of scratch injury to yourself and damage to the
contents.
5
If a wooden box has been closed using screws, always remove them using a
screwdriver.
Do not attempt to force the lid open with a crowbar or similar tool.
Summary of Contents for SC90
Page 2: ......
Page 16: ...14 419050 B Simrad SC90 ...
Page 219: ...419050 B 217 Øverland UPC 3005 Dimensions Cable layout and interconnections ...
Page 223: ...419050 B 221 Øverland UPC 5000P Dimensions Cable layout and interconnections ...
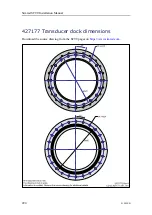
Page 438: ...436 419050 B 427177 Transducer dock dimensions page 494 Simrad SC90 Installation Manual ...
Page 441: ...419050 B 439 Drawing file ...
Page 442: ...440 419050 B Simrad SC90 Installation Manual ...
Page 445: ...419050 B 443 Drawing file ...
Page 452: ...450 419050 B Simrad SC90 Installation Manual ...
Page 455: ...419050 B 453 Drawing file ...
Page 458: ...456 419050 B Simrad SC90 Installation Manual ...
Page 463: ...419050 B 461 Drawing file ...
Page 468: ...466 419050 B Simrad SC90 Installation Manual ...
Page 469: ...419050 B 467 Related topics Installing the optional gate valve DN350 page 84 Drawing file ...
Page 471: ...419050 B 469 Drawing file ...
Page 473: ...419050 B 471 214043 Gate valve installation DN350 Drawing file ...
Page 475: ...419050 B 473 422915 Gate valve installation DN350 Drawing file ...
Page 477: ...419050 B 475 083045 Gate valve installation DN500 Drawing file ...
Page 479: ...419050 B 477 33414 Gate valve dimensions DN350 Drawing file ...
Page 480: ...478 419050 B Simrad SC90 Installation Manual ...
Page 481: ...419050 B 479 Related topics Installing the optional gate valve DN350 page 84 Drawing file ...
Page 482: ...480 419050 B 33473 Gate valve dimensions DN350 Simrad SC90 Installation Manual ...
Page 483: ...419050 B 481 Related topics Installing the optional gate valve DN350 page 84 Drawing file ...
Page 484: ...482 419050 B 33498 Gate valve dimensions DN500 Simrad SC90 Installation Manual ...
Page 485: ...419050 B 483 Drawing file ...
Page 487: ...419050 B 485 37357 Gate valve dimensions DN500 Drawing file ...
Page 488: ...486 419050 B Simrad SC90 Installation Manual ...
Page 489: ...419050 B 487 Related topics Installing the optional gate valve DN500 page 103 Drawing file ...
Page 491: ...419050 B 489 Drawing file ...
Page 494: ...492 419050 B Simrad SC90 Installation Manual ...
Page 495: ...419050 B 493 Related topics Installing the optional gate valve DN350 page 84 Drawing file ...
Page 497: ...419050 B 495 Drawing file ...
Page 542: ... 2018Kongsberg Maritime ISBN xxx ...
Page 543: ......
Page 544: ...Simrad SC90 Fish finding sonar Installation Manual ...

