background image

| 15

Wiring | 

10kW and 25kW Installation  Manual

Radar scanner: 25 kW

Fitting the scanner cable

1.

Unscrew the four cover bolts and lift up the hinged cover of the pedestal.

2.

Remove the cable gland assembly from the lower half of the pedestal.

3. 

Pass the scanner end of the radar cable through the cable gland (

1

), plain washer (

2

), rubber

gasket (

3

) and another plain washer (

4

), in the order shown.

4.

Unravel the braided shield and wrap it around the washer (

4

).

5. 

Pass the scanner cable through the cable gland opening, into the pedestal.

Summary of Contents for TXL-10S-4

Page 1: ...ENGLISH 10kWand25kW LowEmissionRadar Installation Manual ...

Page 2: ... This manual represents the product as at the time of printing Navico Holding AS and its subsidiaries branches and affiliates reserve the right to make changes to specifications without notice Warranty The warranty card is supplied as a separate document Declarations and conformance This equipment is intended for use in international waters as well as coastal sea areas administered by countries of...

Page 3: ...ving a gain greater than the maximum gain indicated for that type are strictly prohibited for use with this device System Model Transmitter Antenna part number description antenna gain dBi impedence nominal TXL 10S 4 768C NKE2103 151 10359 001 4 foot antenna 27 9 dBi 50 ohm TXL 10S 6 768C NKE2103 151 10360 001 6 foot antenna 29 9 dBi 50 ohm TXL 25S 7 768C NKE2254 151 10361 001 7 foot antenna 30 7 ...

Page 4: ...eceiving antenna Increase the separation between the equipment and receiver Connect the equipment into an outlet on a circuit different from that of the receiver Consult the dealer or an experienced technician for help Trademarks NMEA 2000 is a registered trademark of the National Marine Electronics Association Navionics is a registered trademark of Navionics SpA Simrad is a trademark of Kongsberg...

Page 5: ...he theoretical maximum detection range 7 Reduce false echoes and shadow zones 9 Hardware mounting 9 Install the radar processor 10 Install the scanner 12 Wiring 12 Guidelines 12 Radar scanner 10 kW 15 Radar scanner 25 kW 18 Radar processor connections 21 Pinouts 21 Scanner cable 22 NMEA COMMS cable 23 Specifications 23 TXL 10S 4 TXL 10S 6TXL 25S 7 25 Drawings 25 10 kW scanner 26 25 kW scanner 27 R...

Page 6: ...with data from other navigation aids and sources When a conflict arises between the navigation data from your radar and data from other navigation aids make sure you resolve the conflict before proceeding with navigation A CAREFUL NAVIGATOR NEVER RELIES ON ONLY ONE METHOD TO OBTAIN NAVIGATION INFORMATION International Regulations for Preventing Collisions at Sea mandate that when radar is on a ves...

Page 7: ...beam angle Note The safe range for a non rotating antenna is far greater due to the lack of averaging however this is not a permitted operational mode and the system includes interlocks to prevent this mode of operation FCC labels 10kW 4 foot 6 foot FCC ID CKENKE2103 IC 768C NKE2103 SERIAL 1406J3LC00001 COMPASS SAFE DISTANCE STD 2 4m STEER 1 8m SERIAL 1406J3LC00001 25kW 7 foot two labels MODEL TXL...

Page 8: ...ar for proper performance Don t take any shortcuts and follow these instructions carefully Check the parts System TXL 10S 4 TXL 10S 6 TXL 25S 7 example Antenna 4 foot 6 foot 7 foot Pedestal NKE 2103 4 NKE 2103 6 NKE 2254 7 Processor 10 kW 10 kW 25 kW Scanner cable 20 m 20 m 20 m Ethernet adaptor 1 1 1 Ethernet cable 1 8m 6 ft 1 1 1 Accessories note some hardware is packed with the antenna brass wa...

Page 9: ...hat the location site provides the scanner with a clear view of the front of the vessel DON T DO THIS DON T install the scanner too high up where its weight will alter the stability of the vessel and cause degrade the radar picture over short ranges DON T install the scanner close to lamps or exhaust outlets The heat emissions may cause the equipment to break down Soot and smoke will degrade the p...

Page 10: ...trated within this angle meaning that outside of this angle the radar beam will be very weak Scanner power θ value half the 3 dB beam width 10 kW 10 25 kW 10 An example of an A B Line is shown in the picture If you install the scanner below the A B line the scanner will be too low It will be difficult to acquire distant targets and the superstructure will be more likely to impede the passage of th...

Page 11: ... of the earth s surface under normal conditions of wave propagation Bad weather conditions can reduce the maximum detection range Reduce false echoes and shadow zones False echoes can be produced on the radar display if the scanner is installed too close to an object on the vessel s superstructure This object can block the radar beam and reflect it back generating false echoes and shadow zones If ...

Page 12: ...8 Pre installation checks 10kW and 25kW Installation Manual D diameter of the obstacle R distance between the antenna and the obstacle ...

Page 13: ...cessor must be located where it can be easily connected to the ship s ground the scanner cable the power cable and the radar communications cable or the network cable Check that these cables and the ship s ground can easily reach the radar processor BEFORE you drill Use fasteners suited to the mounting surface material If the material is too thin for self tappers reinforce it or mount processor wi...

Page 14: ...estal ensure correct orientation is used both the antenna and the platform on the pedestal have a front and back edge even though they may appear nearly symetrical 1 10 kW pedestal rotating platform 2 25 kW pedestal rotating platform 3 front edge of platform antenna front should be on same side Tighten the supplied M10 hex bolts to 350 kg cm 34 3 N m or 25 3 lb ft 1 antenna front shown 2 rotating ...

Page 15: ...oles followed by the mounting holes to suit mounting fasteners When lifting the scanner in place ensure it is not lifted by the plastic antenna housing Any lifting sling should be fitted to lift the scanner via each side of the metal mounting platform that the antenna attaches to Fit the supplied brass inserts to the pedestal mounting holes followed by stainless steel bolts nuts and spring washers...

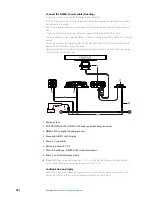
Page 16: ...hened or re terminated DO leave room to easily access install and remove cables DO make sure cables connecting to the radar processor are not under stress from bending or twisting that could place pressure on the processors connectors Radar scanner 10 kW Fitting the scanner cable 1 Unscrew the four cover bolts and lift up the hinged cover of the pedestal 2 Remove the cable gland assembly from the ...

Page 17: ...nsuring it is stuck to the same side as before to ensure good conductivity g g y 1 2 3 4 50mm 6 Pass the scanner cable through the cable gland opening into the pedestal 7 Connect the five scanner cable connectors to the J connectors as follows Cable Connector Pedestal Connector on PCB P1 J1 P2 J2 P3 J3 P4 J4 P5 J5 8 Use the cable clamp 1 to secure the cable to the upper housing The clamp should ho...

Page 18: ...bolts 12 Close the pedestal and firmly secure it with the screws Earth the 10 kW scanner The earth point must be connected to the vessel s ground system 1 Connect one end of the copper Earth strop 2 to the bolt 1 on the pedestal 2 Connect the other end of the Earth strop to the mounting location using the Earth bolt 3 3 Apply silicon sealant around both of the bolts Note If the radar mounting loca...

Page 19: ...pedestal 2 Remove the cable gland assembly from the lower half of the pedestal 3 Pass the scanner end of the radar cable through the cable gland 1 plain washer 2 rubber gasket 3 and another plain washer 4 in the order shown 4 Unravel the braided shield and wrap it around the washer 4 5 Pass the scanner cable through the cable gland opening into the pedestal ...

Page 20: ...P2 J2 P3 J3 P4 J4 P5 J5 7 Use the cable clamp 1 to secure the cable to the upper housing The clamp should hold the cable at the point where it is wrapped in copper tape 8 Close the pedestal case sides securing them with the supplied screws 9 Fit the cable gland assembly Use silicon sealant around the cable entry point 10 Use silicon sealant around the mounting bolts ...

Page 21: ... to the pedestal with a hexagonal bolt C 2 Connect the other end of copper Earth strap to the mounting location using the special hexagonal Earth bolt B 3 apply silicon sealant around both the bolts Note If the radar mounting location is not made of a electrically conductive material fit a longer earth strop that allows direct connection to the vessel s ground ...

Page 22: ... cable The radar processor requires a 24 V DC supply capable of delivering 15 amps continuous Scanner Fuse rating Cable length 5 m 16 4 ft Cable length 10 m 26 ft Cable length 20m 20 ft 10 kW 15 A 2 5mm2 14 AWG 6mm2 10 AWG 10mm2 8 AWG 25 kW 15 A 2 5mm2 14 AWG 6mm2 10 AWG 10mm2 8 AWG The radar processor must be connected to a dedicated fuse circuit breaker The fuse circuit breaker should be labeled...

Page 23: ...el with a metal hull connect the radar processor chassis ground to the hull at the closest possible location using 12 AWG wire or thicker Connect the Ethernet cable Ethernet is used to share the radar data with compatible displays on the network Use of a adaptor is required to convert from RJ45 connector to the 5 pin connector used on Simrad network hubs and displays 1 3 2 4 1 Radar processor 2 Et...

Page 24: ...must be used to convert PGNS to NMEA0183 4800 baud Heading calibration should be performed during initial setup annually and after any major structural changes to the vessel _ 12 V DC T T 2 1 6 7 8 5 4 3 1 Radar system 2 AT10HD NMEA 2000 NMEA 0183 high speed heading converter 3 NMEA 2000 compliant heading sensor 4 Compatible MFD with display 5 Micro C drop cables 6 Network power 12 V DC 7 Micro C ...

Page 25: ...2 Motor Power 5 Black Sky thick 16 1 Scanner Ground 6 Black 22 6 Analog Ground 7 Drain wire coax line 24 2 Video Ground 8 No connection Not used 9 Yellow Pink thick 16 Scanner Power 10 Axis line transparent insulation 24 1 Video 11 Yellow thin 24 3 2 RS 485 Comm 12 Green thin 24 5 Bearing Zero 13 White thin 24 4 RS 485 Comm 14 Drain wire 24 2 Trigger Ground 15 Shield line 24 1 Trigger 16 Orange me...

Page 26: ...ction Color 1 NMEA RX A Green 2 NMEA RX B Red 7 NMEA TX A Orange 8 NMEA TX B Blue 12 NMEA TX GROUND Yellow 9 SHIELD Drain 10 RADAR REMOTE POWER IN Brown Note the NMEA COMMS cable is an optional cable part number AA010070 for installations using a NMEA 0183 heading sensor ...

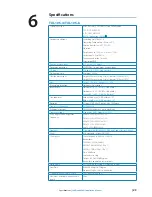
Page 27: ...al 1 8 10 4ft 3dB width Horizontal 1 2 10 6ft 3dB width Vertical 20 20 4 6ft 3dB width Side lobe level Below 26dB max 4 6ft within 10 Below 30dB max 4 6ft outside 10 Rotation 27 rpm 4 6ft Min 20rpm at Max 100Knots Transmitter frequency 9410 30MHz Peak power output 10kW 50 under any pulse condition Transmitter tube Magnetron NJRC Model MAF1565N Pulse length Pulse Repetition Frequency 0 08μS 30 2250...

Page 28: ...h Vertical 20 20 3dB width Side lobe level Below 26dB max within 10 Below 30dB max outside 10 Rotation 24 rpm Min 20rpm at Max 100Knots Transmitter frequency 9410 30MHz Peak power output 25kW 50 under any pulse condition Transmitter tube Magnetron NJRC Model M1568BS Pulse length Pulse Repetition Frequency 0 07μS 30 2250Hz 5 0 20μS 25 2250Hz 5 0 30μS 25 1900Hz 5 0 40μS 25 1400Hz 5 0 80μS 25 750Hz 5...

Page 29: ... and 25kW Installation Manual Drawings 10 kW scanner 4 FT 1285mm 50 59 6 FT 1880 mm 74 02 348 mm 13 70 290 mm 11 42 141 7 mm 5 58 457 4 mm 18 01 461 mm 18 15 260 mm 10 24 130 mm 5 12 Note mounting templates are provided ...

Page 30: ...26 Drawings 10kW and 25kW Installation Manual 25 kW scanner 2254 mm 88 74 458 mm 18 03 260 mm 10 24 300 mm 11 81 142 mm 5 59 536 mm 21 10 463 mm 18 23 290 mm 11 42 Note mounting templates are provided ...

Page 31: ... 27 Drawings 10kW and 25kW Installation Manual Radar processor 197 5 mm 7 77 182 6 mm 7 19 90 4 mm 3 56 ø 4 mm 3 56 141 mm 5 55 57 1 mm 2 25 ...

Reviews: