

39
POINT INVISIBLE
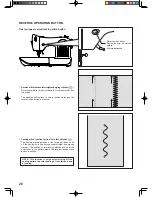
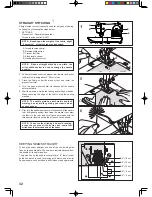
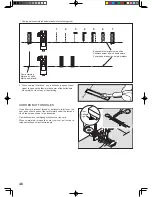
1. Avec un fil assorti, cousez le rebord coupé. Sur un tissu
léger, faites un rebord d’environ 1.3 cm (1/2 po) ou moins
et repassez. Sur un tissus moyen ou épais, surjetez le
rebord coupé.
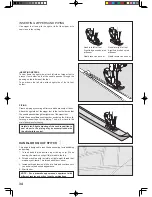
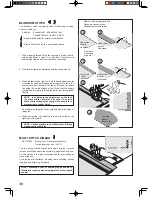
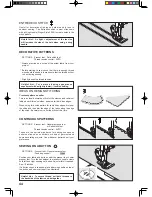
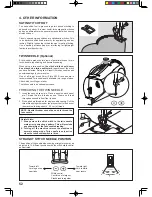
2. Maintenant, pliez le tissu comme indiqué dans l’illustration,
l’envers tourné vers le haut.
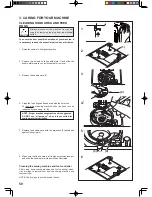
3. Placez le tissu sous le pied. Faites tourner le volant à la
main vers vous (sens antihoraire) jusqu’à ce que l’aiguille se
déplace complètement vers la gauche. Elle ne devrait percer
que le repli du tissu.
Effectuez la couture lentement, tout en guidant
soigneusement le tissu le long du bord du guide.
4. Lorsque l’ourlet est terminé, les points sont presque
invisibles sur l’endroit du tissu.
-
Point ourlet invisible régulier pour tissu tissé
- Point ourlet invisible pour les tissus extensibles
BLINDZOMEN
1. Werk eerst de ruwe rand af. Doe dit door bij fijne stoffen de
rand om te slaan of door bij middelzware en zware stoffen
de rand overhands te naaien. Sla de zoom vervolgens
over de gewenste lengte om, deze persen en met spelden
vastzetten.
2. Vouw de stof nu zoals afgebeeld, met de verkeerde kant
naar boven.
3. Plaats de stof onder het voetje met de vouw in de stof in
een zodanige positie dat de naald de vouw juist doorsteekt
wanneer de naald naar links draait. Let erop dat de steken
slechts één textieldraadje in de vouw pakken. Indien nodig
de blindsteek-geleiding (B) van het voetje (A) instellen. Bij
het naaien moet de vouw langs de blindsteek-geleiding
worden gevoerd.
Naai langzaam, waarbij de stof gelijkmatig langs de
blindsteek-geleiding wordt geschoven.
4. Wanneer dit is voltooid, zijn de steken aan de rechterzijde
van de stof bijna onzichtbaar.
INSTELLINGEN : Voetje - Blindsteekvoet invisible
: Spanningsregelaar - AUTO
-
-
RÉGLAGES : Pied presseur - Pied ourlet invisible
: Réglage tension du fil supérieur - AUTO
Gewone blindzoomsteek voor normale stoffen.
Elastische blindzoomsteek voor fijne, rekbare
stoffen.
REMARQUE: en plus des ajustements possibles
sur le pied, le contrôle de la largeur du point peut
être utilisé. Le contrôle de la largeur du point
change le déplacement de l’aiguille pour un point
plus ou moins large.
OPMERKING: gebruik eerst de steekbreedte en
de steeklengteregelaar om de exacte breedte en
lengte van de naald fijn af te stellen. Daarna kunt u
de blindsteek-geleiding instellen.
REMARQUE: la couture d’ourlets invisible
demande de la pratique. Pour débuter faites un
essai de couture.
OPMERKING: omdat deze techniek iets aan oefeing
vergt, wordt er altijd aanbevolen om een naaiproef
uit te voeren.
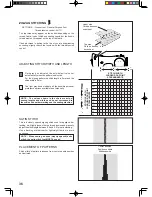
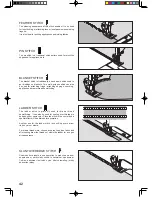
ZIGZAG MULTI-POINT
Comme son nom l’indique, le point est solide, car il fait trois
points courts là où le zigzag normal n’en fait seulement qu’un.
Pour cette raison, on le recommande pour surjeter tous les
types de tissus.
Il est aussi idéal pour les points d’arrêt, le reprisage et pour la
pose d’élastique plat.
RÉGLAGES : Pied presseur - Pied universel
: Réglage tension du fil supérieur - AUTO
ZIGZAG MET MEERDERE STEKEN
Deze steek is sterker dan een normale zigzag steek omdat de
steek uit 3 zigzagstappen bestaat.
Bijzonder geschikt voor het afwerken van stofkanten op alle
textielsoorten.
Tevens kunt u met deze steek scheurtjes repareren,
tafelkleden naaien of patchwork en elastiek opnaaien.
INSTELLINGEN : Voetje - Standaardvoet
: Voetje - Standaardvoet
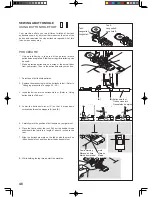
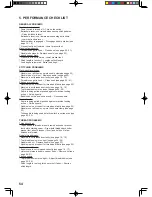
REMARQUE: la réparation d’une déchirure ou un
surjet, comme indiqué dans l’illustration, nécessite
l’ajustement manuel de la commande sur la longueur.
OPMERKING: voor afwerken en repareren zoals
afgebeeld, gebruik de steeklengteregelaar om de
exacte lengte van de naald fijn af te stellen.


