background image

3

ENGLISH

IMPORTANT SAFEGUARDS 

Read this instruction manual thoroughly before operating the appliance and keep for 
future reference.

1.  

This appliance is intended for domestic and internal use only.

2.  

The appliance is not to be used with an external thermostat or remote control system.

3.  

This appliance is not intended for use by persons (including children) with reduced physical 
or sensory capabilities, or lack of experience and knowledge, unless they have been given 
supervision or instruction concerning the use of the appliance by a person responsible for 
their safety.

4.  

Children should be supervised to ensure that they do not play with the appliance.

5.  

Place the appliance on a 

fl

 at and stable surface.

6.  

Check if the voltage indicated on the base of the appliance corresponds to the local voltage 
before you connect the appliance.

7.  

Disconnect from the mains supply when not in use and before cleaning.

8.  

Never pull off the cable to disconnect it from the socket. Instead, unplug by pulling the plug 
from the socket.

9.  

Τ

he use of accessory attachments, not recommended by Singer, may cause hazards. Only 

use the connector provided by the manufacturer.

10.  Do not let the cord hang over the edge of the worktop or touch hot surfaces.
11.  Surfaces become very hot during operation, and remain hot for some time after the unit is 

switched off. Do not touch the lid or the sides of the oven without protective oven gloves.

12.  All metal items in the oven, such as the racks, fry pan, etc, can get very hot during cooking. 

Be careful when removing these items from a hot oven. 

13.  Always wear oven gloves or use the tongs supplied.
14.  Use the handle and wear oven gloves when lifting the lid from the glass oven.
15.  Only touch the product on the handles when in use.
16.  The glass lid/control panel should be placed on the worktop resting on its side.
17.  Always remove the lid away from you so the escaping steam is channeled away from your face.
18.  Do not move the oven when in use.
19.  Take care when moving the lid for possible drips or splashes.
20.  The halogen heating element will switch on and off for temperature regulation. This is normal.
21.  The handle on the lid has a safety mechanism, if the lid is not on properly or the lid is off the 

oven, it will automatically turn off.

22.  Be careful when disposing of hot liquids, particularly fat or oil.
23.  Use extreme caution when taking off pans or cooking racks from the halogen oven.
24.  Allow to cool before taking off parts and before cleaning.
25.  The appliance is completely switched off only when disconnected from the mains supply.
26.  Never immerse the appliance or its plug in water or any other liquid.
27.  If the cord or any other part is damaged, you must immediately stop the use of the appliance 

and contact any SINGER Service Center or SINGER Client Service for repair.

28.  Do not use the appliance near or below curtains and any other combustible material.
29.  The partial or total non-respect of the safety instructions in the present instruction manual 

will automatically release Singer of any type of responsibility in case of malfunction of the 
machine or injuries to persons or animals.

30.  In case of manipulation, repairing or any modi

fi

 cation of the machine made by unquali

fi

 ed 

persons or in case of improper use, the guarantee will be automatically cancelled. 

Keep this manual for future reference

Summary of Contents for Vita cook

Page 1: ...N MANUAL GR ΒΙΒΛΙΟ ΟΔΗΓΙΩΝ FR MODE D EMPLOI RO MANUAL DE UTILIZARE SER UPUTSTVO ZA UPOTREBU BG ИНСТРУКЦИИ ЗА ЕКСПЛОАТАЦИЯ Halogen oven Φουρνάκι ρομπότ Four halogène Cuptor cu halogen Halogena pećnica Халогенна фурна ...

Page 2: ...GB ENGLISH 3 GR EΛΛΗΝΙΚΑ 7 FR FRANÇAIS 11 RO ROMANA 15 SER SERBIAN 19 BG БЪЛГАРСКИ 23 ...

Page 3: ...ys wear oven gloves or use the tongs supplied 14 Use the handle and wear oven gloves when lifting the lid from the glass oven 15 Only touch the product on the handles when in use 16 The glass lid control panel should be placed on the worktop resting on its side 17 Always remove the lid away from you so the escaping steam is channeled away from your face 18 Do not move the oven when in use 19 Take ...

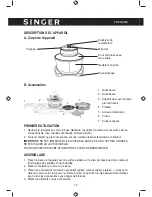
Page 4: ...ktop of your kitchen and away from moisture and liquids 2 Place the glass bowl inside the base 3 Place the desired cooking accessory ie rack steamer fry pan in the glass bowl according to the food you want to cook The tongs supplied can be used to remove accessories without the danger of personal burns 4 Place the food on the accessory 5 Place the glass lid on top of the glass bowl The lid should ...

Page 5: ...ing the lid always use the handle as this releases the safety switch and turns the oven off Be aware that the lid will still be hot and we recommend the use of oven gloves to protect your hands from the risk of burning Cooking guidelines Only lift the lid by its handle When removing the glass lid while it is still hot be extremely care ful and always use kitchen gloves Do not touch any surface of ...

Page 6: ...ng of this product please contact your local city office your household waste disposal service or the shop where you purchased the product DEFROST FUNCTION Always ensure that the food is adequately thawed before cooking The appliance has a defrost setting which is a low temperature that should be used to defrost foods Set the temperature at 80 C and set the time at about 6 9mins CLEANING AND CARE ...

Page 7: ... αυτών των αξεσουάρ από τη θερμή συσκευή 13 Πάντοτε να φοράτε γάντια φούρνου ή να χρησιμοποιείτε τις λαβίδες που παρέχονται 14 Χρησιμοποιήστε τη λαβή και φορέστε γάντια φούρνου όταν σηκώνετε το σκέπασμα από το καπάκι από τη συσκευή 15 Αγγίξτε τη συσκευή μόνο στις λαβές όταν τη χρησιμοποιείτε 16 Το καπάκι πίνακας ελέγχου θα πρέπει να τοποθετείται στον πάγκο κουζίνας στο πλάι του 17 Όταν αφαιρείτε τ...

Page 8: ...ετήστε την πλαστική βάση σε μια σταθερή επιφάνεια πάνω στον πάγκο εργασί ας της κουζίνας σας και μακριά από υγρασία και υγρά 2 Τοποθετήστε το γυάλινο δοχείο μέσα στη βάση 3 Τοποθετήστε το επιθυμητό εξάρτημα μαγειρέματος πχ σχάρα δίσκο για μαγείρεμα στον ατμό δίσκο για τηγάνισμα στο γυάλινο δοχείο σύμφωνα με το φαγητό που θέλετε να μαγειρέψετε Οι λαβίδες που παρέχονται μπορούν να χρησιμοποιηθούν γι...

Page 9: ...μέσω της αντίστροφης μέτρησης που έχει αρχίσει Η συσκευή θα τερματίσει τη λειτουργία της όταν ο χρόνος μαγειρέματος ολοκληρωθεί και ο ρυθμιστής θερμοκρασίας φθάσει στη θέση OFF Η χειρολαβή στο καπάκι λειτουρ γεί και ως μηχανισμός ασφαλείας Για να εξασφαλίσετε ότι ο ατμομάγειρας λειτουργεί επιλέξτε ένα χρόνο μαγειρέματος και στη συνέχεια βεβαιωθείτε ότι η λαβή είναι πλήρως κατεβασμένη ώστε να ενεργ...

Page 10: ...ε το φαγητό με ένα πιρούνι ή με μια ένα σουβλάκι μαγειρέματος για να ελέγξετε για αμαγείρευτα υγρά στα κρέατα πουλερικά κλπ ή πόσο τρυφερά είναι όταν μαγειρεύετε λαχανικά Συμβουλές Πάντα να εξασφαλίζετε ότι το φαγητό είναι ζεστό εσωτερικά πριν το σερβίρισμα Αν ψήνετε κέικ για καλύτερα αποτελέσματα χρησιμοποιήστε μια φόρμα για κέικ με την τρύπα στη μέση ΑΠΟΨΥΞΗ Πάντοτε να διασφαλίζετε ότι τα τρόφιμ...

Page 11: ...nies 14 Utiliser la poignée et porter des gants de protection lorsque vous retirez le couvercle du four 15 Ne toucher que les poignées du four lorsque celui ci est en fonction 16 Le couvercle en verre panneau de configuration doit être mis sur le plan de travail reposant sur le côté 17 Toujours retirer le couvercle loin de vous afin d éviter la vapeur qui peut s échapper lors de l ouverture 18 Ne ...

Page 12: ...lacer la base de l appareil sur une surface stable sur le plan de travail de votre cuisine et tenir éloigné des liquides et de l humidité 2 Placer le récipient en verre sur la base 3 Placer les accessoires de cuisson souhaités grilles cuiseur vapeur plateau dans le ré cipient en verre selon le type de nourriture à cuire Les pinces fournies peuvent être utilisées pour retirer les accessoires sans d...

Page 13: ...osition off La poignée sur le couvercle fonctionne comme un mécanisme de sécurité Pour vous assurer que le four fonctionne sélectionner le temps de cuisson puis s assurer que la poignée est complètement abaissée afin d activer l interrupteur de sécurité dans le corps du couvercle Lorsque vous retirez le couvercle toujours utiliser la poignée car cela libère le capteur de sécurité et éteint le four...

Page 14: ...ochette pour vérifier le jus de cuisson des viandes volailles etc ou la tendreté des légumes Conseils S assurer que la nourriture est bien chaude avant de servir Pour de meilleurs résultats lors de la cuisson des gâteaux utiliser un moule à gâteau de forme ronde avec un trou au milieu Fonction décongélation Toujours s assurer que la nourriture est suffisamment décongelée avant la cuisson L apparei...

Page 15: ...rnizate 14 Utilizaţi mânerul şi purta mănuşi de cuptor când ridicarea capacului de la cuptor sticla 15 Doar atingeţi produsul pe mânerele în timpul utilizării 16 Capac de sticla panoul de control ar trebui să fie introduse pe blat odihnindu se pe partea sa 17 Întotdeauna scoateţi capacul departe de tine atat de abur evadarea este canalizată departe de faţa ta 18 Nu mişcaţi cuptorul în timpul utili...

Page 16: ...suprafata ferma si stabila departe de umezeala excesiva 2 Puneti bolul de sticla pe baza 3 Asezati accesoriile pe care le veti folosi exemplu raft de gatit steamer tigaie in bolul de sticla in functie de ce doriti sa gatiti Clestii care sunt furnizati se folosesc pentru scoaterea accesoriilor fara sa va ardeti 4 Puneti mancarea in cuptor 5 Puneti capacul deasupra bolului de sticla Ar trebui sa se ...

Page 17: ...tdeauna mânerul deoarece acesta elibereaza sistemul de blocare al cuptorului Fiti conştienti de faptul că cuptorul va fi inca fierbinte şi vă recoman dăm utilizarea de manusi pentru cuptor pentru a proteja mâinile de riscul de ardere Gătitul orientări Deschideti capacul numai prin ridicarea capacului de mâner Când scoateţi capacul de sticlă în timp ce este încă fierbinte să fiti extrem de atent şi...

Page 18: ...i cumparat produsul FUNCŢIA DE DECONGELARE Întotdeauna asigurati va că produsul alimentar este decongelat adecvat înainte de gătire Aparatul are o setare de dezghetare la o temperatură scăzută care ar trebui să fie utilizata pentru decongelare alimente Setaţi temperatura la 80 C şi timpul la aproximativ 6 9 minute INSTRUCTIUNI DE CURATIRE SI INGRIJIRE GENERALE Asiguraţi vă că unitatea este oprită ...

Page 19: ...ske rukavice ili priložene hvataljke 14 Koristiti ručku i nositi kuhinjske rukavice prilikom podizanja poklopca sa staklene pećnice 15 Kada se uređaj koristiti može se dodirivati samo ručka 16 Stakleni poklopac kontrolni panel se na radnu površinu spušta na stranu 17 Poklopac uvek dizati tako da bude okrenut od lica kako bi para koja izbija mogla da ide na suprotnu stranu od koristnika 18 Ne pomer...

Page 20: ...u u kuhinji i podalje od vlage i tečnosti 2 Staklenu posudu postaviti na bazu 3 Željeni pribor rešetku posudu za barenje tiganj staviti u staklenu posudu u zavisnosti od toga što će se spremati Hvataljke su priložene kako bi se dodaci mogli vaditi iz posude bez opasnosti od opekotina 4 Hranu staviti na odabrani dodatak 5 Stakleni poklopac staviti na staklenu činiju Poklopac mora da nalegne na bazu...

Page 21: ...skroz spuštena i da naleže na poklopac kako bi pokrenula sigur nosni prekidač na poklopcu Prilikom skidanja poklopca voditi računa jer se tada oslobađa sigurnosni prekidač i isključuje pećnicu Obratiti pažnju jer je pećnica verovatno još uvek vruća i preporučuje se korišćenje kuhinjskih rukavica kako bi se izbegao rizik od opekotina Smernice za pripremu hrane Poklopac dizati isključivo pomoću ručk...

Page 22: ...rhu očuvanja prirodnih resursa Za detaljnije informacije o reciklaži ovog proiz voda obratite se opštinskoj vlasti službi za skupljanje smeća ili prodavnici gde ste kupili ovaj proizvod UPUTSTVA ZA ČIŠĆENJE I ODRŽAVANJA Uveriti se da je uređaj isključen Izvaditi utikač iz struje i ostaviti uređaj da se potpuno ohladi pre čišćenja Svi delovi osim poklopca i plastične baze mogu se prati u mašini za ...

Page 23: ...им от фурната 13 Винаги ползвайте ръкавици за фурна или използвайте дръжката предоставена с уреда 14 Използвайте дръжката и ръкавици за фурна когато повдигате капака на фурната 15 Хващайте фурната само за дръжката когато работи 16 Стъкленият капак блок за управление трябва да бъде поставен върху работния плот с правилната си страна 17 Винаги отваряйте капака така че парата да не идва към вас 18 Не...

Page 24: ...ВАНЕ 1 Поставете пластмасовата основа на твърдата и стабилна повърхност на работния плот на кухнята и далеч от влага и течности 2 Поставете стъклената купа в основата 3 Поставете желаният аксесоар т е скара или тиган в стъклената купа С предоста вента дръжка аксесоаритемогат да бъдат поставяни или изваждани безопасно 4 Поставете храната 5 Поставете стъкленият капак върху стъклената купа Капакът тр...

Page 25: ...тялото на капака При отваряне на капака ползвайте дръжката тъй като тя освобождава предпаз ния ключ в тялото на капака и изключва печката Имайте предвид че фурната ще продължи да бъде гореща Препоръчваме използването на кухненски ръкавици за защита на ръцете от изгаряне Готвене препоръки Повдигнете капака за дръжката му Отварянето на стъкления капак когато е още то пъл да става изключително внимат...

Page 26: ...но размразена преди готвене Уредът има функция за размразяване при ниска температура която трябва да се из ползва за размразяване на храни Настройте температурата на 80 C и времето на около 6 9 минути ОБЩИ ИНСТРУКЦИИ ЗА ПОЧИСТВАНЕ И ПОДДРЪЖКА Уверете се че уредът е изключен Изключете от мрежата и изчакайте да изстине напълно преди почистване Всички части с изключение на капака и пластмасовата осно...

Page 27: ......

Reviews: