background image

21

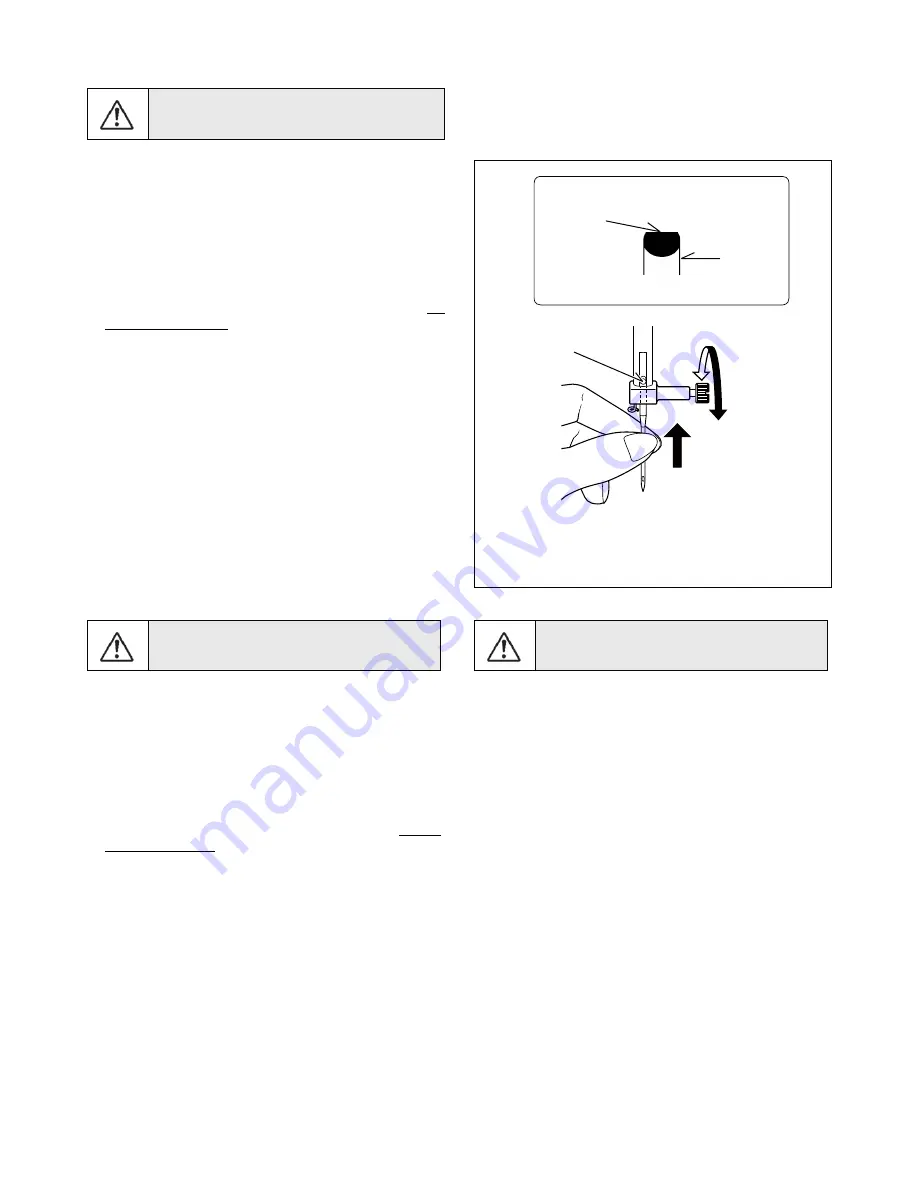
Changement d’aiguille

1.  Relever la barre à aiguille à sa position la plus haute en 

tournant le volant vers vous.

2.  Desserrer la vis du serre-aiguille.

3.  Enlever l’aiguille en la tirant vers le bas.

4.  Insérer la nouvelle aiguille dans le serre- aiguille, avec le 

côté plat à l’arrière.

5.  Pousser l’aiguille vers le haut, jusqu’ à la butée.

6.  Resserrer la vis du serre-aiguille fermement.

D é b r a n c h e z  t o u j o u r s .  L a  m a c h i n e  d e 

O¶DOLPHQWDWLRQpOHFWULTXHHQUHWLUDQWOD¿FKHGHOD

prise murale.

Changing the needle

1.  Raise the needle bar to its highest position by turning the 

KDQGZKHHOFRXQWHUFORFNZLVHWRZDUG\RX

2.  Loosen the needle clamp screw by turning it toward you.

3.  Remove the needle by pulling it downward.

4.  Insert the new needle into the needle clamp with the 

ÀDW

VLGHWRZDUGWKHEDFN

5.  Push the needle up as far as it can go.

6.  Tighten the needle clamp screw firmly with the screw 

driver.

Always disconnect the machine from power 
supply by removing the plug from the wall-outlet.

Cambio de la aguja

1.  Levantar la barra de la aguja a la posición más alta girando 

el volante hacia Ud.

$ÀRMDUHOWRUQLOORTXHVXMHWDODDJXMDJLUiQGRORKDFLD8G

3.  Quitar la aguja sacándola hacia abajo.

4.  Insertar la aguja nueva en la barra porta-aguja con el lado 

plano hacia la parte posterior.

5.  Empujar la aguja lo más arriba posible.

6.  Apretar el tornillo fírmemente con el destornillador.

Siempre desconecte la máquina de la fuente 
de alimentación retirando el enchufe del 
tomacorriente de la pared.

Flat
side
toward
the

EDFN

Flat side
Côté plat
Lado plano

Lado
plano
hacia
fuera de 
Ud.

Côté
plat
orienté
vers
l’arrière

Pin
Butée
Pasador

Needle
Aiguille
Aguja

Summary of Contents for XL-420

Page 1: ...XL 420 INSTRUCTION MANUAL MANUEL D INSTRUCTION MANUAL DE INSTRUCCIONES ...

Page 2: ... WKH VHZLQJ PDFKLQH RII ZKHQ PDNLQJ DQ DGMXVWPHQWV LQ WKH QHHGOH DUHD VXFK DV WKUHDGLQJ QHHGOH FKDQJLQJ needle threading bobbin or changing presser foot etc OZD V XQSOXJ VHZLQJ PDFKLQH IURP WKH HOHFWULFDO RXWOHW ZKHQ UHPRYLQJ FRYHUV OXEULFDWLQJ RU ZKHQ PDNLQJ DQ RWKHU XVHU servicing adjustments mentioned in the instruction manual 7R DYRLG HOHFWULFDO VKRFN QHYHU SXW WKH PDFKLQH QRU WKH PDLQV FDEOH ...

Page 3: ...ous retirez les couvercles HIIHFWXH OD OXEUL FDWLRQ RX WRXW DXWUH HQWUHWLHQ PHQWLRQQp GDQV OH PDQXHO G LQVWUXFWLRQV 14 N insérez ni ne laissez tomber aucun objet dans aucune ouverture 15 N utilisez pas en plein air 16 N utilisez pas où des produits en aérosol sont en usage ni où est administré de l oxygene 17 Pour débrancher tournez tous les réglages en position d arrêt 0 puis débranchez la prise ...

Page 4: ... OD PiTXLQD 7HQHU XQ FXLGDGR HVSHFLDO FRQ OD DJXMD 14 Usar siempre la placa de agujas apropiada Una placa de agujas impropia puede producir la rotura de la aguja 15 No usar agujas despuntadas 16 No presionar ni tirar del tejido mientras se está cosiendo Esto podría doblar la aguja y romperla 17 Situar el interruptor principal de la máquina en posición Off 0 cuando se realice algún ajuste en el áre...

Page 5: ...h Feather stitch Pin stitch Ladder stitch BODQNHW VWLWFK Slant pin stitch Slant overedge stitch UHHN NH VWLWFK QWUHGHX VWLWFK ULVV FURVV VWLWFK Crossed stitch Decorative Stitching 48 49 Continuous patterns 50 51 Sewing on a button 50 51 Buttonholes 52 57 Using buttonhole foot Corded buttonholes Buttonholing with hard to sew fabrics TABLE OF CONTENTS 3 PREPARATION FOR EMBROIDERY SEWING Before attac...

Page 6: ...LI FLOHV j FRXGUH 3 PRÉPARATIFS POUR LA BRODERIE YDQW GH HU O XQLWp GH EURGHULH 58 61 L DWLRQ GX SLHG EURGHULH Q ODJH GX O GH FDQHWWH Q ODJH GX O VXSpULHXU 3ODWHDX GH UDOORQJH Fixation de l unité de broderie 62 63 Retrait de l unité de broderie 62 63 Fixation du tissu dans le cerceau de broderie 64 65 Utilisation du tissu et de l entoilage 66 69 Préparation de la machine avant d installer le cerce...

Page 7: ...GR RMDOHV HQ PDWHULDOHV GL FLOHV GH FRVHU 3 PREPARACION PARA BORDADO Antes de colocar la unidad de bordado 58 61 Colocando el pie de bordado Enhebrado del hilo de la canilla Enhebrado del hilo superior Base de extension Colocando la unidad de bordado 62 63 Retirando la unidad de bordado 62 63 Asegurando el material en el aro de bordado 64 65 Usando el material y estabilizador 66 69 Preparando la m...

Page 8: ...elease button 28 Needle clamp screw 29 General purpose foot 30 Feed dogs 31 Needle plate 32 Bobbin cover release button 33 Embroidery unit 34 Hoop release lever 35 Carriage 36 Handle 37 Accessory drawer 38 Embroidery unit release lever 39 Release lever 40 Connector 41 Large hoop 42 Inner frame 43 Outer frame 44 Hoop adjusting screw 45 Hoop mounting plate 46 Small hoop 47 Power line cord 48 Foot co...

Page 9: ...H OH FkEOH 86 HVW EUDQFKp j la machine lorsque vous êtes en mode broderie 1 Guía hilo 2 Guía hilo 3 Control tensión hilo 4 Palanca de ensartado 5 Cubierta frontal 6 Cortador de hilo 7 Base de extensión caja de accesorios 8 Eje devanador canilla 9 Tope devanador canilla 10 Botones de operación 11 Pasador de carrete horizontal 12 Asa para llevar 13 Volante 14 Interruptor corriente luz 15 Conector de...

Page 10: ... 52 5 19 Vinyl bag 20 Bobbins SINGER Class 15J bobbins 21 Scissors 22 Embroidery presser foot 23 Embroidery software CD FUTURA embroidery is system of the machine and the software providing powerful option and capabilities To install the FUTURA software refer to the CD insert for more information 9 10 11 12 13 14 15 16 17 18 23 19 20 21 22 The Foot that comes on your Sewing machine is called the G...

Page 11: ...9 Destornillador para placa de aguja grande 10 Destornillador grande 11 Destornillador pequeño 12 Prensatelas de cremalleras 13 Prensatelas de puntada invisible 14 Pie prensatelas para coser en satén 15 Prensatelas para coser botones 16 Prensatelas de ojales 17 Red de bobina larga 18 Red de bobina corta PARA BORDADO 19 Bolsa de accesorio 20 Bobinas Bobinas SINGER Clase 15J 21 Tijeras 22 Prensatela...

Page 12: ...e sure to wipe off any surplus oil from needle plate area EHIRUH XVLQJ RXU PDFKLQH WKH UVW WLPH POWER LINE CORD FOOT CONTROL Connect the plug of the power line cord into the cord VRFNHW DQG RXU ZDOO RXWOHW DV LOOXVWUDWHG RQQHFW WKH IRRW FRQWURO SOXJ LQWR WKH PDFKLQH VRFNHW when using sewing machine only NOTE In sewing mode the machine can be operated either with or without the foot control see pag...

Page 13: ...onecte el cordón de la linea eléctrica a la máquina 1 y el enchufe a la alimentación de corriente 2 tal como se ve en el dibujo Conecte el enchufe del control de pedal en el conector de la máquina 3 NOTA Cuando el control de pedal está desconectado la máquina no funcionará INTERRUPTOR CORRIENTE LUZ La máquina no funcionará hasta que se conecte el interruptor de corriente luz El mismo interruptor c...

Page 14: ...obbin as shown Place bobbin onto the bobbin winder spindle as far as it can go 3 Holding onto the end of the thread push the bobbin winder ODWFK DJDLQVW WKH EREELQ XQWLO LW FOLFNV DQG EREELQ VWDUWV WR rotate 4 Bobbin will disengage automatically and the winding mechanism will stop when the bobbin is full Remove the wound bobbin and cut the thread tail Be sure to use only SINGER Class 15J bobbins n...

Page 15: ...CANILLA 1 Coloque el carrete de hilo en el pasador de carrete y asegúrelo con la tapa de pasador de carrete Tire del hilo hacia afuera del carrete y páselo a través de las guías de KLOR WDO FRPR VH LQGLFD HQ OD JXUD 2 Coloque el extremo del hilo por el orificio en la bobina como se muestra Coloque la bobina en el eje del devanador de bobina lo más alejado que se pueda 3 Sosteniendo el extremo del ...

Page 16: ...X SXOO WKH WKUHDG 4 Pull thread through the slot A and then to the left 5 With a finger held gently on top of the bobbin pull the thread until it stops in the slot B Then pull the thread along the groove on the needle plate until it is snipped with cutter on the top left 6 Replace the clear bobbin cover plate onto the needle plate NOTE Sewing can be started without having to pull up the bobbin thr...

Page 17: ...rando el volante contador a la derecha 2 Retire la tapa de canilla empujando el botón de apertura hacia la derecha La tapa de canilla saldrá lo suficiente para permitirle desmontar la cubierta 3 Inserte la canilla asegurándose que la canilla gira hacia la izquierda cuando se tira del hilo 4 Lleve el hilo por la abertura A y después hacia la izquierda 5 Con un dedo sostenga suavemente encima de la ...

Page 18: ...he thread into the thread guide 4 Pass the thread through the eye of the needle 5 from IURQW WR EDFN 6HH IROORZLQJ SDJH IRU LQVWUXFWLRQV RQ operation of the Automatic Needle Threader IMPORTANT To verify that the machine is threaded properly in the tension discs do this simple check 1 With the presser foot raised pull the thread towards the back of the machine You should detect only D VOLJKW UHVLVW...

Page 19: ...forte résistance et beaucoup SOXV GH GpÀH LRQ GH O DLJXLOOH 6L YRXV QH VHQWH SDV GH UpVLVWDQFH OH O D pWp PDO HQ Op HW YRXV GHYH OH UpHQ OHU ENHEBRADO DEL HILO SUPERIOR A Levante el prensatelas Siempre asegúrese de levantar el prensatelas antes de bobinar el hilo superior Si no se levanta el prensatelas no se podrá lograr la tensión correcta del hilo B Gire el volante contador a la derecha hasta q...

Page 20: ...cho del ensartador Thread cutter holder RXSH O VXSSRUW Cortador de hilo Thread guide XLGH O Guía hilo B A UTILISATION DE L ENFILE AIGUILLE AUTOMATIQUE Veillez à relever le pied presseur et à lever l aiguille dans sa SRVLWLRQ OD SOXV KDXWH DYDQW G HQ OHU OH O 1 Thread the machine with your left hand while gripping the thread with your right hand RRN WKUHDG WR WKH WKUHDG guide on the needle bar and ...

Page 21: ...DUWDGR VH UHFRPLHQGD MDU OD PiTXLQD en posición de costura recta posición de central de la aguja cuando se use el ensartador de aguja automático º Los hilos gruesos no se pueden ensartar en agujas delgadas º No bajar la palanca de ensartado mientras la máquina está funcionando o se puede romper el gancho del ensartador º If the threading hook is deviated from needle hole adjust the position of the...

Page 22: ...de leur poids Polyester coton 100 polyester 0HUFHULVp FDOLEUH Fil fort Polyester coton 100 polyester 0HUFHULVp FDOLEUH Polyester coton 100 polyester 0HUFHULVp FDOLEUH Nylon Polyester coton Polyester Nylon 2000 ou 2020 tige rouge 2000 ou 2020 tige rouge 2000 ou 2020 tige rouge TYPE CALIBRE 11 80 bague orange 14 90 bague bleue 16 100 bague pourpre 18 110 bague jaune LÉGERS Batiste Gaze Crêpe MOYENS ...

Page 23: ...ew needle into the needle clamp with the ÀDW VLGH WRZDUG WKH EDFN 5 Push the needle up as far as it can go 6 Tighten the needle clamp screw firmly with the screw driver Always disconnect the machine from power supply by removing the plug from the wall outlet Cambio de la aguja 1 Levantar la barra de la aguja a la posición más alta girando el volante hacia Ud ÀRMDU HO WRUQLOOR TXH VXMHWD OD DJXMD J...

Page 24: ...n control dial on top of the machine STRAIGHT STITCHING The correct appearance of your stitching is largely determined by the balanced tension of both top and bobbin threads The WHQVLRQ LV ZHOO EDODQFHG ZKHQ WKHVH WZR WKUHDGV µORFN LQ WKH middle of layers of the fabric you are sewing I ZKHQ RX VWDUW WR VHZ RX QG WKDW WKH VWLWFKLQJ LV LUUHJXODU you will need to adjust the tension control Do this ho...

Page 25: ...é 3 Rabaissez le levier du pied presseur de façon à ce que le pied s enclenche de lui même sur son support AJUSTE DE LA TENSION DEL HILO SUPERIOR El 90 de su costura será realizada con la palabra S exhibido en el dial de control de tensión encima de la máquina COSTURA RECTA El buen aspecto de la costura generalmente está determinado por la tensión equilibrada de ambos hilos superior e inferior Si ...

Page 26: ... de costura de largo y ancho LED indicator Témoin a diode Indicador LED LED indicator Témoin a diode Indicador LED Stitch length control Longueur de point Control longitud puntada Pattern selection buttons Touches de sélection de motif Botones de selección de patrón Stitch width needle position control Commande de largeur de point position d aiguille Control de ancho de puntada posición de aguja C...

Page 27: ...e la rangée contenant le motif que vous désirez utiliser Arrêtez lorsque le témoin à diode s allume au dessus du motif désiré FUNCIONES DEL PANEL DE CONTROL Botones de selección de patrón Conecte el interruptor principal y el indicador LED encima del patrón de costura recta se encenderá En ese momento podrá coser la Puntada recta Para seleccionar otros patrones presione el botón de VHOHFFLyQ GH SD...

Page 28: ...ually change the length width or straight stitch needle postition according to your preference Starting at the Auto SRVLWLRQ VOLGH WKH FRQWURO NQRE OHIW RU ULJKW WR ORFDWH HDFK RI the potential adjustments At each manual adjustment point WKH ZLOO EOLQN WLPHV LQ JUHHQ DQG D EHHS ZLOO VRXQG The LED will light in red beyond the potential adjustment range NOTES 1 Some patterns offer more opportunities...

Page 29: ...de control de posición de aguja largo y ancho de puntada El indicador LED próximo al control se encenderá en naranja sin destellar y se escuchará un bip indicando que se encuentra en la posición de ajustes por defecto automático Ajustes manuales Una vez que haya determinado la posición por defecto automática podrá cambiar manualmente el largo ancho o posición de aguja de puntada recta de acuerdo a...

Page 30: ...p 4 START STOP BUTTON When the Start Stop button is pushed the machine starts slowly and when the button is pushed once more the machine stops However when foot control is plugged the Start Stop button will be inactive 5 LED INDICATOR Green light indicates machine is ready to start Red light indicates machine is operating Flashing red light indicates a problem or an error Flashing for 2 3 seconds ...

Page 31: ... de la machine 6 LEVIER DE CONTRÔLE DE LA VITESSE La vitesse de couture se règle en faisant glisser levier de contrôle de la vitesse Lorsque le rhéostat est utilisé le levier sert d un limiteur de vitesse supérieur FUNCIONES DEL PANEL DE OPERACIÓN 1 BOTON DE MODO DE PUNTADA DE REFUERZO Presione este botón y puede realizar puntada de refuerzo con el LED iluminado La máquina hace cuatro pequeñas pun...

Page 32: ...cia izquierda STITCH POINT PUNTADA SYMBOL SYMBOLE SIMBOLO LENGTH LONGUEUR mm LARGO NEEDLE POSITION POSITION D AIGUILLE AGUJA POSICIONADA AUTO AUTO AUTO MANUAL MANUEL MANUAL AUTO AUTO AUTO MANUAL MANUEL MANUAL STRAIGHT DROIT RECTA 2 5 0 5 4 8 CENTER CENTRE CENTRO LEFT RIGHT GAUCHE DROIT IZQUIERDA DERECHA STRAIGHT STRETCH DROIT EXTENSIBLE RECTA TRIPLE 2 5 1 5 3 0 HAND LOOK QUILT 87 21 8 32 17 5 0 28...

Page 33: ...7 0 BLANKET 1 LANGUETTE 1 PUNTO DE RIBETE 1 2 5 1 5 3 0 3 5 1 0 7 0 SLANT PIN ÉPINGLE OBLIQUE ALFILER INCLINADO 2 0 0 8 2 5 3 5 1 0 6 0 SLANT OVEREDGE SURJET OBLIQUE OVERLOCK INCLINADO 2 0 1 0 3 0 5 0 1 0 7 0 5 GREC LLAVE GRIEGA 2 5 1 3 2 5 5 0 3 5 7 0 ENTREDEUX ENTREDEUX ENTREDOS 2 5 1 5 3 0 3 0 2 0 7 0 ARROWHEAD FLÈCHE PUNTA DE PLEOHA 0 5 0 5 1 5 7 0 3 5 7 0 BLANKET 2 LANGUETTE 2 PUNTO DE RIBETE...

Page 34: ...ntly with your hands When reaching the edge of the fabric stop the sewing machine LUVW WXUQ WKH KDQGZKHHO FRXQWHU FORFNZLVH WRZDUG RX until the needle is in its highest position then raise the presser foot Draw the fabric to the rear and cut off excess thread with the thread cutter located on the bottom of the face cover as shown 3 1 6 06 675 7 7R NHHS WKH VHDP VWUDLJKW XVH RQH RI WKH QXPEHUHG JXL...

Page 35: ... abajo D Botón de puntada en reversa E Pulsador de comienzo parada F Control de dientes en el lado posterior G Palanca pie prensatelas H Control longitud puntada I Control de ancho de puntada J Interruptor corriente luz 2 Tire de ambos hilos debajo del prensatelas hacia atrás de la máquina dejando una separación de 6 pulg 15 cm 3 Colocar la tela debajo del prensatelas y bajar la palanca del prensa...

Page 36: ... D SLSLQJ E FRYHULQJ D OOHU FRUG ZLWK D ELDV VWULS RI IDEULF Attach the right side of the zipper foot to the foot holder so that the needle passes through the right side of the zipper foot DVWH WKH VHDP DOORZDQFHV WRJHWKHU HQFORVLQJ WKH OOHU FRUG forming seam tape for the piping Helpful Hint Slight adjusting of the needle position to sew closer to the piping may be accomplished with the Stitch Wid...

Page 37: ...puyez de nouveau sur l interrupteur de départ 16 5 21 5 0 5 6 9 92 Utilizar el prensatelas de cremalleras que permite coser a la derecha o la izquierda de la cremallera o cerca del cordón vivo INSERCION DE CREMALLERAS Para coser el lado derecho aplicar el lado izquierdo del prensatelas de cremalleras al sujetador pie prensatelas de manera que la aguja pase a través de la abertura en el lado izquie...

Page 38: ...omatically when pattern No 03 is set The stitch length is 2 mm and the stitch width is about 5 mm is the selection range when setting the value manually ADJUSTING STITCH WIDTH AND LENGTH 3 0 17 2 3 77 516 Stitch width of pattern increases from center needle position as illustrated SATIN STITCH 7KLV LV D FORVHO VSDFHG VWLWFK XVHG IRU DSSOLTXp EDU WDFNLQJ etc Slightly loosen the top thread tension f...

Page 39: ... réglées automatiquement lorsque le motif No 03 est établi La longueur de point est de 2 mm et la largeur de point est de 5 mm environ est la sélection lorsque vous réglez manuellement la valeur RÉGLAGE DE LA LARGEUR ET DE LA LONGUEUR DE POINT PUNTADA ZIG ZAG El hilo superior puede aparecer en la parte inferior según el hilo tejido tipo de puntada y velocidad de costura pero el hilo de la bobina n...

Page 40: ...X E KDQG XQWLO WKH QHHGOH VZLQJV IXOO to the left It should just pierce the fold of the fabric If it does not adjust the guide B on the Blind hem Foot A so that the needle just pierces the fabric fold and the guide just rests against the fold Sew slowly guiding the fabric carefully along the edge of the guide 4 When completed the stitching is almost invisible on the right side of the fabric SETTIN...

Page 41: ... hasta que la aguja se mueva completamente hacia la izquierda Deberá solo atravesar el pliegue del material De lo contrario ajuste la guía B en el pie de puntada invisible A de manera que la aguja solo atraviese el pliegue del material y la guía solo descanse contra el pliegue Cosa lentamente guiando el material cuidadosamente a lo largo del borde de la guía 4 Una vez terminado los puntos son casi...

Page 42: ... PDNHV WKUHH VKRUW VWLWFKHV ZKHUH WKH QRUPDO LJ DJ PDNHV RQO RQH For this reason it is recommended for overcasting most types of fabrics It is also ideal for mending tears applying patches and inserting elastic SETTINGS Presser foot General Purpose Foot Thread tension control S ...

Page 43: ...ale du pied Lorsque vous avez un accroc en deux parties reprisez à partir de chaque extrèmité pour revenir au centre Pour renforcer votre couture placez un morceau de tissu sous l accroc Vous pouvez aussi utiliser ce point pour la finition des coutures RÉGLAGES Pied presseur Pied universel 5pJODJH WHQVLRQ GX O VXSpULHXU S ZIG ZAGDETRESPUNTADAS Esta es una puntada fuerte ya que como su nombre impli...

Page 44: ...HDPV ZKLFK WDNH D ORW RI VWUDLQ Use this stitch also to top stitch lapels collars and cuffs to give D SURIHVVLRQDO QLVK WR RXU JDUPHQWV OVEREDGE STITCH 7KLV VWLWFK LV HVSHFLDOO XVHG IRU PDNLQJ VSRUWVZHDU W VHZV DQG QLVKHV WKH VHDP LQ RQH RSHUDWLRQ W LV YHU HIIHFWLYH IRU repairing raw or worn edges as well RIC RAC STITCH The ric rac stitch is provides a bold topstitch for decorative ERUGHUV W LV LG...

Page 45: ...trelaza tres veces hacia adelante hacia atrás y hacia adelante Es particularmente adecuada para reforzar las costuras de prendas deportivas de tejidos elásticos y no elásticos y para costuras curvas que requieren una gran resistencia Utilizar también esta puntada para sobrecoser solapas redondeadas cuellos y puños ya que proporciona un acabado profesional a las prendas POINT NID D ABEILLE 1 Piquez...

Page 46: ...GJHV DQG IRU DSSOLTXH ZRUN LADDER STITCH The Ladder stitch is primarily used for drawn thread hemstitching It can also be used for sewing over thin tape in an opposite or same color Place the stitch in the center and a special effect will be obtained for decoration Another use for the ladder stitch is couching over narrow ribbon yarn or elastic RU GUDZQ WKUHDG ZRUN FKRRVH D PHGLXP WR KHDY ZHLJKW l...

Page 47: ...RX GH O pODVWLTXH 3RXU OHV WUDYDX GH O WLUp FKRLVLVVH XQ WLVVX GH W SH WRLOH JURVVLHU HW DSUqV OD FRXWXUH WLUH OH O GH O pFKHOOH SRXU REWHQLU une apparence ouverte et aérée NOTEZ Assurez vous de coudre précisément le long de la OLJQH GH JUDLQ GX WLVVX VL YRXV YRXOH WLUHU OHV OV PUNTADA EN ESCALERA La puntada en escalera se usa principalmente para hacer GREODGLOORV 7DPELpQ VH SXHGH XVDU SDUD FRVHU ...

Page 48: ...oduce a narrow supple seam particularly suited to swimwear sportswear T shirts babywear in stretch nylon stretch towelling jersey and cotton jersey 5 67 7 A traditional pattern suited for decorative borders hems and HGJH QLVKLQJV ENTREDEUX STITCH Useful for decorative stitching on borders and for use in heirloom sewing The Entredeux stitch is most often sewn with a Wing Needle SINGER Style 2040 to...

Page 49: ...ements en tricot machine ou main peuvent être assemblés avec ce point Vous pouvez également fixer les bandes d encolure et les poignets PUNTADA OVERLOCK ELASTICA DV FRVWXUDV RYHUORFN HOiVWLFDV SURGXFHQ XQD FRVWXUD estrecha y elástica particularmente adecuada para prendas de baño prendas de sport camisetas T prendas de niños de nylon elástico toalla elástica jersey y algodón POINT GREC 8Q PRWLI WUD...

Page 50: ...tch for finishing the edges of fabrics such as those used for table linens or children s FORWKLQJ KHQ VHZLQJ WKLV VWLWFK RQ D IDEULF HGJH UVW VHZ the stitch with a stabilizer underneath the fabric Trim the edge of the fabric along the edge of the stitch being careful not to cut into the stitching Pyramid on bias tape This stitch can be used for embellishing bias binding or creating decorative bord...

Page 51: ...aitement à la couture des manches et des cols des vêtements de femmes et d enfants et permet aussi d obtenir des bords plus propres Lorsque vous utilisez ce motif de points pour obtenir des bords plus propres coudre d abord le point puis couper le bord du tissu le long de la bordure des points Veillez alors porter attention à ne pas couper les points Pyramide sur galon biais Utilisez une bande en ...

Page 52: ...oot Lower SUHVVHU IRRW 7XUQ WKH KDQG ZKHHO FRXQWHU FORFNZLVH WRZDUG RX WR PDNH VXUH WKH QHHGOH FOHDUV ERWK WKH OHIW DQG ULJKW openings of the button Adjust width if required Sew 10 stitches across I D VKDQN LV UHTXLUHG SODFH D GDUQLQJ QHHGOH RQ WRS RI WKH button and sew over top of it SETTINGS Presser foot Button sewing foot Feed dog control Helpful Hint To secure thread pull both threads to the b...

Page 53: ...de maintien est requise placer une aiguille de reprisage sur la partie supérieur du bouton et coudre RÉGLAGES Pied presseur Pied Pied pour boutons Abaisse griffes d entraînement COSIDO DE BOTONES Coloque el botón en la posición deseada baje el prensatelas Gire el volante para comprobar que la aguja entra limpiamente en los agujeros derecho e izquierdo de botón ajuste el ancho de la puntada y cosa ...

Page 54: ...IRRW IURP YLEUDWLQJ ZKHQ PRYLQJ across the table PROCEDURE Use an interfacing in the area of the garment where buttonholes are placed Stabilizer should also be used 0DNH D SUDFWLFH EXWWRQKROH RQ D VFUDS RI WKH IDEULF ZLWK WKH selected button 1 Select one buttonhole pattern 2 Replace the presser foot with the buttonhole foot Refer to Changing presser foot on page 22 23 3 Insert the button into the ...

Page 55: ...l Después de coser el ojal retire el papel 1 Seleccione uno de los patrones de ojales 2 Cambie el prensatelas por el pie de ojaladora Consulte Cambio del pie prensatelas en la página 22 23 3 Inserte el botón en el pie de ojaladora Consulte Uso del pie de ojaladora arriba 4 Ajuste la palanca de ojales C de manera que baje verticalmente entre los topes A y B PROCÉDURE Utilisez un entoilage à l endro...

Page 56: ...JDUPHQW 6 Place the fabric under the foot Pull out the bobbin thread underneath the fabric to a length of about 4 inches to the rear OLJQ WKH EXWWRQKROH PDUN RQ WKH IDEULF ZLWK WKH PDUN RQ the buttonhole foot and then lower the buttonhole foot 8 While holding the top thread start the machine Sewing will be completed automatically in the following order KHQ VHZLQJ LV QLVKHG XVH D EXWWRQKROH RSHQHU ...

Page 57: ...LPHQWD 6 Coloque el material debajo del pie Tire del hilo de la bobina debajo del material a un largo de aproximadamente 10 cm hacia atrás 7 Alinee la marca del ojal en el material con la marca en el pie de ojaladora y luego baje el pie de ojaladora 0LHQWUDV VRVWLHQH HO KLOR VXSHULRU KDJD IXQFLRQDU OD PiTXLQD La costura se terminará automáticamente en el siguiente orden 9 Une fois la couture termi...

Page 58: ... under plate and buttonhole foot CORDED BUTTONHOLES RRN OOHU FRUG FURFKHW WKUHDG RU EXWWRQKROH WZLVW RYHU WKH spur and pull both ends of the cord forward under the foot and tie off the cord as shown in the illustration Sew buttonhole so that zigzag stitches cover the cord When completed release the cord from the foot and snip off the extra length If desired instead of snipping off the extra length...

Page 59: ...O GH VRLH VXU OD WLJH du pied pour boutonnière et tirer les deux extrémitès sous le pied vers le devant Coudre la boutonnière de manière à ce que le zig zag recouvre le cordonnet La boutonnière terminée détacher le cordonnet du pied tirer OHV ERXWV YHUV O DYDQW HW WDLOOHU O H FpGDQW GH O 6L GpVLUp DX OLHX GH FRXSHU OHV OV VXSHUÀXV HPPHQH OHV vers le dessous du tissu à l aide d une grosse aiguille ...

Page 60: ...WHU FORFNZLVH WRZDUG RX XQWLO the needle is in its highest position 1 Remove presser foot screw presser foot and foot holder 2 Attach the embroidery presser foot behind presser bar so that the drive lever is above the needle clamp Secure it by tightening presser foot screw 3 Turn hand wheel toward you to move needle up and down DQG FKHFN WKDW WKH HPEURLGHU SUHVVHU IRRW PRYHV XS DQG down together w...

Page 61: ...E COLOCAR LA UNIDAD DE BORDADO COLOCANDO EL PIE DE BORDADO Levante el levantador de prensatelas Gire el volante hacia delante hasta que la aguja se encuentre en su posición más alta 1 Retire el tornillo del prensatelas el pie de prensatelas y el soporte de pie 2 Coloque el prensatelas de bordado detrás de la barra de prensatelas de manera que la palanca de accionamiento se encuentre encima de la a...

Page 62: ...e 16 19 NOTE It is recommended to thread the upper thread before transmitting a design to the machine for embroidery EXTENSION TABLE 1 Turn off power to machine 2 Slide the extension table to left to remove it from machine Refer to page 98 99 ...

Page 63: ... 1 Eteindre la machine 2 Faites glisser la table de rallonge vers la gauche pour la retirer de la machine Reportez vous aux page 98 99 ENHEBRADO DEL HILO SUPERIOR Consulte las página 16 19 NOTA Se recomienda enhebrar antes de transferir los datos BASE DE EXTENSION 1 Apague la máquina 2 Deslice la extensión de la cama hacia la izquierda para retirarla de la máquina Consulte las página 98 99 ...

Page 64: ...ull it towards WKH OHIW GLUHFWLRQ FKHFNLQJ WKDW WKH HPEURLGHU XQLW GRHV not detach Note If embroidery unit is not securely installed the finished HPEURLGHU PD EH GLVWRUWHG 0DNH VXUH WKDW WKH embroidery unit is pushed in as far as it will go CAUTION Always be sure to turn off power to machine before installing embroidery unit REMOVING EMBROIDERY UNIT Turn off the machine Remove embroidery hoop from...

Page 65: ...bien instalada la forma terminada del patrón se podría deformar Asegúrese que la unidad de bordado entre tanto como sea posible PRECAUCION PRECAUCION Asegúrese siempre de desconectar la alimentación de la máquina antes de instalar la unidad de bordado RETRAIT DE L UNITÉ DE BRODERIE 0HWWUH OD PDFKLQH KRUV IRQFWLRQ Retirez le cerceau de broderie de la machine Reportez vous aux page 70 71 1 En tenant...

Page 66: ...gether by pressing down on the inner frame a Tighten hoop adjusting screw b Once fabric is properly positioned in embroidery frame ZLWK QR VODFN VHFXUHO WLJKWHQ WKH VFUHZ F 7LJKWHQ WKH IDEULF LQ WKH IUDPHV VR WKDW LW PDNHV D VRXQG OLNH D GUXP ZKHQ WKH WLJKWHQHG VXUIDFH LV WDSSHG ZLWK D QJHU Once fabric is properly positioned in embroidery frame ZLWK QR VODFN VHFXUHO WLJKWHQ WKH VFUHZ G 7KLV PDUN ź...

Page 67: ... grand cerceau seulement H DLWH FRUUHVSRQGUH OHV PDUTXHV źŸ GHV FDGUHV intérieure et extérieure 6 85 1 2 0 7 5 1 52 DE BORDADO NOTA Para información sobre el uso de estabilizador apropiado consulte la página 66 67 1 Afloje el tornillo de ajuste de aro en el marco exterior y retire el marco interior Coloque el material entre el marco interior y exterior NOTA Coloque entretela cuando sea apropiado c...

Page 68: ...roduce best results when embroidering DEULFV ZKLFK ODFN UPQHVV RU VWDELOLW VXFK DV OLJKWZHLJKW cotton can pull in when being embroidered This can result LQ SUREOHPV VXFK DV VKULQNDJH DQG SXFNHULQJ RI WKH IDEULF around the embroidery area Stretch fabrics may stretch or distort when tightening the hoop and the result may be uneven embroidery Furthermore when the fabric is removed from the hoop DIWHU...

Page 69: ...issus suivants en utilisant un soin spécial Pour les tissus a surface petit poil comme des serviettes utiliser un entoilage soluble dans l eau sur le dessous et le dessous du tissu Les tissus lâches comme le denim ou la toile de lin demande un entoilage de poids moyen que l on peut découpée après la broderie Le tissus de type T shirt requières normallement que l on place à son endos au moins une e...

Page 70: ...ich is smaller than the hoop size or when embroidering close to the edge of the fabric attach the stabilizer as illustrated WHEN EMBROIDERING A NARROW PIECE OF FABRIC SUCH AS RIBBON TAPE Always use a layer of stabilizer which is bigger than the KRRS EHLQJ XVHG 7KH VWDELOL HU ZLOO QRW ZRUN SURSHUO unless it is clamped in the hoop along with the fabric being embroidered Stabilizer can usually be obt...

Page 71: ...nt à la broderie que vous voulez effectuer Il est recommandé généralement d utiliser un entoilage d une épaisseur équivalente au tissu Si se está bordando sobre material que es más pequeño que el tamaño del aro o cuando se borda cerca del borde del material coloque el estabilizador de la manera indicada CUANDO SE BORDA EN UN MATERIAL ANGOSTO COMO EN UNA CINTA Use siempre una capa de entretela que ...

Page 72: ...el aro ATTACHING AND REMOVING EMBROIDERY HOOP 1 Raise presser foot and needle and push up lever A of HPEURLGHU IRRW ZLWK RXU QJHU DQG SDVV HPEURLGHU KRRS under it To remove pull the hoop forward to slide it out from underneath the embroidery foot 6OLGH WKH KRRS RQWR WKH HPEURLGHU XQLW IURP IURQW WR EDFN XQWLO LW FOLFNV LQWR SODFH To remove press the release lever and slide the hoop towards you NOT...

Page 73: ... clique en place Pour le retirer tirer le cerceau vers vous tout en poussant le levier de retrait du cerceau vers la gauche REMARQUE Avant de fixer le petit cerceau mettez l interrupteur d alimentation sur la position de marche pour placer le chariot sur la position d attente de broderie COLOCANDO Y RETIRANDO EL ARO PARA BORDAR 1 Levante el prensatelas y la aguja y empuje la palanca A del pie de b...

Page 74: ...LQH LQWR WKH 520 GLVF UHFHLYHU in your PC After some seconds the Installation procedure of the software will start automatically If after a short while the software doesn t automatically start the installation process you may start the installation procedure manually by going to the Start option of Windows VHOHFW 5XQ W SH XWXUD6WDUW H H DQG FOLFN RQ 2 After some seconds the step by step installati...

Page 75: ...iquez simplement sur Suivant pour continuer INSTALACIÓN DEL SOFTWARE Para comenzar a utilizar el software en su PC deberá instalar primero el contenido del CD en su PC Este procedimiento se denomina SURFHGLPLHQWR GH LQVWDODFLyQ 3RU IDYRU VLJD las siguientes instrucciones para instalar correctamente el software de la máquina de coser y bordar FUTURA en su ordenador personal El software de la máquin...

Page 76: ...Q DOZD V DERUW WKH LQVWDOODWLRQ SURFHGXUH E FOLFNLQJ RQ DQFHO CORRECT START UP PROCEDURE 1 0 52 5 1 The following steps must be followed for proper start up protocol If these steps are not followed precisely you will get a Transmission Pending error message Boot up your computer but do not open the Futura software Next attach the embroidery unit to your sewing machine and connect the USB cable bet...

Page 77: ... utiliser le grand cerceau éteignez votre machine fermez le programme Futura puis éteignez votre ordinateur Attendez un moment allumez votre ordinateur puis suivez les étapes 1 à 4 ci dessus 352 0 1726 255 726 3 5 20 1 5 25 5 Se deberán seguir los siguientes pasos para un correcto inicio Si no se siguen con precisión marcará un mensaje de error Transmisión pendiente Inicie su computadora pero no a...

Page 78: ...stops at its highest position FORWARD STITCH BUTTON After the embroidery design has been transferred to the machine the embroidery can be advanced one stitch at a time Note The embroidery hoop will move as it is advancing through the design To advance continuously press and hold this button REVERSE STITCH BUTTON 7R EDFN XS WKURXJK D GHVLJQ WKDW LV DOUHDG LQ SURJUHVV press the Reverse Stitch button...

Page 79: ...haque fois Pour faire marche arrière de façon continue appuyez et maintenez le bouton enfoncez Le dessin de broderie peut reculer entièrement pour atteindre son point de départ ARRANCANDO PARANDO LA MAQUINA Cuando se presiona el botón de comienzo parada la máquina comenzará a funcionar lentamente y cuando presione el interruptor una vez más la aguja se moverá y parará en su posición más alta INTER...

Page 80: ... the thread hold a length of thread of about 6 inches at both ends DQG SXOO LW FKHFN WKH OHQJWK DW ZKLFK LW EUHDNV If using a highly elastic thread reduce the upper thread tension Thread path is incorrect Refer to page 16 19 Thread is tangled around spool holder Thread or fabric bits have collected under the needle plate Remove the thread or fabric bits Refer to page 102 103 A thin needle is being...

Page 81: ...su épais Utilisez une aiguille plus grosse Il faut normalement utiliser une aiguille 14 Reportez vous aux page 10 11 LOCALIZACION DE AVERIAS 6 6 7 1 3817 6 6 5203 EL HILO La punta de la aguja está rota Cambie la aguja La aguja está doblada Cambie la aguja La aguja no está bien instalada Instale la aguja correctamente Consulte la página 20 21 Latensióndelhilo superioresdemasiada Ajuste la tensión d...

Page 82: ...G UXLQ WKH QLVKHG embroidery Stop embroidering remove the hoop and untangle the thread This can cause fabric WR SXFNHU DQG UHVXOW in uneven feeding reduce the thread tension Refer to page 22 23 1HHGOH WLS LV EURNHQ RU QHHGOH LV WRR WKLFN Select a correct needle Refer to page 20 21 If the thread is tangled on the spool pin or somewhere along the thread path this will cause the thread to hang up and...

Page 83: ... BORDADO DESALINEADO Se continúa bordando cuando el hilo está enredado Estabilizador sin colocar cuando usa la luz o se estira el material Coloque entretela a la tela Consulte la página 66 69 El material no ha sido colocado firmemente en el aro Apriete el material en los bastidores d e m a n e r a q u e haga ruido como un tambor cuando la superficie tensada es golpeada con un dedo Consulte la pági...

Page 84: ...sion Rethread upper thread see page 16 17 Threading the Top Thread Placing the small net that is supplied with the accessories over the spool of thread may ensure that the thread is unwinding properly 1 If stitches are missing If the embroidery machine detects that the thread has EURNHQ LW PD FRQWLQXH WR HPEURLGHU XS WR DERXW HLJKW VWLWFKHV ZLWKRXW DQ WKUHDG EODQN VWLWFKHV EHIRUH LW automatically ...

Page 85: ...ptor de puntada hacia atrás retorno de puntada para moverse hacia atrás en los datos de bordado El aro se moverá hacia atrás una puntada a la vez 0XpYDVH KDFLD DWUiV HQ ORV GDWRV KDVWD KDEHU pasado completamente por el área en blanco 2 Vuelva a usar la máquina de bordar y continúe bordando 2 La computadora indica con una luz parpadeante y un sonido bip que el hilo se ha roto pero éste no está roto...

Page 86: ...he density of a design be adjusted when resizing design When sizing designs from the Design Library you can resize within the hoop area on screen and the stitch count will be adjusted automatically All other formats should be changed in the DESIGN CHANGE SIZE menu in order to change the stitch count 5 Resizing individual letters RX FDQ UHVL H LQGLYLGXDO OHWWHUV DIWHU RX KDYH EURXJKW them into the ...

Page 87: ...etra conservará la densidad apropiada 3 Après avoir redimensionné un dessin de broderie la densité de la couture est trop serrée ou pas assez serrée Le programme Futura recalcule le point d un motif importé pendant la prise de dimensions mais seulement si l option DESIGN CHANGE SIZE motif changement de dimension est sélectionnée La limite maximum est de 149 et la limite minimum est de 51 limites p...

Page 88: ...DW WKH EDFN WKDW FDQ possibly interfere with the removal of the hoop from the embroidery unit depending on the size of the design being HPEURLGHUHG PRYLQJ WKH KRRS WR D 3DUN SRVLWLRQ WKH needle moves to center position temporarily allowing you to remove the hoop from the embroidery unit change the EREELQ WKUHDG UHDWWDFK WKH KRRS DQG WKHQ PRYH EDFN WR WKH original position where you stopped the emb...

Page 89: ...ermettra de retirer le cercle de l unité de broderie changer la canette replacer le cerceau et ensuite revenir en position d origine où vous avez arrêté le motif de broderie D Q TXH YRXV SXLVVLH UHSUHQGUH OD FRXWXUH Après avoir changé la canette rattachez le cerceau à l unité de broderie Appuyez encore une fois sur le bouton aiguille jumelée de sorte que l aiguille se déplace vers la position d or...

Page 90: ...g the Fabric Please note The fabric must be large enough to accommodate the amount of hoops that will be required to stitch out the design 1 Using a very QH OLQHG ZDWHU VROXEOH PDUNHU PDUN D OLQH vertically down the center of the fabric 0DUN D OLQH KRUL RQWDOO DFURVV WKH FHQWHU RI WKH IDEULF The vertical and horizontal lines must be at precise right angles to each other These lines will now be ref...

Page 91: ...XH VSpFLDOH GX ORJLFLHO Futura qui permettra aux données de broderie qui sont plus grandes qu un cerceau de broderie à être envoyé à la machine pour être cousu en rendant facile le déplacement du tissus dans le cerceau pour que chaque partie du dessin de broderie s aligne exactement Ces données de broderie peuvent être un dessin unique qui est trop grand pour le cerceau ou une combinaison d élémen...

Page 92: ...KLQ WKH JXLGH OLQH PDUNLQJV RI WKH KRRS 6HH JXUHV DQG L O V E Data 1 Donnée 1 Datos 1 Data 4 Donnée 4 Datos 4 Data 2 Donnée 2 Datos 2 Data 3 Donnée 3 Datos 3 A B C Fig 4 Fig 4 Fig 4 Fig 3 Fig 3 Fig 3 Guide line Ligne Guide Línea guía Guide line Ligne Guide Línea guía Guide line Ligne Guide Línea guía Guide line Ligne Guide Línea guía There are two sets of markings on the inner hoop On each side of...

Page 93: ...de marquage de données 1 avec les lignes guide GX FHUFHDX 9RLU OHV JXUHV HW 4 Los datos de diseño son enviados a la maquina para coser una sección a la vez Pulse en la herramienta 7UDQVPLWLU D OD 0DTXLQD HQ OD EDUUD GH KHUUDPLHQWDV 5 El área gris Aro 1 son los primeros datos de bordado que son enviados a la maquina para su costura Coloque la tela y la entretela en el aro alineando las líneas de cr...

Page 94: ... de borrado Leftward Vers la gauche Hacia la izquierda Rightward Vers la droite Hacia la derecha Upward Vers le haut Hacia arriba Downward Vers le bas Hacia abajo Î Î A C B Please Note The buttons on the machine are lit WR LQGLFDWH WKH FURVV OLQH SRVLWLRQV RI WKH IDEULF in the hoop The blinking button is indicating the point to be input If a mistake is made when entering the points press the clear...

Page 95: ...ne erreur est faite en entrant les points appuyer sur le bouton d effacement le bouton double aiguille de suppression pour supprimer le V SRLQW V HW HQVXLWH UHFRQ UPHU OH V SRLQW V Nota Los botones en la maquina se iluminan para inidcar las posiciones de la linea de cruce en la tela en el aro El boton destellando está indicando el punto a ingresar Si se comete un error cuando se ingresan los punto...

Page 96: ...DFKLQH 1DYLJDWRU ER and the screen will prompt you to enter the information from the data 2 area Use the same procedure to re hoop the fabric send the data 2 design to the machine and input the A B and C points The buttons on the machine will once again be lit to indicate the cross line SRVLWLRQV LQ WKH KRRS DQG WKH EXWWRQ WKDW LV EOLQNLQJ LV indicating the point to be input Embroider the data 2 d...

Page 97: ...t saisissez les points A B et C Les boutons sur la machine s allumeront de nouveau pour indiquer la position des lignes de marquage dans le cerceau et le bouton clignotant indique le point à être saisi Brodez les données 2 du dessin 9 Después de que todos los colores del diseño del aro 1 se hayan bordado puse Salir en el cuadro Navegador de OD 0DTXLQD OD SDQWDOOD OH SHGLUi LQJUHVDU OD LQIRUPDFLyQ ...

Page 98: ...férées Toutes les lampes DEL sont éteintes VWD FRQHFWDGR HO FDEOH 86 SHUR ORV GDWRV GH ERUGDGR DXQ QR VH WUDQV HUHQ Todos los LEDs están apagados Embroidery data is being transferred All LED lamps are turned off Les données de broderie sont transférées Toutes les lampes DEL sont éteintes RV GDWRV GH ERUGDGR VH HVWiQ WUDQV ULHQGR Todos los LEDs están apagados XVW DIWHU WKH HPEURLGHU GDWD ZDV FRPSOH...

Page 99: ...hora el bloque 4 está en progreso KHQ ODVW EORFN RU RQH XQLW RI HQGOHVV KRRS LV FRPSOHWHG All LED lamps are turned off RUVTXH OH GHUQLHU EORF RX XQH XQLWp GH FHUFHDX LQ QL HVW FRPSOpWp Toutes les lampes DEL seront éteintes Cuando el último bloque o una unidad del aro es completado Todos los LEDs se apagan USB cable is disconnected while being suspended Embroidery is still available ODPSV DUH OLW D...

Page 100: ...ng purposes and lowered for darning freehand embroidery and monogramming so that you not the feed dogs are moving the fabric 4 OTHER THINGS YOU SHOULD KNOW CONVERTING TO FREE ARM SEWING RXU PDFKLQH FDQ EH XVHG HLWKHU DV D ÀDW EHG RU DV D IUHH arm model LWK WKH H WHQVLRQ WDEOH LQ SRVLWLRQ LW SURYLGHV D ODUJH ZRUNLQJ VXUIDFH DV D VWDQGDUG ÀDW EHG PRGHO 7R UHPRYH WKH H WHQVLRQ WDEOH KROG LW UPO ZLWK ...

Page 101: ...e peut s utiliser aussi bien sous la forme d une base plane que celle d un bras libre En conservant la table de rallonge en place vous disposez d une grande table de travail Pour retirer la table de rallonge tenez la fermement avec les deux mains et tirez la à gauche vers l extérieur comme indiqué sur l illustration Pour la remettre en place faites glisser la table de rallonge à sa place jusqu à c...

Page 102: ... size is not correct for thread and fabric see page 20 21 0DFKLQH LV QRW WKUHDGHG FRUUHFWO VHH SDJH Top thread tension is too loose see page 22 23 Fabric is being pulled or pushed against machine feeding action Guide it gently Bobbin has not been wound evenly Rewind bobbin see page 12 13 1HHGOH EUHDNV Fabric is being pulled or pushed against machine feeding action Guide it gently Needle size is no...

Page 103: ...demasiado apretadas Ajustar las tensiones del hilo vea página 22 23 D ORQJLWXG GHO SXQWR HV GHPDVLDGR ODUJR SDUD PDWHULDO QR o suave Acortar la longitud del punto vea página 24 27 PROBLÈMES GENERAUX La machine ne coud pas L interrupteur est hors fonction L activé voir page 10 11 Le levier pour boutonnière n est pas relevé lorsque vous cousez des motifs de points Relevez le levier pour boutonnière ...

Page 104: ...LWK WKH OLQW EUXVK Put one drop RI VHZLQJ PDFKLQH RLO RQ WKH KRRN UDFH DV indicated by the arrows A B 5 Replace the bobbin case with the projection 3 positioned against the spring 4 0DNH VXUH WKDW WKH QHHGOH LV DW LWV KLJKHVW SRVLWLRQ DQG SXW and slide the needle plate into position as illustrated Cleaning the sewing machine and footcontroller IWHU XVLQJ NHHS VHZLQJ PDFKLQH DQG IRRWFRQWUROOHU FOHD...

Page 105: ... mantenga las piezas esenciales limpias siempre para obtener un funcionamiento eficáz de su máquina 1 Levantar la aguja a la posición más alta 2 Quitar dos tornillos en la placa de la aguja y resbalar la placa de la aguja 1 hacia ti según lo ilustrado para el retiro 3 Quite la cápsula 2 4 Limpiar el área del transportador y de la lanzadera con el cepillo de hilachas Echar una gota de aceite para m...

Page 106: ...l to the points indicated by arrows Helpful Hints For the machine used frequently It should be oiled periodically For the machine used after a long interval It should be oiled before it is used CAUTION Always remove the dust and lint before oiling For best results always use SINGER Brand Sewing Machine Oil Use of oil other than Sewing Machine Oil will cause damage to your machine ...

Page 107: ...marca SINGER Usar aceite que no sea especial para máquina de coser dañará su máquina HUILAGE DE L INTÉRIEUR DE LA PLAQUE FRONTALE 1 Retirez les deux vis et la plaque frontale 0HWWH XQH JRXWWH G KXLOH SRXU PDFKLQH j FRXGUH VXU OHV SRLQWV LQGLTXpV SDU OHV ÀqFKHV Conseils utiles Pour une machine utilisée fréquemment graissage périodique obligatoire Pour une machine non utilisée depuis longtemps grais...

Page 108: ...en using twin needles the stitch width should never be set above twin needle mark regardless of the stitch you KDYH VHOHFWHG RLQJ VR ZLOO UHVXOW LQ EURNHQ QHHGOHV DQG possible damage to your machine Use of a Singer Brand twin needle is strongly recommended The twin needle is an optional purchase THREADING THE TWIN NEEDLE 1 Place a spool on each spool pin Thread the two threads as one Draw one thre...

Page 109: ...se venden por separado ENHEBRADO DE DOS AGUJAS 1 Colocar el carrete sobre cada pasador Enhebre los dos hilos como uno Tirar un hilo a través de cada guía y a través de cada aguja desde delante a atrás 2 Recoger el hilo de carrete como en cuanto a sola costura de la aguja Tirar tres hilos juntos bajo de pie prensatelas de delante a atrás dejando alrededor de 6 15 cm Suggestions utiles 1 Sélectionne...

Page 110: ...n the hoop accurately for continuous sewing RXU VRIWZDUH LQFOXGHV D VHOHFWLRQ RI GHVLJQV IRU HQGOHVV HPEURLGHU ZKLFK FDQ EH IRXQG LQ WKH HVLJQ LEUDU RX FDQ use other designs as endless embroidery as well because the software will automatically add the alignment stitches for you Hoop the Fabric 0DNH VXUH WKDW WKH ULJKW KDQG HGJH RI WKH IDEULF WR EH embroidered has a very straight edge so that it wi...

Page 111: ...e retentira et un message d erreur apparaitra et la machine s arrêtera 9RXV EURGHUH YRV GHVVLQV HQ FRQWLQX HQ GpEXWDQW j OD Q GX WLVVX HQ SURJUHVVDQW OH ORQJ GX UHERUG GX WLVVX YHUV OD Q GH celui ci ELEVADOR DE RODILLA El elevador de rodilla es muy útil con algunas técnicas de costura como pegado de aplicaciones y costura libre Permite mantener ambas manos en su proyecto puede incluso controlar la...

Page 112: ...set will allow you to have the endless hoop segments intersect by decreasing the distance between them or leave a gap between the segments by increasing the distance between them You can load one of the Endless Hoop designs that come with the Design Library From the main menu select Create and then Design Library Select for Endless Hoop category and choose a design of your liking Offset distance c...

Page 113: ...on vous permet de changer la distance de compensation tout en pré visualisant le résultat ainsi obtenu avant que vous ne cousiez les segments Le changement de la compensation vous permettra de rapprocher les segments du cerceau en continu en diminuant la distance entre eux ou de laisser un écart entre les segments en augmentant la distance entre eux Una vez que ha transferido los datos a la máquin...

Page 114: ...epeat The Color Block List should be displayed along the bottom of the PC screen for easy reference regarding FRORU VHTXHQFH I LW LV QRW WKH RORU ORFN LVW FDQ EH accessed from the main menu Go to Tools then scroll down to Color Block List RX ZLOO VHH WKH FRORU VHTXHQFH of your selected design displayed at the bottom of your PC screen 8 Before releasing the hoop press any one of the shift buttons l...

Page 115: ...a primero con un conjunto de puntadas de alineación en forma de L en las esquinas superior izquierda y derecha del área del diseño antes que se cosa el diseño Se usan para ayudar en el reposicionamiento del aro cuando une los segmentos de diseño Después de que se cose el diseño principal el diseño termina con un conjunto de puntadas de alineación en la esquina inferior izquierda y derecha del dise...

Page 116: ...irection needed When the needle has been correctly positioned over the corner of the left alignment stitches and the right edge of the fabric is parallel with guide A press OK on the machine s main control panel Lower the presser foot then press the Start Stop button to begin stitching the next endless design When you start sewing the alignment stitches from the bottom left and right of the previo...

Page 117: ... terminado el cual está ahora sobre el área donde bordará el siguiente segmento Para hacer esto use los botones de cambio en el panel de control para mover la aguja en la dirección necesaria Cuando la aguja se ha colocado correctamente sobre la esquina de las puntadas de alineación izquierdas y el borde derecho de la tela esté paralelo con la guía A presione OK en el panel de control principal de ...

Page 118: ...th the fabric remaining in the hoop Remove the bobbin cover plate and empty bobbin Wind the bobbin insert it into the bobbin case and replace the bobbin FRYHU SODWH 3ODFH WKH KRRS EDFN RQWR WKH PDFKLQH Lower the presser foot lifter Press the Start Stop button to resume embroidery Should you find that the hoop will not release from WKH PDFKLQH EHFDXVH WKH EDFN RI WKH IRRW LV FRPLQJ in contact with ...

Page 119: ...e dessin que vous brodez enlevez le pied presseur ainsi que l aiguille pour retirer le cerceau de la machine Replacez ensuite le pied presseur et l aiguille pour reprendre la broderie Astuces Utiles XDQGR ERUGH SLH DV PiV JUDQGHV R JUXHVDV GH WHOD es útil apoyar la tela en una mesa enfrente y atrás de la máquina XDQGR WUDEDMH FRQ KLORV HVSHFLDOHV FRPR PHWiOLFRV R diseños con densas áreas de puntad...

Page 120: ...ournez interrupteur sur OFF et éliminer le problème qui a causé le dévidoir de s arrêter El devanador está bloqueado debido a que el hilo se enredó en uso o rotación interrumpido por la fuerza Î Apagar el interruptor y eliminar el problema que causa que el devandor se pare ż ż Buttonhole is selected on selection button but buttonhole lever is raised Î Lower buttonhole lever and begin sewing button...

Page 121: ...n initiale Î Tournez interrupteur sur OFF et attacher plus cerceau El tamaño de bastidor es demasiado pequeño para mover el bastidor a la posición original Î Apagar el interruptor y cambiar el bastidor más grande ż Hoop size is smaller than embroidery data Î Attach appropriate hoop and restart La taille de cerceau est plus petite que données de broderie Î Joindre cerceau appropriées et redémarrez ...

Page 122: ...120 ...

Page 123: ...121 ...

Page 124: ...10 13 ENGLISH FRANÇAIS ESPAÑOL 䢳䢻䢵䢶䢸 ...

Reviews: