|
Spectre 3.0 Assembly Manual
Revision 1.2
Page
| 16
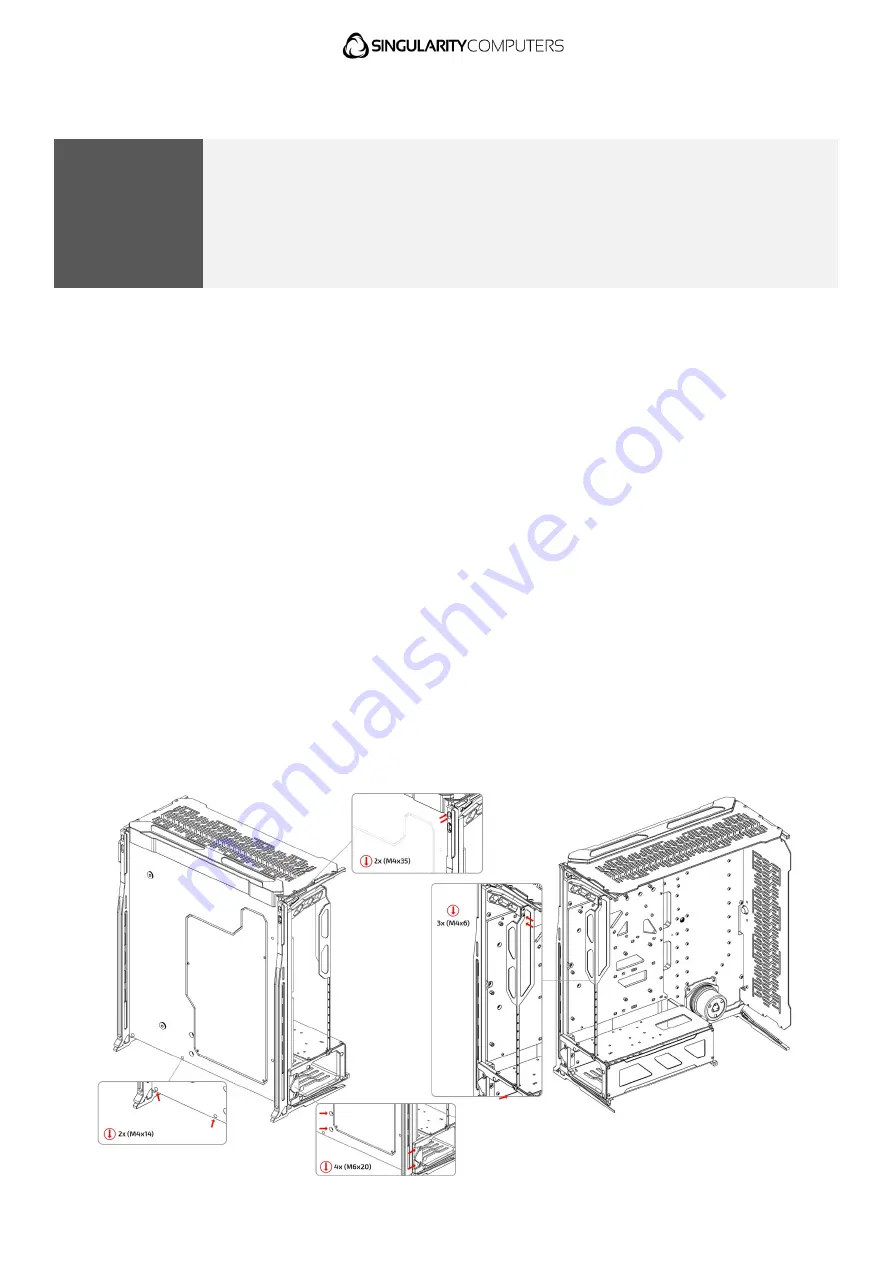
Step 8: Install PSU Shroud, Cable Shroud & Rear IO.
Pieces Involved
•
Spectre 3.0 Case
•
Fasteners – 4x M6 x 20mm
•
J
Radiator Panels
•
Fasteners – 2x M4 x 14mm
•
l
Cable Shroud
•
Fasteners – 3x M4 x 6mm
•
q
Rear I/O Panel
•
Fasteners – 2x M4 x 35mm
•
n
Rear I/O Support
PSU Shroud Installation:
Begin by installing the PSU Shroud to the Rear Leg. It is best to install the top fastener first. Use
the 4x M6 x 20mm Fasteners. Make sure to hold the PSU Shroud up while doing this. Then install
the second fastener to the Rear Leg. Then align the PSU Shroud to the Distribution Plate and
install the two fasteners through the Distribution Plate to hold the PSU Shroud at the front. If you
have any fastener alignment issues you will need to loosen related fasteners to allow the built-
in tolerances to settle everything into position. Do not overtighten fasteners on acrylic.
Cable Cover Installation:
Install the Cable Cover to the Case. It fits onto the bottom of the Distribution Plate underneath the
D5 Pump Top. Use the 2x M4 x 14mm Fasteners to attach it, the fasteners install from the back of
the Distribution Plate. Do not overtighten fasteners on acrylic.
Rear IO Installation:
Install the Rear IO Support to the case, it fits onto the front of the Distribution Plate and the
fasteners go all the way through from the back sandwiching everything together. Use the 2x M4
35mm Fasteners. Then install the Rear IO Panel, first installing the two fasteners at the top which
go into the Rear IO Support, then the fastener at the bottom which goes into the PSU Rear Bracket.
If you have any fastener alignment issues you will need to loosen related fasteners to allow the
built-in tolerances to settle everything into position. Do not overtighten fasteners on acrylic.


