background image


15

7. CLEANING AND MAINTENANCE 

1)


Use the wet cloth to clean the machine after daily use, do not wash it with water 
directly. 

2)


Clean the splashed flour thoroughly which may lie in the top of the clamping block, 
safety cover, etc. 

3)


Clear the dust in the top cover of the spiral mixer very often. 

4)


Make sure to turn off the power after daily use. 

5)


Check all the components to see whether it is in good status termly. 

6)


Check whether the convection belts are in good tension monthly. 


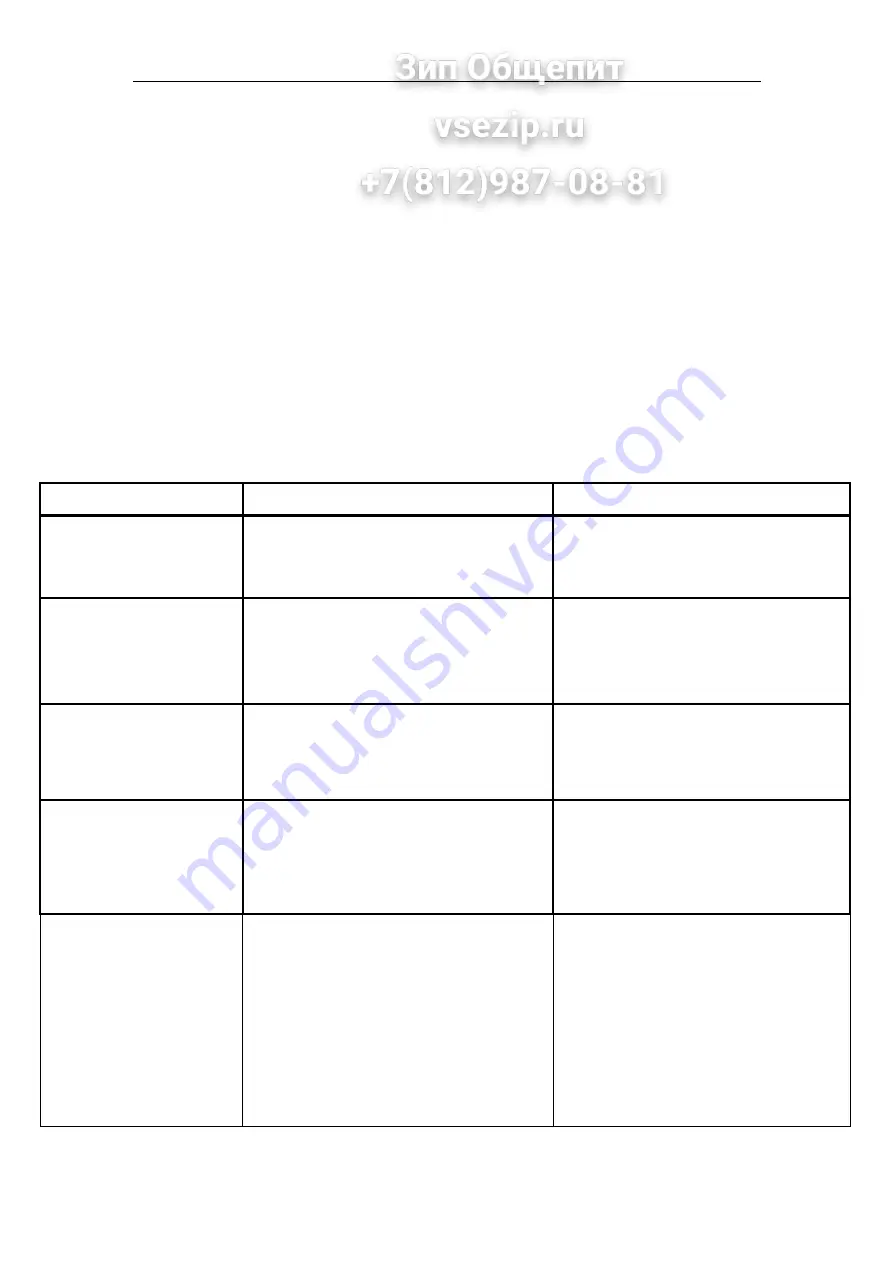
8. TROUBLESHOOTING 


Item 

Possible reason  

Method  

1.Bowl and beater rotate in 
reverse direction 


Check whether the any of the two cables 
are in reverse connection 


exchange any of the two cables 

2.Machine shakes when 
operation 
 

a)


The ground is not horizontal and 
plain enough. 

b)


Foot pad is unstable.


a)


Select a horizontal and plain 
ground to install it. 

b)


Readjust the foot pad to enable the 
machine’s stability.


3.The bowl still rotates 
after the safety cover has 
been opened 


a)


The microswitch is wrong. 

b)


The adjust wheel go with the 
microswitch is wrong 

a)


Change the microswitch. 

b)


Tighten the adjust wheel or change 
it if damaged. 


4.Guide roller can’t work 

a)


The bearing of the guide roller is 
damaged. 

b)


The gap is too long to service the bowl

a)


Change the microswitch. 

b)


Readjust the gap between guide 
roller and bowl to satisfy the bowl. 

5. Main shaft can not work 


a)


Check the power 

b)


Check the main switch   

c)


Check the motor 

d)


Check the magnetic valve 

e)


Check the over-load protection 

f)


Check any breakage about “ON/OFF” 
button. 

g)


Check the trolley whether well located 


Should carried on professional 
electricians


Summary of Contents for SM-120a

Page 1: ...L SM 120a 1 BRIEF INTRODUCTION AND SPECIFICATION 2 2 TRANSPORTATION 4 3 INSTALLATION 5 4 SAFETY INSTRUCTIONS 7 5 OPERATION PANEL 8 6 HYDRAULIC SYSTEM 12 7 CLEANING AND MAINTENANCE 15 8 TROUBLESHOOTING 15 9 ELECTRIC DIAGRAM 17 10 PARTS LIST 18 ...

Page 2: ...al mixer with removable bowl suitable for big production The drawing below show parts of the machine for your reference Figure 1 No item No Item 1 Top cover 6 Hook 2 Operation panel 7 Trolley 3 Center Pillar 8 Frame 4 Safety guard 9 Electric box 5 Bowl 10 Base plate Table 1 ...

Page 3: ...0 1330 Table 2 Remark SM 120a SM120a S SM 200a SM 200a S share the same transportation installation operation and components of machine The difference between the two is SM 120a SM 200a have their operation panel and electric box in their top position while SM120a S SM 200a S have their operation panel and electric box in a separate stand for easy approach INSTRUCTION ON MODEL MODEL INSTRUCTION ON...

Page 4: ...and sides use strong nylon rope to tie to the four rings at bottom leveling screws as shown in Figure 2 Then use crane to lift the machine from bottom wooden board and move to the installation position Pay attention that the head will not tilt and fall down to prevent oil leakage The machine should be placed slowly and steadily see Figure 2 Figure 2 ...

Page 5: ...m plate of the machine 4 Take our leveling screws At its position put washer bolt to fix the machine firmly to the ground as shown in Figure 3 Figure 3 5 Connect electric power cables to the machine with a circuit breaker which about 2m high 6 After electric connection check the rotation of bowl and hook Both bowl and hook should rotate clockwise from top view If wrong exchange two power cables an...

Page 6: ...on see Figure 5 Figure 4 8 Pull the bowl out of the machine and push the bowl into the machine Repeat as above until the bowl can be pushed in and pulled out easily Tighten the adjustment screws of the bowl guide rod as shown in Figure 5 Then try to pull out the bowl and push it in again to make sure the bowl can go in and out smoothly Figure 5 ...

Page 7: ...tion and the indication lamp will on if the trolley is well located Move the bowl ahead and rotate the bowl slightly to make sure bowl drive wheel is in good contact with bowl 5 Pay attention that power cables of head is not stucked 6 Make sure when open the safety guard the machine will stop 7 All the operators should comply with safety rules on clothing and wearing 8 Operator himself should not ...

Page 8: ...to set the time on both timers Maximum set time is 20 minutes After 20 minutes the timer starts from 0 minute again Press key to reduce time When the spiral mixer is switched ON timers will show the set time When the timer starts to work it will count down until it comes to 0 During AUTOMATIC operation when the safety cover is raised the timer will stop at the current position When the spiral mixe...

Page 9: ... lamp shows inching condition When neither INCH nor ON lamp light up it is in STOP condition e ON lamp lights up showing ON condition f STOP lamp lights up only when the safety cover is raised g O L Over LOAD This lamp lights up when the overload relay is on Please remove the fault voltage drop mixer overloaded or cable connection becomes loose so that this lamp will turn off 5 1 3 FUNCTION KEYS A...

Page 10: ...ntinue running after you push ON key When pressing OFF key the timer will jump back to the time it was originally set 5 3 MANUAL OPERATION A Press key until MANU lamp lights up B Press and keys to select the desired speed and bowl direction C Press key to start the machine D Press key when you want to stop the operation The timer will stop functioning under manual operation The bowl can not be rev...

Page 11: ...o the machine Remark 1 Move the head of the machine up and down at least once a time before daily use 2 Do not operate the machine when the bowl is not located well 3 Do not move the bowl any further when the head moves up and down 4 Bowl should be pushed into the mixer steadily neither too slow nor too fast If you find it is difficult to push the bowl then move the bowl backward Adjust the track ...

Page 12: ... 7 hydraulic system 1 Start the machine and hydraulic system Turn on the power press UP or DOWN button the motor will run and the hydraulic system start to work 2 Head up Press UP button The cylinder move upward to bring down mixer head to its top position ...

Page 13: ... person presses UP button to make the mixer head move upward then presses DOWN button so that the mixer head moves downward Then Another person opens adjusts throttle valve until the pressure gauge showed about 40Kg cm2 Figure 9 pressure display 40 Kg cm2 6 Why the frame of the machine shakes when mixing How to do with it The reason is the pressure goes down in cylinder Check if there is any oil l...

Page 14: ...ck valve work with problems we suggest you should fix or change it Figure 10 pressure display 200 Kg cm2 7 Pressure value for your reference when operation MOVEMENT PRESSURE DISPLAY Kg cm2 UP 0 TOP 0 DOWN 40 BOTTOM 200 Table 3 movement and pressure display 8 After the pressure being adjusted well one person presses UP button to make the mixer head move upward Another person closes the throttle val...

Page 15: ...peration a The ground is not horizontal and plain enough b Foot pad is unstable a Select a horizontal and plain ground to install it b Readjust the foot pad to enable the machine s stability 3 The bowl still rotates after the safety cover has been opened a The microswitch is wrong b The adjust wheel go with the microswitch is wrong a Change the microswitch b Tighten the adjust wheel or change it i...

Page 16: ... any abnormal on motor Should carried on professional electricians 8 Electric leakage a Check if any damage on cables b Check if any moisture in electrical box c Check if any malfunction on transformer Should carried on professional electricians 9 Main shaft will stop unexpectedly f Check if any trip happened or set value of current is changed g Check if any abnormal on motor 10 Strange noise made...

Page 17: ...17 9 ELECTRIC DIAGRAM ...

Page 18: ...18 10 PARTS LIST ...

Reviews: