


1
SAVE THESE INSTRUCTIONS!
Form Z804
Date 2009October28/A
Page 1 of 8
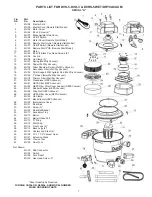
INSTRUCTIONS & PARTS LIST FOR
DVS-5, DVH-3 & DVRS-5 WET/DRY VACUUM
SERIAL “A”
Read and understand these instructions before operating this tool.
Printed In U.S.A.
250 Snap-on Drive • PO Box 1596 • Murphy, NC 28906 • USA • Phone: 828-835-9765 •www.siouxtools.com
WARNING
When used improperly power tools can create hazardous situations.
Everyone using, maintaining, changing accessories or working near this tool must read, understand and follow
these Safety Instructions!
Improperly used power tools can cause injury or death.
• Read the Owner’s Manual completely before attempting to operate this unit.
• Always check the filters before each use.
• Connect to a properly grounded outlet. See grounding instructions.
• Don’t change filters, clean the unit, or empty the canister until the plug has been disconnected from the electrical outlet. Always uplug unit
when not in use and before servicing.
WARNING
–
To avoid risk of electrical shock, do not use out doors or on wet surfaces.
WARNING
– To reduce the risk of burns, fire, electric shock, or personal injury:
• Do not allow this unit to be used as a toy or to run unattended at any time. Keep children away from this unit.
• Do not use accessories except those recommended and provided by Sioux Tools. Use this unit only for its intended use as described in
this manual. Use of accessories not recommended by the manufacturer may cause fire, electric shock, or injury. (See parts list)
• Do not operate this unit in an enclosed space where flammable, explosive or toxic vapors are given off by oil-base paint, paint thinner,
gasoline, etc.
• Do not vacuum toxic, carcinogenic, combustible, or other hazardous materials such as asbestos, arsenic, barium, beryllium, lead,
pesticides, or other health endangering materials.
• To avoid the igniting of vapors or dust due to the arcing of the motor brushes, do not pick up flammable or readily combustible material.
• Do not expose your Vacuum to excessive heat as damage to your vacuum may occur and the 1 year warranty will be null and void.
• Do not pick up anything that is burning or smoking, such as cigarettes, matches, or hot ashes.
• Do not use without dust bag and/or filters in place.
• Do not pull unit by the suction hose.
• Do not abuse cord. Never carry your Vacuum by the cord or pull cord to disconnect it from the outlet. Grasp the plug, not the cord.
• Do not leave the cord lying on the floor once you have finished the cleaning job. It can become a tripping hazard.
• Never handle plug, cord, or cleaner with wet hands.
• Never drop or insert any objects into any openings. Do not use with any opening blocked; keep free of dust, lint, hair, and anything that
may reduce air flow.
• Keep cord away from heat, oil and sharp edges. Do not close doors on the cord or snag it under furniture or pull around corners with
sharp edges.
• The operation of a Wet/Dry Vacuum can result in foreign objects being blown into your eyes, which can result in eye damage. Always
wear safety goggles when operating vacuum.
• Use special care when emptying heavily loaded canisters.
• Do not use outdoors or on wet surfaces. Do not leave appliance when plugged in. Unplug from outlet when not in use and before
servicing. Do not use with damaged cord or plug if appliance is not working as it should, has been dropped, damaged, left outdoors, or
dropped into water.
• Wear eye and hearing protection. Always use safety glasses. Everyday eyeglasses are NOT safety glasses. USE CERTIFIED SAFETY
EQUIPMENT. Eye protection equipment should comply with ANSI Z87.1 standards. Hearing equipment should comply with ANSI S3.19
standards.


