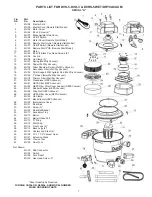
background image

6

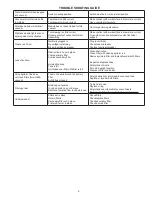
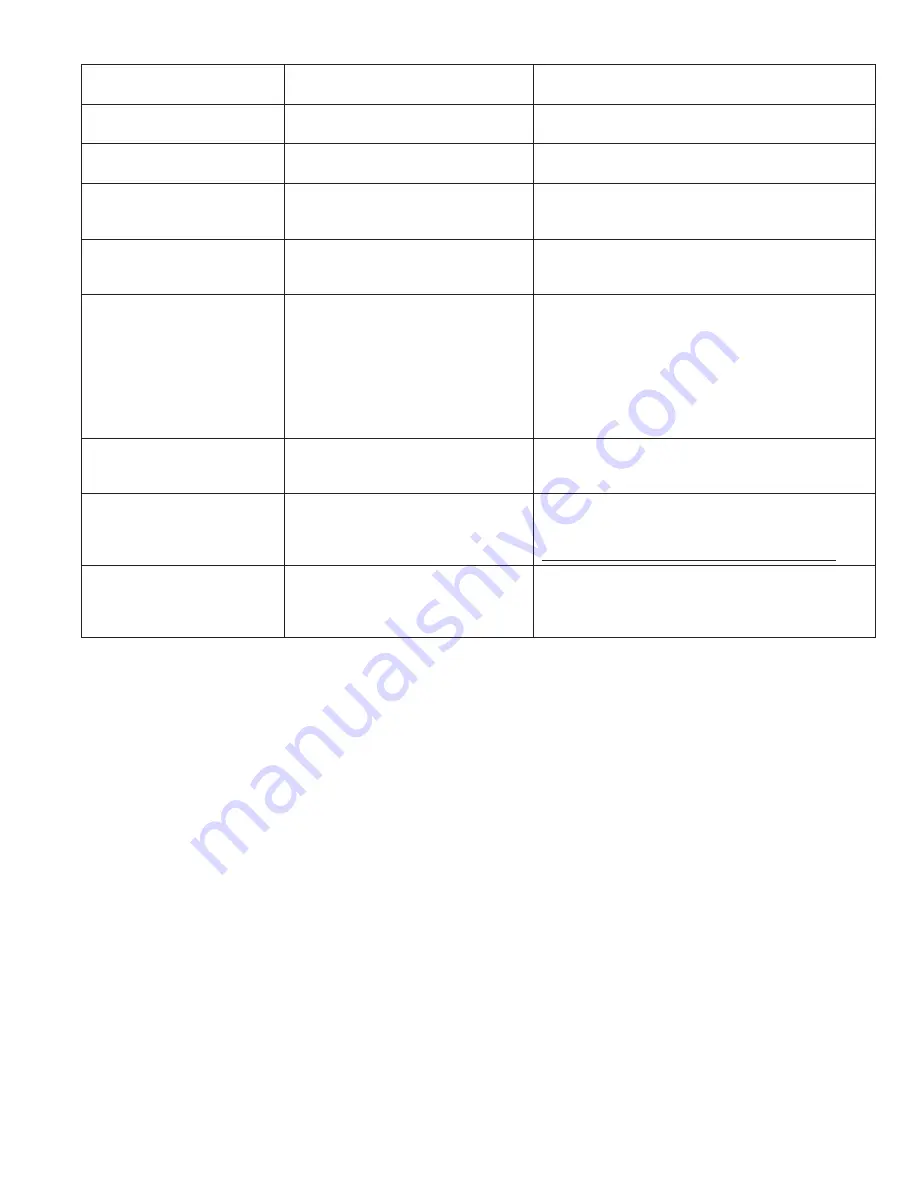
TROUBLE SHOOTING GUIDE

Tool will not start when plugged 

into vacuum

Switch in wrong position

Switch must be in II or auto-start position

Vacuum will not start when the 

tool starts 

Tool draws too little current 

Tool draws too much current 

Make contract with work surface to draw more current 

Use a remote start module 

Wireless module will not start 

vacuum 

Module has not been trained for this 

vacuum 

Go through training procedure 

Wireless module lights are not 

blinking when tool activates 

Tool drawing too little current 

Drawing plenty of current but still not 

transmitting 

Make contract with work surface to draw more current 

Try another tool, if unsuccessful contact technical 

support 

Cleaner won’t run 

Not firmly plugged in 

No voltage in wall plug 

Blown fuse/tripped breaker 

Plug in unit firmly 

Check fuse or breaker 

Replace fuse/reset breaker 

Loss of suction 

Obstruction in hose in place 

Coated primary filter 

Coated secondary filter

Hole/split in hose 

Tank is full 

Unit tipped over Micro Prefilter is full

Clean obstruction 

Clean Filter with cleaning agitator rod 

Remove primary filter and replace/launder both filters

Inspect and replace hose 

Empty tank of waste 

Put unit in upright position 

Dispose of filter and debris

Using Agitator Rod does 

not clean filters (Non-HEPA 

vacuum) 

Too much debris around the primary 

filter 

Both filters plugged 

Empty debris from intermediate cover and tank 

Replace or launder both filters. 

Filters get wet 

Drain cap not sealed 

O-ring on drain cap not in place 

Debris not emptied from tank before use 

Tighten drain cap 

Replace o-ring 

Empty tank and intermediate cover of waste 

**Always dry filters thoroughly before continued use 

Unit blows dust 

Filters not in place 

Hole in filter/s 

Secondary filter not in place 

Primary filter not in place 

Check filters 

Check/replace filters 

Check secondary filter 

Check primary filter

Summary of Contents for DVH-3

Page 1: ...h as asbestos arsenic barium beryllium lead pesticides or other health endangering materials To avoid the igniting of vapors or dust due to the arcing of the motor brushes do not pick up flammable or readily combustible material Do not expose your Vacuum to excessive heat as damage to your vacuum may occur and the 1 year warranty will be null and void Do not pick up anything that is burning or smo...

Page 2: ...r tank right side up Attach Accessory Tray Align the three slots on the edge of the accessory tray with the three guides on the rear side of the tank and press the accessory tray toward the tank as you push the tray down The two lock ing tabs will slide under the rim of the tank and catch By pushing the tray down and toward the tank it will lock into place Place intermediate cover and lid assembly...

Page 3: ...e when suction is reduced and cleaning the filters with the agitator rod is not sufficient the filters may be replaced or laundered and reused Micro Prefilters are disposable and will hold 20 30 lbs of dust How toReplace Filters Regular Wet Dry Vacuum Filter assembly Turn vacuum lid upside down on a flat surface Place the small white secondary filter over the spring mounted cage on the underneath ...

Page 4: ... condition when it was shipped from the factory If a minor problem occurs it usually can be solved quite easily when the cause is found Therefore this Trouble Shooting Guide is provided for you convenience Operation When the switch is in the I position the vacuum will turn on but no power will be applied to the vacuum outlet When the switch is in the II position power will be applied to the outlet...

Page 5: ...ning plug The vacuum can also be reset back to factory defaults by executing the following reset procedure In factory default mode the vacuum does not recognize any wireless start modules The first time the vacuum receives a wireless signal it will automatically recognize that and only that device Wireless reset procedure 1 Turn the vacuum off 0 on the switch 2 Insert the training reset plug 3 Pre...

Page 6: ...e fuse reset breaker Loss of suction Obstruction in hose in place Coated primary filter Coated secondary filter Hole split in hose Tank is full Unit tipped over Micro Prefilter is full Clean obstruction Clean Filter with cleaning agitator rod Remove primary filter and replace launder both filters Inspect and replace hose Empty tank of waste Put unit in upright position Dispose of filter and debris...

Page 7: ...d Wet Dry Vacuum 19 MV 46 7 Hose Clamp Wet Dry Vacuum 20 MV 18 Primary Filter Wet Dry Vacuum 21 MV 20 Crosspiece HEPA Vacuum 22 MV 21 HEPA Filter HEPA Vacuum 23 MV 22 HEPA Filter Filter Cover Support HEPA Vacuum 24 MV 41 Rubber Washer HEPA Vacuum 25 MV 48 Wing Nut HEPA Vacuum 26 MV 23 HEPA Filter Cover HEPA Vacuum 27 MV 45 Lid Clamp MV 47 Band Clamp HEPA Vacuum 28 MV 29 Intermediate Cover 29 MV 31...

Page 8: ...r malformaciones congénitas y otras alteraciones del aparato reproductor WARNING Some dust created by power sanding sawing grinding drilling and other construction activities contains chemicals known to cause cancer birth defects or other reproductive harm Printed In U S A 250 Snap on Drive PO Box 1596 Murphy NC 28906 USA Phone 828 835 9765 www siouxtools com ...

Page 9: ...Z804_revA used on DVH 3 DUSTLESS HEPA VACUUM DVS 5 STANDARD DUSTLESS VACUUM ...

Reviews: