background image

24 

ter and where necessary with the 
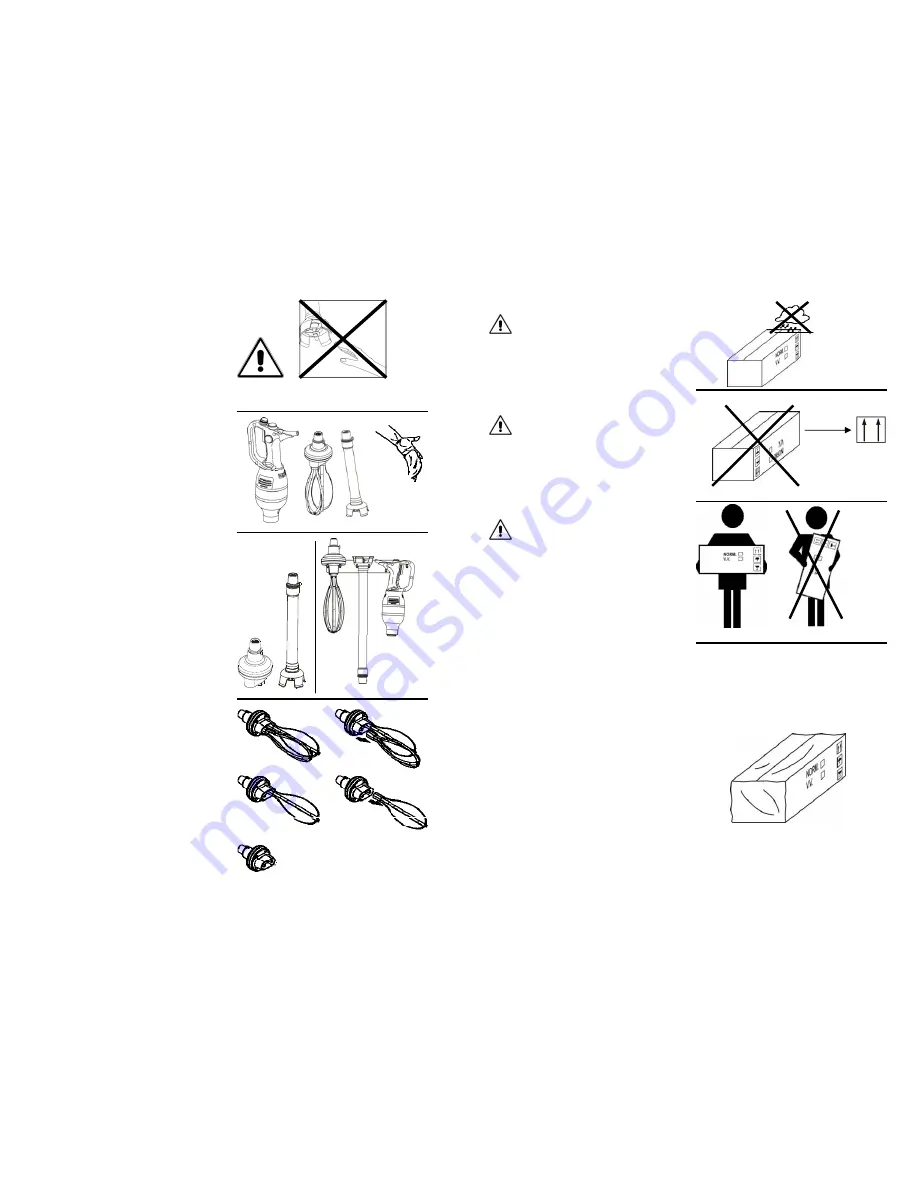
previously used detergent (Fig. 57). 

5) Empty the container, rinse it and fill 

it with warm water. Let the machine 
operate again for some more 10-15 
seconds, if necessary repeat the op-
eration till a complete and thorough 
rinse is guarantied. 

6)  ATTENTION: Check the result of the 

operation and if necessary repeat 
from point (2) or intervene manually 
on the parts that are still dirty. The 
knives area could provoke wounds 
to the hands (Fig. 56). So, please 
pay the maximum attention. 

7)  Reuse the tool for another operation 

or: 

8)  Dry the tool with a cloth and position 

it vertically for 1 or 2 hours to ease 
the drainage of residual liquid (Fig. 
57). 

9)  Hence place the shaft on the special 

wall bearing (Fig. 58). 

WHIP

 (Fig. 59) 

Proceed as described for the shafts till 
point 5. 
6) disassemble  the  whip  from  the 

whip’s body and check the complete 
cleaning. 

Intervene manually on the parts that 

are still dirty, paying attention to the 
internal area of the whip’s body (Fig. 
60) 

ATTENTION:

 Whips can be danger-

ous when handles with bare or wet 
hands. Wear protective gloves and 
pay maximum attention anyway. 

Reuse the tool for another operation 

assembling the whips to the whip’s 
engine or: 

7)  Dry the whip’s body with a cloth po-

sition it vertically for 1 or 2 hours to 
ease the drainage of residual liquid 
(Fig. 58). 

8)  Hence place the assembled whip on 

(1) (2) 

(3) (4) 

(5) 

ATTENTION! 

Fig. n°56 

Fig. n°59 

Fig. n°58 

Fig. n°57 

a) 

b) 

Once the item has been received, pro-
ceed to the opening and check that all 
the material is inside if the box does not 
show external damages. While if the 
box or the contents show signs of mis-
using (Fig. 6), knocks, fall or ruptures, it 
is necessary to inform the freight for-
warder of the damage by writing a de-
tailed report about the possible dam-
ages suffered within three days of the 
delivery  date.  Generally,  complaints 
that are not communicated immediately 
are not taken into consideration by the 
freight forwarder. 

1.2 - BOX CHECK UPON RECEIPT


Do not overturn the box (Fig. 4). 

Please  ensure  that  the  box  is  held 
firmly at the far  ends  of its  longest 
sides, while carrying it and keep the 
box itself parallel to the floor (Fig. 5). 

Do not leave the box exposed to hu-
midity and rain (Fig. 3). 

Fig. n°3 

Fig. n°5 

Fig. n°4 

Fig. n°6 

Summary of Contents for Ciclone W 200

Page 1: ...its packaging indicates that this product must not be disposed of with your other household waste Separate waste collection of this appliance is organised and managed by the manufacturer It is the user s responsibility to contact the manufacturer and follow the waste treatment system the manufacturer has adopted for separate waste collection The separate collection and recycling of your waste equi...

Page 2: ... S USE CHAP 6 REGULAR CLEANING page 23 6 1 GENERAL INFORMATION 6 2 EXTRA CLEANING 6 2 1 GENERAL INFORMATION 27 CHAP 7 MAINTENANCE 7 1 GENERAL INFORMATION Before carrying out any maintenance task it is recommended to unplug the feeding cable from the net to insulate the machine from the rest of the plant completely 7 2 DIPPING OF ACCIDENTAL FALL OF THE MACHINE In case of immersion or accidental fal...

Page 3: ...5 Proceed to clean the single pieces with a dump cloth and some dish deter gent keeping in mind that the bearings must not come into contact with liq uids 6 In case of encrustation insist with the cloth Do not use abrasives pointy or sharp tools 7 Disassemble everything the opposite way ATTENTION fix firmly the knife or this could detach itself during the operating stage Fig n 64 1 3 b a 2 3 CHAP ...

Page 4: ...58 The whips Fig 30 ref 19 can be washed even by the dishwasher ENGINE S BODY 1 unplug the feeding cable from the net to insulate the machine from the electrical feeding completely Fig 61 2 Remove possible product splashes that deposited on the machine s body with a wet sponge and dry im mediately with a cloth 3 Check that no residual from the work nor liquid did not enter the cone fixing the tool...

Page 5: ... ous when handles with bare or wet hands Wear protective gloves and pay maximum attention anyway Reuse the tool for another operation assembling the whips to the whip s engine or 7 Dry the whip s body with a cloth po sition it vertically for 1 or 2 hours to ease the drainage of residual liquid Fig 58 8 Hence place the assembled whip on 1 2 3 4 5 ATTENTION Fig n 56 Fig n 59 Fig n 58 Fig n 57 a b 5 ...

Page 6: ...e cleaning of the machine is an operation to be done absolutely at the end of every working cycle Immediate cleaning can save a lot of time guaranties hygiene and maintenance of the machine The cleaning must be scrupulously detailed in all the parts that come into direct or indirect contact with food The dipping blender must not be cleaned with water cleaners or water jets Fig 53 and or with acid ...

Page 7: ...eed immediately to the cleaning of the tool see chapter 6 Regular cleaning Fig n 48 Fig n 49 Fig n 50 Working cycles 10 minutes ON 10 minutes OFF Fig n 51 7 2 2 PLACEMENT The machine and its related accesso ries must be kept in a dry environ ment far away from heat humidity splashes dust and anything else that might damage the dipping blender and its accessories Fig 13 The machine and its related ...

Page 8: ... up wards while the whip is to be kept as Fig n 14A 178 mm 178 mm 600 mm Fig n 14 2 3 ELECTRICAL CONNECTION 21 5 3 MACHINE S USE ATTENTION Check that the machine is perfectly dry and that there is no dirt or hu midity from previous uses or washes Fig 43 Check that the shaft or the whip have not residual encrustations from previous uses Before using it ensure that the shaft and the whip are fixed t...

Page 9: ... Use the whip Fig 42 Eggs milk etc can be used to obtain creamy substances mousses cream as long as they do not have or they do not reach by the end of the operation consistencies that can be compared to other dough For the latter the dipping blender is not suitable Fig n 41 Fig n 42 9 Fig n 16 2 4 ELECTRICAL DIAGRAM 115V SINGLE PHASE 230V Fig 18 Fig n 17 electric plant of the building is accordin...

Page 10: ...eem obvious they are of paramount impor tance for the installation the use the maintenance and possible inconveniences and related remedies Fig n 21 19 5 1 PREPARATORY CHECK Check that the tools are perfectly as sembled as per chapter 5 Check that the electrical connections has been done correctly as per para graph 2 3 Hold the machine with a hand and after that check its functioning with the fol ...

Page 11: ...ed in the same way with the other whip 4 In order to disassemble do the oppo site CHAP 5 USE OF THE MACHINE 1 2 3 4 5 1 2 3 Fig n 36 Fig n 37 11 Do not wash the blender by means of the dishwasher or water jets Fig 22 23 The dipping blender has been de signed to blend fruit vegetables and meat unfrozen and without bones or stones Fig 24 and anyhow food that is not particularly hard or resistant to ...

Page 12: ... 4 OVERALL DIMENSIONS WEIGHT FEATURES ATTENTION The electrical features of the machine are indicated by a plate placed by the grip Fig 15 TABLE 1 OVERALL DIMENSIONS AND TECHNICAL FEATURES Fig 35 Power Power source Knives revolution Dimensions AxBxC Net weight Watt 230V 50Hz r p m mm kg W 20 200 230V 50Hz 12 000 100x182x340 2 W 20 VV 200 230V 50Hz 1 000 12 000 100x182x340 2 W 28 280 230V 50Hz 12 00...

Page 13: ...esistant ABS with stainless steel details These materials guarantee hygiene when there is contact with food and good re sistance to the agents contained by food Moreover high mechanical resistance is guaranteed due to their formation The operating shaft is made up almost completely by stainless steel the main body in die casted aluminium and coated in highly resistant ABS The perfectly insulated a...

Page 14: ...4 Respect of the minimum space to grip the machine as per what is pre scribed by law Maximum liquid level marked on the shaft Fig 45 4 2 2 Electrical safety devices As far as electrical nature safety the dipping blender described by this man ual complies to the EC 2006 95 low tension directive the EC 2004 108 electro magnetic compatibility directive Therefore the dipping blender is pro vided with ...

Reviews: