61 25 665 D3437
D3437
.
076.01.15
.
02 06.2012
75
Sirona Dental Systems GmbH
4
General operating procedures
Service Manual GALILEOS
4.3
Configuring the unit
båÖäáëÜ
4.3.2.2
Type 2: Configuration over a network cable (peer-to-peer)
Type 2: Configuration over a network cable (peer-to-peer)
Connecting the Facescan unit to a PC
✔
A PC with an installed web browser must be available.
✔
The factory setting of the IP address of the Facescan is
192.168.16.240.
✔
The PC employed must be in the 192.168.16.xx network; otherwise,
no network connection can be achieved.
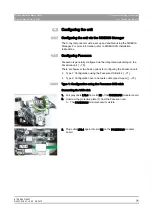
➢ Using a network cable, connect the PC directly to the GALILEOS
media converter with installed Facescan.
Opening the web dialog / general types 1
Opening the web dialog
1. Switch GALILEOS on.
2. Open up a web browser on the PC.
3. Enter the Facescan IP address into the web browser
(http://<IP-Adresse>).
ª
A password dialog box opens.
4. In the field
"User"
enter
"service"
.
5. In the field
"Password"
enter
"sirona"
.
ª
The
"Facescan Device Service "
web dialog opens.
Selecting the configuration dialog
Selecting the configuration dialog
➢ In the menu bar, select the menu item
"CONFIGURATION"
.
ª
The
"Facescan Configuration"
window opens.
Starting the configuration
1.
When selecting with DHCP:
Set the
"DHCP State"
field to
"On"
.
or
➢
When selecting without DHCP:
Set the
"DHCP State"
field to
"Off"
.
2. In the
"IP Adresse"
field, enter the desired IP address (factory setting:
192.168.16.240).
3. In the
"Netmask"
field, enter the desired subnet mask (factory setting:
255.255.255.0).
Completion / Configuration
Completing the configuration
➢ Confirm the configuration with the
"Configure Network"
button.
ª
The Facescan restarts with the modified settings.
Summary of Contents for galileos
Page 1: ...MSKOMNO d ifiblp kÉï ë çÑW båÖäáëÜ pÉêîáÅÉ j åì ä GALILEOS Service Manual ...
Page 2: ......
Page 387: ......

