62 38 328 D3439
6
D3439
.
092.05.03
.
02 04.2010
Removal of the block clamp
Sirona Dental Systems GmbH
Installation Instructions for Manual Block Clamp CEREC MC XL, inLab MC XL
3
Removal of the block clamp
Software version information
The milling unit is located in the block change position.
1. Switch the milling unit off at the main switch (0) and disconnect the power
plug.
2. Open the milling chamber door.
3. Loosen the milling instruments with the torque wrench and pull them out
manually.
4. Remove the installed automatic block clamp, see the operating instruc
-
tions.
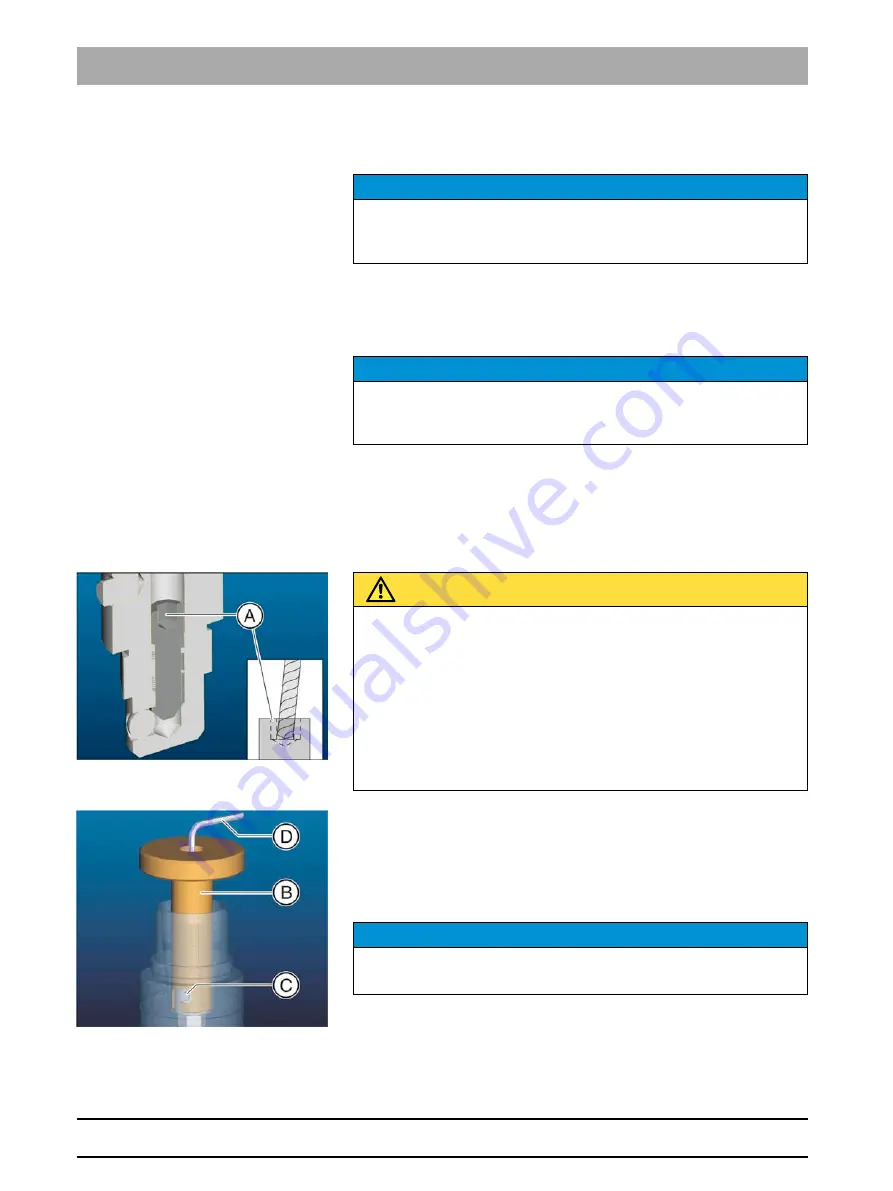
5. Remove the dirt deposits from hex socket A.
6. Insert the Allen key (D) into the socket as far as possible to prevent it from
slipping. Then loosen the fastening of the block fastener in the block
shaft.
7. Use the installation aid (B), to grasp the block fastener by the pin (C) and
pull it out.
NOTICE
Software version
Software version 3.60 or higher must be installed in order to use the manual
block clamp.
NOTICE
Leave the milling chamber screen inserted
Leave the milling chamber screen inserted. This will prevent any small parts
from falling into the tank.
CAUTION
Cleaning the hex socket, removing dirt deposits.
The hex socket (A) of the fastening for the block fastener may get clogged
with dirt.
In this case, you will not be able to loosen the fastening with the Allen key.
Carefully remove any dirt deposits using the 1.2 mm drill bit. Clamp the
drill bit in the tool holding fixture (see "Toolkit" [ 5]).
Make sure that the drill bit projects at least 20 mm.
Be careful not to damage the edges of the hex socket while removing dirt
deposits.
NOTICE
Block fastener
The removed block fastener is no longer required.
Summary of Contents for inLab MC XL
Page 2: ......
Page 3: ...MQKOMNM bob j uiI áåi Ä j ui kÉì ÄW aÉìíëÅÜ báåÄ ì åäÉáíìåÖ ÑΩê ã åìÉääÉ _äçÅâëé ååìåÖ ...
Page 4: ......
Page 83: ......
Page 85: ......
Page 86: ......
Page 87: ......
Page 88: ...NOTE BELOW THE LAST POSITION WHEN BE FULL AND RIGHT INSTALLED ...


