59 38 399 D3352
4 – 14
D3352.076.01.13.02
07.2008
4.3 Adjusting the panoramic X-ray unit
Tabs 4
Starting the exposure
3.
Take an exposure (60kV/3mA; 0.60 s):
– Press the
R key
to move the unit back to the starting position.
XG
Plus
:
The procedure is completed when the status message “ORTHOPHOS is
ready for exposure“ appears on the touchscreen and the exposure
parameters of service routine
S010.1
are displayed.
XG5 / 3 / 3 PPE:
The procedure is completed when the exposure parameters of service
routine
S010.1
are displayed and the progress indicator disappears.
– Press the release button. Hold down the release button until image ac-
quisition is completed and the preview image appears in the exposure
dialog box.
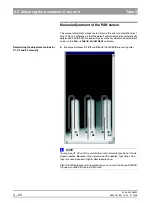
Evaluating the X-ray image
4.
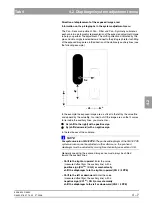
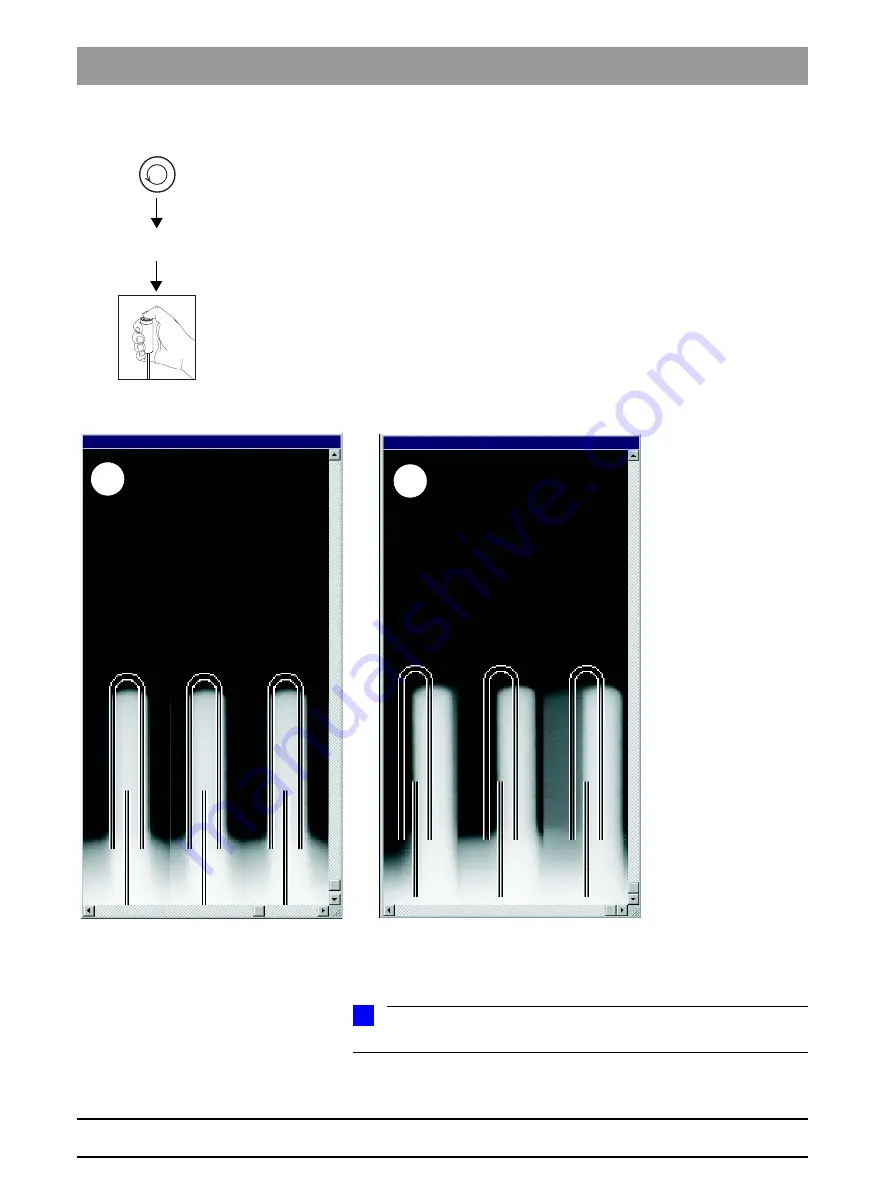
Evaluate the X-ray image:
– The three needle images must lie in the center of the exposed ar-
eas and inside the auxiliary lines (A).
NOTE
i
If these criteria are not fulfilled
(B)
, the pan sensor must be adjusted.
R
WAIT
!
UNTIL
UNIT
IS
IN
STARTING
POSITION
Adjustment: ok
A
B
Adjustment: not ok
Summary of Contents for ORTHOPHOS XG 3 DS
Page 4: ......
Page 9: ...ORTHOPHOS XG 1General information...
Page 12: ...59 38 399 D3352 1 4 D3352 076 01 13 02 07 2008 Tab1...
Page 59: ...ORTHOPHOS XG 2 Messages...
Page 124: ...59 38 399 D3352 2 66 D3352 076 01 13 02 07 2008 2 6 List of available service routines Tab 2...
Page 125: ...ORTHOPHOS XG 3 Troubleshooting...
Page 153: ...ORTHOPHOS XG 4 Adjustment...
Page 269: ...ORTHOPHOS XG 5 Service routines...
Page 433: ...ORTHOPHOS XG 6 Repair...
Page 436: ...59 38 399 D3352 6 4 D3352 076 01 13 02 07 2008 Tab6...
Page 530: ...59 38 399 D3352 6 98 D3352 076 01 13 02 07 2008 6 21 Replacing cables Tabs 6...
Page 531: ...ORTHOPHOS XG 7 Maintenance...
Page 577: ...b 59 38 399 D3352 D3352 076 01 13 02 07 2008...


