båÖäáëÜ
59 38 399 D3352
D3352.076.01.13.02
07.2008
6 – 15
Tab 6
6.2 Replacing the ring motor (M1_3)
6.2
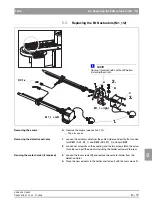
Reusing the coupling and flywheel
3.
Loosen set screws
C
and
D
and remove coupling
E
and absorber
F
from
the defective motor.
z
Attach the coupling and absorber to the new motor and retighten the set
screws.
NOTE
i
Seal
set screws
C
and
D
with Loctite 242 before tightening them.
Installing the new motor
z
Insert the new motor including coupling and absorber in the ring.
NOTE
i
While inserting the motor, turn it back and forth slightly until the pinion
engages in the ring gear.
z
Use the screws and serrated washers
B
to screw the new motor onto the
ring securely.
4.
Run the motor cable along its original path and plug it back into connector
X813
on board
DX1
(see "Laying cables when replacing the ring motor"
on page 6-16).
NOTE
i
Don't forget to reattach all cable ties and clamps.
Attaching the covers
z
Reattach the covers.
ATTENTION: What to do after replacement?
– Check the function of the ring motor.
– Perform the complete unit adjustment (see chapter 4).
Summary of Contents for ORTHOPHOS XG 3 DS
Page 4: ......
Page 9: ...ORTHOPHOS XG 1General information...
Page 12: ...59 38 399 D3352 1 4 D3352 076 01 13 02 07 2008 Tab1...
Page 59: ...ORTHOPHOS XG 2 Messages...
Page 124: ...59 38 399 D3352 2 66 D3352 076 01 13 02 07 2008 2 6 List of available service routines Tab 2...
Page 125: ...ORTHOPHOS XG 3 Troubleshooting...
Page 153: ...ORTHOPHOS XG 4 Adjustment...
Page 269: ...ORTHOPHOS XG 5 Service routines...
Page 433: ...ORTHOPHOS XG 6 Repair...
Page 436: ...59 38 399 D3352 6 4 D3352 076 01 13 02 07 2008 Tab6...
Page 530: ...59 38 399 D3352 6 98 D3352 076 01 13 02 07 2008 6 21 Replacing cables Tabs 6...
Page 531: ...ORTHOPHOS XG 7 Maintenance...
Page 577: ...b 59 38 399 D3352 D3352 076 01 13 02 07 2008...


