båÖäáëÜ
59 38 399 D3352
D3352.076.01.13.02
07.2008
6 – 17
Tab 6
6.3 Replacing the PAN actuators (M1_1/2)
6.3
6.3
Replacing the PAN actuators (M1_1/2)
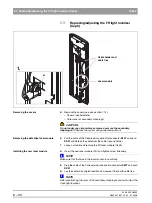
Removing the covers
z
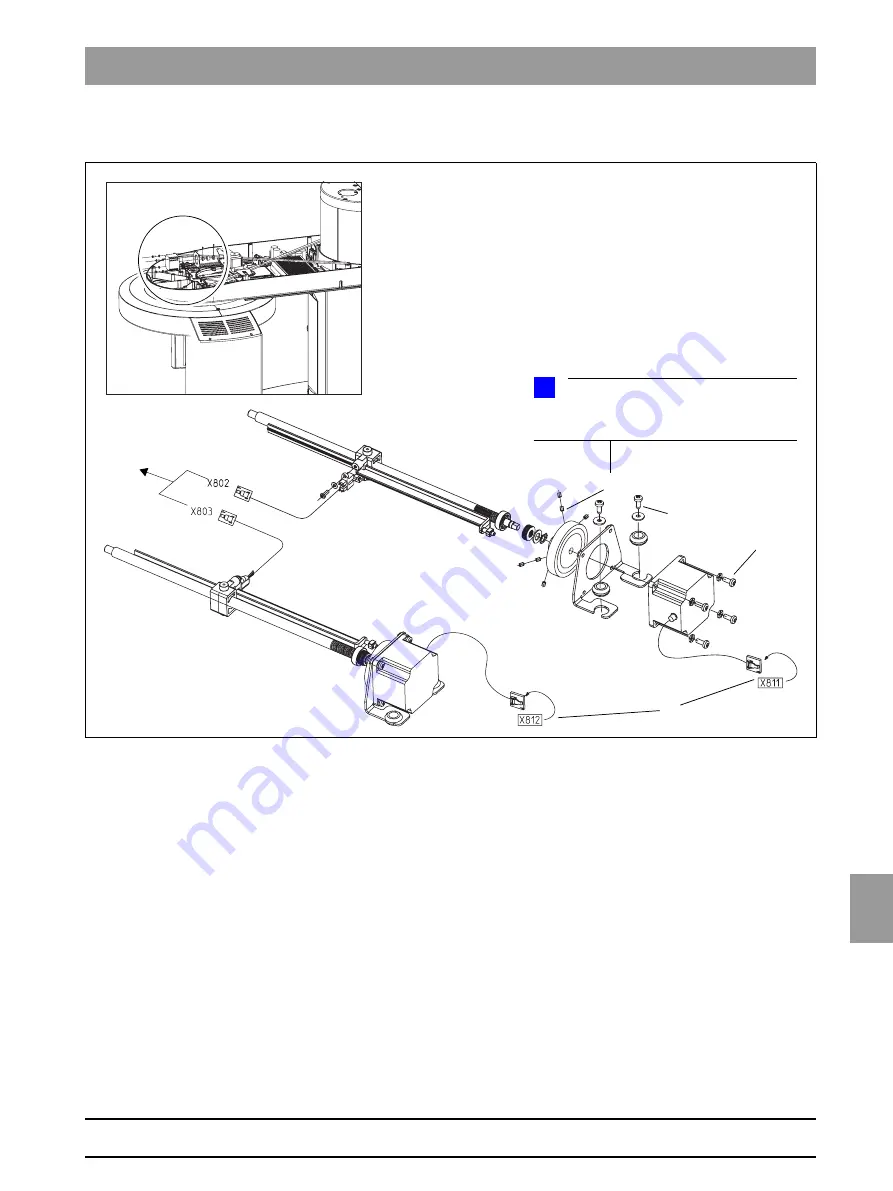
Remove the covers (see section 1.14):
– Top arm cover
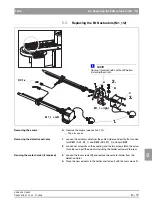
Removing the defective actuator
1.
Loosen the actuator cable from the cable holders and pull it off of connec-
tors
X811
(AK1; M1_1)
and
X812
(AK2; M1_2) on board
DX1
.
2.
Loosen set screws
A
on the coupling and the two screws
B
on the actua-
tor holder and pull the actuator including the holder out toward the rear.
Reusing the motor holder (if required)
3.
Loosen the four screws
(C)
and remove the actuator holder from the
defective motor.
z
Place the new actuator in the holder and fasten it with the four screws
C
.
M1_1 = right
M1_1 = left
A
B
C
NOTE
i
Seal set screws
A
with Loctite 242 before
fastening them tight.
1.
3.
2.
DX1
Summary of Contents for ORTHOPHOS XG 3 DS
Page 4: ......
Page 9: ...ORTHOPHOS XG 1General information...
Page 12: ...59 38 399 D3352 1 4 D3352 076 01 13 02 07 2008 Tab1...
Page 59: ...ORTHOPHOS XG 2 Messages...
Page 124: ...59 38 399 D3352 2 66 D3352 076 01 13 02 07 2008 2 6 List of available service routines Tab 2...
Page 125: ...ORTHOPHOS XG 3 Troubleshooting...
Page 153: ...ORTHOPHOS XG 4 Adjustment...
Page 269: ...ORTHOPHOS XG 5 Service routines...
Page 433: ...ORTHOPHOS XG 6 Repair...
Page 436: ...59 38 399 D3352 6 4 D3352 076 01 13 02 07 2008 Tab6...
Page 530: ...59 38 399 D3352 6 98 D3352 076 01 13 02 07 2008 6 21 Replacing cables Tabs 6...
Page 531: ...ORTHOPHOS XG 7 Maintenance...
Page 577: ...b 59 38 399 D3352 D3352 076 01 13 02 07 2008...


