båÖäáëÜ
59 38 399 D3352
D3352.076.01.13.02
07.2008
6 – 21
Tab 6
6.5 Replacing the Easypad (XG
Plus
) or the Multipad (XG 5 / 3 / 3 PPE)
6.5
6.5
Replacing the Easypad (XG
Plus
)
or the Multipad (XG 5 / 3 / 3 PPE)
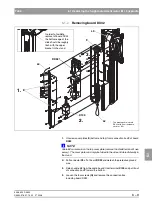
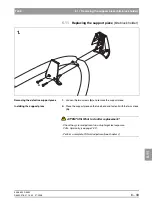
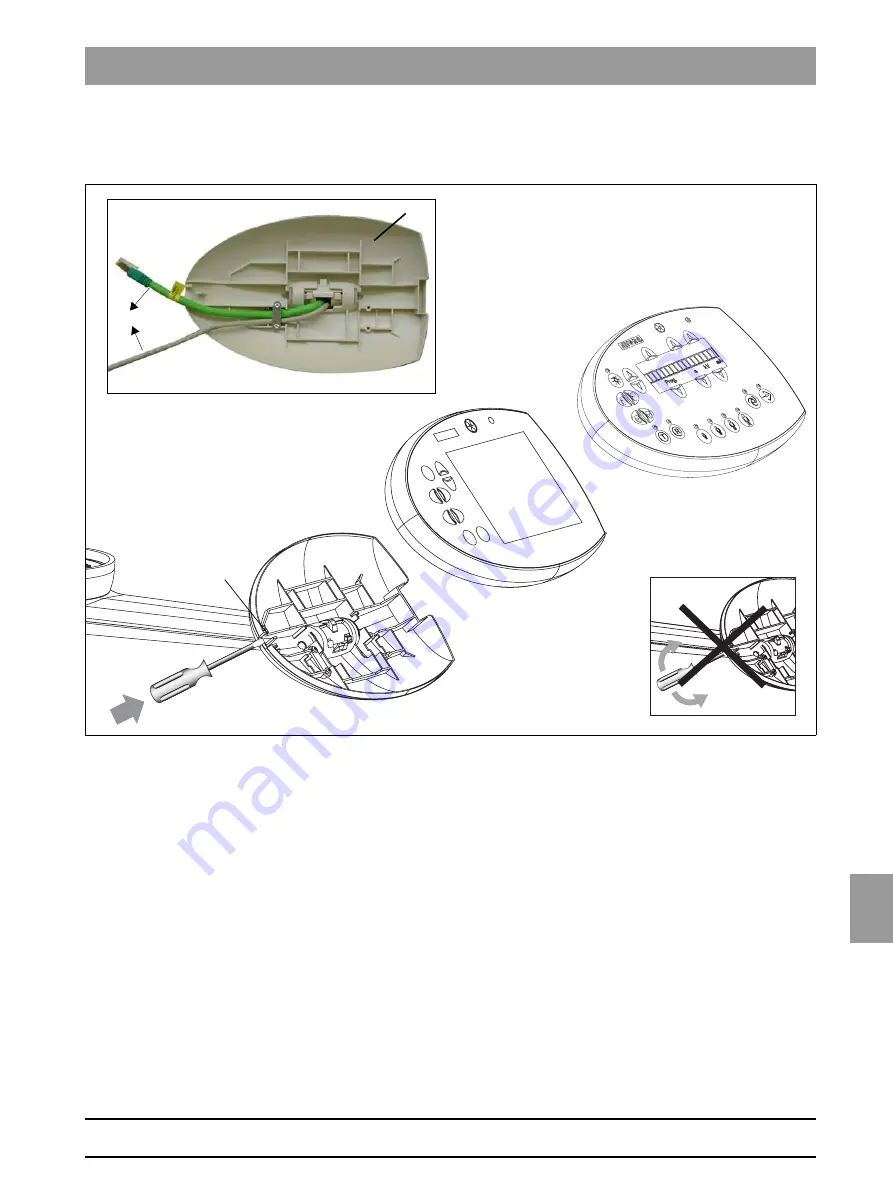
Removing the defective user interface
1.
Press into slit
A
of the housing cover with a screwdriver
(do not pry!)
and
remove the defective user interface from the control panel.
2.
Pull cables
L9
and
L10
off of connectors
X102
(L9) and
X103
(L10) on
board
DX7/DX71
.
1.
2.
L9 (X102)
L10 (X103)
DX7/DX71
Easypad (XG
Plus
)
Multipad (XG 5 / 3 / 3 PPE)
*
*
Shielded in unit HW version
BA and higher (see page
6-25)
A
Summary of Contents for ORTHOPHOS XG 3 DS
Page 4: ......
Page 9: ...ORTHOPHOS XG 1General information...
Page 12: ...59 38 399 D3352 1 4 D3352 076 01 13 02 07 2008 Tab1...
Page 59: ...ORTHOPHOS XG 2 Messages...
Page 124: ...59 38 399 D3352 2 66 D3352 076 01 13 02 07 2008 2 6 List of available service routines Tab 2...
Page 125: ...ORTHOPHOS XG 3 Troubleshooting...
Page 153: ...ORTHOPHOS XG 4 Adjustment...
Page 269: ...ORTHOPHOS XG 5 Service routines...
Page 433: ...ORTHOPHOS XG 6 Repair...
Page 436: ...59 38 399 D3352 6 4 D3352 076 01 13 02 07 2008 Tab6...
Page 530: ...59 38 399 D3352 6 98 D3352 076 01 13 02 07 2008 6 21 Replacing cables Tabs 6...
Page 531: ...ORTHOPHOS XG 7 Maintenance...
Page 577: ...b 59 38 399 D3352 D3352 076 01 13 02 07 2008...


