59 38 399 D3352
6 – 56
D3352.076.01.13.02
07.2008
6.19 Replacing the light barriers
Tabs 6
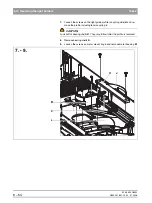
Installing light barrier V1_3
z
Screw new light barrier
V1_3
onto motor housing
M
securely.
z
Reattach motor housing
M
to motor mount ring
L
and screw them together
again with the four screws.
CAUTION
Seal the screws with Loctite 242.
z
Reinsert the left part of the bearing shell and bring the motor mount ring
along with the motor mount back into position.
z
Reinsert the right part of the bearing shell
K
with the guide profile
H
and
the tension spring
J
and tighten the profile screws loosely.
z
Reattach tensioning roller
G
to the motor housing with the eccentric bolt
from below and fasten the eccentric bolt from above using a washer and a
retaining ring.
z
Pull the rotary ring (with motor mount ring) into the frontmost position and
fasten the front screw of guide profile
H
securely.
z
Now push the rotary ring (with motor mount ring) into the rearmost posi-
tion (from the column) and fasten the rear screw of guide profile
H
secure-
ly.
z
Slide the rotary ring back and forth another 1 to 2 times to make sure that
it glides smoothly in the guide.
NOTE
i
Check to make sure that the guide profile is still sufficiently greased following
assembly. Grease the profile with Chesterton 622 if necessary.
z
Reinsert the lower wing plate
F
.
z
Insert both spindles with spindle nuts and screw the bearing cover back
on tight.
z
Reinsert upper wing plate
E
and refasten the wing plates with the
eight screws (
Note Tighten screw C for fastening the eccentric spring
only loosely!
).
z
Attach eccentric spring
D
to the eccentric bolt of the tensioning roller and
reattach it to screw
C
on the upper wing plate with a prestress of 2½ turns.
Tighten screw
C
securely.
z
Reinstall the ring motor (see page 6-15).
CAUTION
Note the correct procedure for laying the cables of the ring motor.
z
Now perform the cabling (see page 6-57).
Summary of Contents for ORTHOPHOS XG 3 DS
Page 4: ......
Page 9: ...ORTHOPHOS XG 1General information...
Page 12: ...59 38 399 D3352 1 4 D3352 076 01 13 02 07 2008 Tab1...
Page 59: ...ORTHOPHOS XG 2 Messages...
Page 124: ...59 38 399 D3352 2 66 D3352 076 01 13 02 07 2008 2 6 List of available service routines Tab 2...
Page 125: ...ORTHOPHOS XG 3 Troubleshooting...
Page 153: ...ORTHOPHOS XG 4 Adjustment...
Page 269: ...ORTHOPHOS XG 5 Service routines...
Page 433: ...ORTHOPHOS XG 6 Repair...
Page 436: ...59 38 399 D3352 6 4 D3352 076 01 13 02 07 2008 Tab6...
Page 530: ...59 38 399 D3352 6 98 D3352 076 01 13 02 07 2008 6 21 Replacing cables Tabs 6...
Page 531: ...ORTHOPHOS XG 7 Maintenance...
Page 577: ...b 59 38 399 D3352 D3352 076 01 13 02 07 2008...


