båÖäáëÜ
59 38 399 D3352
D3352.076.01.13.02
07.2008
7 – 15
Tab 7
7.7 Checking the tube data
7.
7
4.
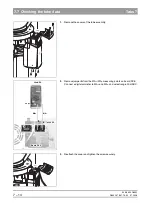
Switch the unit ON
å
.
Wait 1 min. for self-adjustment of the unit.
Press the
R key
ç
to return the X-ray tube head into the initial position.
z
Select
66 kV/8 mA
. Make SIDEXIS XG
ready for exposure.
z
As soon as program
P1
and
66 kV/8 mA
have been selected, the unit is
ready for exposure.
Measurement
5.
Press and hold down the exposure key until a meter reading is obtained.
The ammeter should indicate 8 mA ± 1.6 mA.
Record the display reading
.
NOTE
i
Display: 1mA corresponds to a tube current of 1mA, permissable tolerance
+/-20%.
If the measured value deviates from the permissible value (1 mA)
by more than ± 20 %:
‡
Replace the tube assembly (see 6-38)
z
If the specified value is obtained, switch the unit OFF.
6.
Remove the upper cover and
the meter leads.
z
Replace jumper!
z
Reattach the covers of the tube assembly.
n
*
*
o
o
XG 5 / 3 / 3 PPE
XG
Plus
Summary of Contents for ORTHOPHOS XG 3 DS
Page 4: ......
Page 9: ...ORTHOPHOS XG 1General information...
Page 12: ...59 38 399 D3352 1 4 D3352 076 01 13 02 07 2008 Tab1...
Page 59: ...ORTHOPHOS XG 2 Messages...
Page 124: ...59 38 399 D3352 2 66 D3352 076 01 13 02 07 2008 2 6 List of available service routines Tab 2...
Page 125: ...ORTHOPHOS XG 3 Troubleshooting...
Page 153: ...ORTHOPHOS XG 4 Adjustment...
Page 269: ...ORTHOPHOS XG 5 Service routines...
Page 433: ...ORTHOPHOS XG 6 Repair...
Page 436: ...59 38 399 D3352 6 4 D3352 076 01 13 02 07 2008 Tab6...
Page 530: ...59 38 399 D3352 6 98 D3352 076 01 13 02 07 2008 6 21 Replacing cables Tabs 6...
Page 531: ...ORTHOPHOS XG 7 Maintenance...
Page 577: ...b 59 38 399 D3352 D3352 076 01 13 02 07 2008...


