59 38 399 D3352
6 – 6
D3352.076.01.13.02
07.2008
6.1 Replacing the height adjustment motor (M1_4)/spindle
Tabs 6
6.1
Replacing the height adjustment motor
(M1_4)/spindle
6.1.1
Preparing for motor replacement
z
Remove the sensor and store it in a safe place.
z
Switch the unit ON.
Moving the unit up and removing the
profile covers
z
Use the UP/DOWN keys on the Easypad (XG
Plus
) or Multipad
(XG 5 / 3 / 3 PPE) to move the slide upward and remove the cover parts
(see section 1.14):
– Intermediate piece
– Profile covers, top and bottom
NOTE
i
Tip:
When unscrewing the profile cover, press it toward the top of the unit and
let it slide down after detaching it.
NOTE
i
If the height adjustment motor is inoperative, you can also move the slide man-
ually.
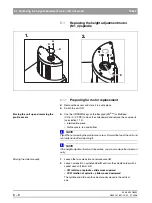
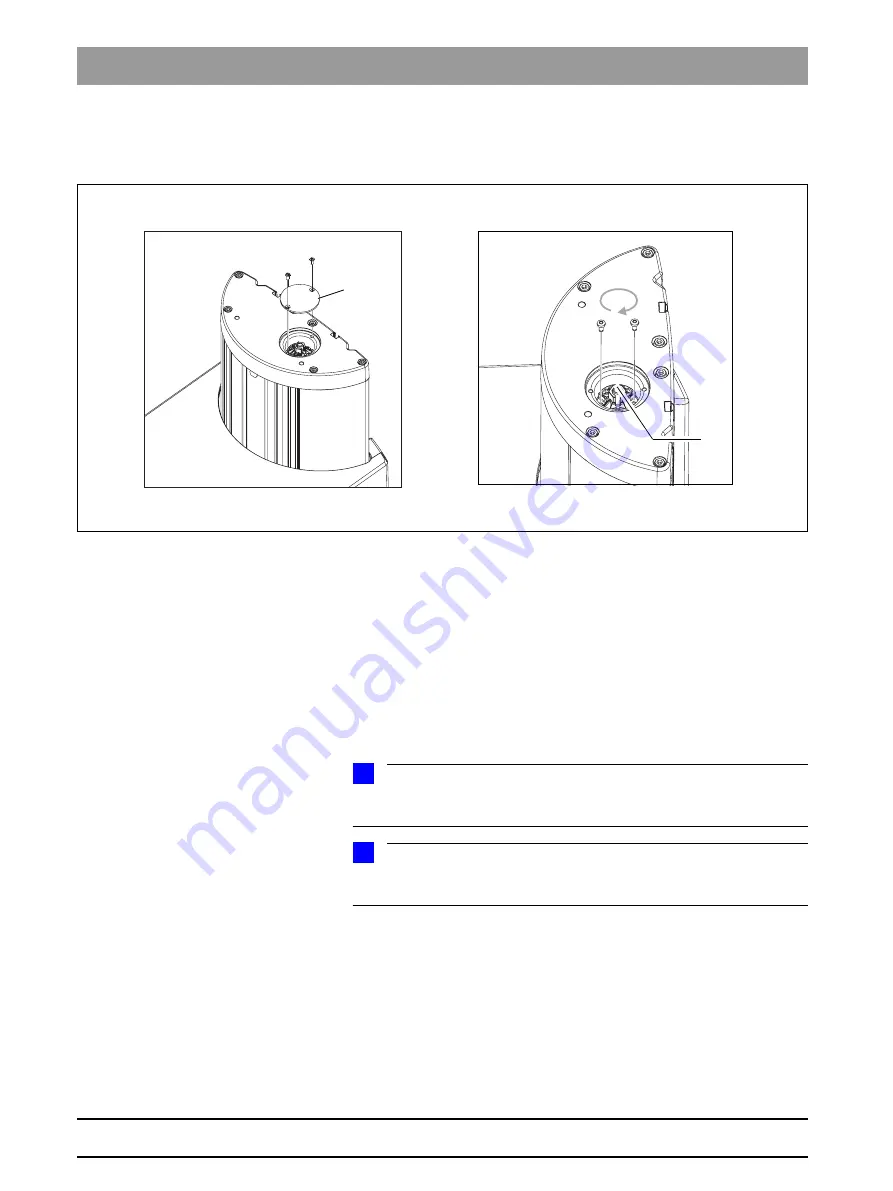
Moving the slide manually
1.
Loosen the two screws
A
and remove cover
B
.
2.
Loosen screws
C
on spindle holder
D
and turn the spindle holder with a
socket wrench (18 mm A/F):
– CW rotation of spindle = slide moves upward
– CCW rotation of spindle = slide moves downward
The spindle and slide can thus be manually moved in the vertical
axis.
1.
A
A
B
2.
C
C
D
Summary of Contents for ORTHOPHOS XG 3 DS
Page 4: ......
Page 9: ...ORTHOPHOS XG 1General information...
Page 12: ...59 38 399 D3352 1 4 D3352 076 01 13 02 07 2008 Tab1...
Page 59: ...ORTHOPHOS XG 2 Messages...
Page 124: ...59 38 399 D3352 2 66 D3352 076 01 13 02 07 2008 2 6 List of available service routines Tab 2...
Page 125: ...ORTHOPHOS XG 3 Troubleshooting...
Page 153: ...ORTHOPHOS XG 4 Adjustment...
Page 269: ...ORTHOPHOS XG 5 Service routines...
Page 433: ...ORTHOPHOS XG 6 Repair...
Page 436: ...59 38 399 D3352 6 4 D3352 076 01 13 02 07 2008 Tab6...
Page 530: ...59 38 399 D3352 6 98 D3352 076 01 13 02 07 2008 6 21 Replacing cables Tabs 6...
Page 531: ...ORTHOPHOS XG 7 Maintenance...
Page 577: ...b 59 38 399 D3352 D3352 076 01 13 02 07 2008...


