background image

SIRS NAVIGATION LTD 

COMPONENT MAINTENANCE MANUAL


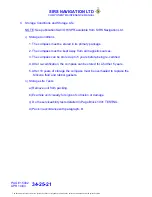
C  Storage Conditions and Storage Life 


   NOTE: See publication SAV/OH/SPR, available from SIRS Navigation Ltd. 
 
   i) Storage Conditions 
 

1. The compass must be stored in its primary package 


2. The compass must be kept away from all magnetic sources. 


3. The compass can be stored up to 5 years before being re-certified. 


4. After re-certification, the compass can be stored for a further 5 years. 


5. After 10 years of storage the compass must be overhauled to replace the 

Silicone fluid and rubber gaskets. 
 

ii)  Storage Life Tests 
 

a) Remove unit from packing. 


b) Examine unit visually for signs of corrosion or damage. 


c) Do the serviceability tests detailed in Page Block 1001 TESTING. 


d) Pack in accordance with paragraph. B. 


PAGE 15002 
APR 10/03


34-25-21

The document reference is online, please check the correspondence between the online documentation and the printed version.

Summary of Contents for KCA0101C

Page 1: ...ndicated are obsolete COMPONENT MAINTENANCE MANUAL WITH ILLUSTRATED PARTS LIST ISSUE 11 April 2003 TP1 APR 10 03 Compass House Bowes Estate Wrotham Road Meopham Kent DA13 0QB England Tel 44 0 1474 816...

Page 2: ...The document reference is online please check the correspondence between the online documentation and the printed version...

Page 3: ...ER 1984 S I 4 FEBRUARY 1985 APRIL 1985 S I 5 APRIL 1985 JUNE 1985 S I 6 OCT 1987 NOVEMBER 1987 S I 7 MARCH 1989 MAY 1989 S I 8 JUNE 1992 JANUARY 1993 S I 9 JUNE 2000 SEPTEMBER 2000 S I 10 JANUARY 2001...

Page 4: ...The document reference is online please check the correspondence between the online documentation and the printed version...

Page 5: ...UAL RECORD OF TEMPORARY REVISIONS INSERTED REMOVED PAGE No TEMP REV No ISSUE DATE DATE BY DATE BY RTR 1 APR 10 03 34 25 21 The document reference is online please check the correspondence between the...

Page 6: ...The document reference is online please check the correspondence between the online documentation and the printed version...

Page 7: ...2 FOR KCA0104FY 7 34 732 MAY 1988 EMBODIMENT OF MOD 02 FOR KCA0105W 7 34 733 MAY 1988 EMBODIMENT OF MOD 02 FOR KCA0106W 7 34 734 MAY 1988 EMBODIMENT OF MOD 02 FOR KCA0112W 7 34 735 MAY 1988 EMBODIMENT...

Page 8: ...The document reference is online please check the correspondence between the online documentation and the printed version...

Page 9: ...Apr 10 03 TESTING AND FAULT ISOLATION 1001 R Apr 10 03 1002 R Apr 10 03 1003 R Apr 10 03 1004 R Apr 10 03 1005 R Apr 10 03 1006 R Apr 10 03 1007 R Apr 10 03 1008 R Apr 10 03 1009 R Apr 10 03 1010 R A...

Page 10: ...9003 R Apr 10 03 ILLUSTRATED PARTS LIST 10001 R Apr 10 03 10002 R Apr 10 03 10003 R Apr 10 03 10004 R Apr 10 03 10005 R Apr 10 03 SPECIAL PROCEDURES 11001 R Apr 10 03 11002 R Apr 10 03 11003 R Apr 10...

Page 11: ...ools and Equipment 3001 Corrector Assembly 3001 Bellows 3001 Stem Assembly and Compass Card 3002 Lamp Housing Assembly 3002 Lead and Socket Assembly 3002 CLEANING General 4001 Stem Assembly 4001 Corre...

Page 12: ...g 7007 SPECIAL TOOLS EQUIPMENT FIXTURES AND MATERIALS General 9001 Electrical Supplies 9001 Tools Fixtures and Equipment 9001 Special Tools Necessary for Compass Adjustment 9002 ILLUSTRATED PARTS LIST...

Page 13: ...CTION ADJUSTMENT 11001 ABBREVIATIONS IN THIS GUIDE ABBREVIATION FULL DESCRIPTION AECMA ASSOCIATION OF EUROPEAN CONSTRUCTORS OF AIRCRAFT MATERIAL ATA AIR TRANSPORT ASSOCIATION OF AMERICA CMM COMPONENT...

Page 14: ...The document reference is online please check the correspondence between the online documentation and the printed version...

Page 15: ...t refer to maintenance on the component when it is installed on the aircraft The compass is a sealed unit and must be repaired by the manufacturer or an approved repair agent F Only use trained employ...

Page 16: ...CAUTIONS and NOTES before you work on the component These adjuncts to the text are used to highlight or emphasize important points when necessary WARNINGS call attention to use materials processes me...

Page 17: ...ors are installed above the compass bowl to reduce magnetic errors The complete compass can be turned to correct magnetic coefficient A errors B Description The compass card is of conic section with g...

Page 18: ...ide the corrector adjustment holes at the front of the compass bowl The lamp housing assembly 230 is a plastic moulding that is assembled to the base of the bowl and secured with a clip fit procedure...

Page 19: ...k 11001 Special Procedures E Leading Particulars The leading particulars for each compass are shown in table 1 below Code Size Weight Voltage dc Ambient Operating Temperture Lamp Resistor Body Colour...

Page 20: ...The document reference is online please check the correspondence between the online documentation and the printed version...

Page 21: ...tional Error ii Defective Lighting iii Slow Movement of the Compass Card iv Fluid Loss Air Bubble v Magnetic Correction Problems i Directional Error The compass will indicate an incorrect heading The...

Page 22: ...MODEL REPAIR IF NECESSARY MEASURE THE POWER SUPPLY CONTINUITY AND REPAIR IF FAULTY FILAMENT LAMP OPERATES PROBLEM SOLVED YES NO YES NO YES NO REPLACE THE LIGHT ASSEMBLY 230 YES FILAMENT LAMP OPERATES...

Page 23: ...must return to 1 degree of the North heading h Follow the procedure detailed in paragraphs d to g for East South and West headings i The compass must be repaired or replaced if it fails to return to 1...

Page 24: ...orth South corrector shaft counter clockwise with the corrector key Monitor the compass card movement It must be between 25 and 35 and of equal value to that recorded in paragraph e g Turn the magneti...

Page 25: ...Part No or Ref 1 Divided Test Head KTQ 0121 2 Sighting vane adapter KTQ 0122 3 Tilt Stand Adapter D KTQ 0124 4 Support Stand Adapter E KTQ 0125 5 Corrector Key CE2 40 6 Standard magnetic needle 3252 L...

Page 26: ...ht comes on C Temperature 1 Put the compass in an environmental chamber and decrease the temperature to 40 C 2 C for three hours in the refrigerator 2 Remove the compass from the environmental chamber...

Page 27: ...will cause a deviation error in the compass of approximately 2 5 2 Set the divided test head and its micrometer scale to be zero 3 Align the divided test head to magnetic north with use of the standar...

Page 28: ...k must be between 1 4 to 1 8 seconds 4 Follow the procedures in paragraphs 1 to 3 but move the card through 30 5 Follow the procedures in paragraphs 1 to 4 and test at East South and West F Friction E...

Page 29: ...difference between each test must not be more than 2 7 Align the compass to South 8 Follow the procedures in paragraphs 3 to 6 9 Align the compass to East 10 Follow the procedures in paragraphs 3 to 6...

Page 30: ...the compass at an angle of 22 5 from the front The value between the lubber line and the card must be North 2 5 left and right of the lubber line PAGE 1010 APR 10 03 34 25 21 The document reference i...

Page 31: ...pass and put in a clean glass container Push and pull the bellows 10 to help this procedure 3 Seal the glass container and keep in a cool dry dark environment 4 Heat the nut 40 with a soldering iron t...

Page 32: ...move the stem assembly and compass card 130 from the compass bowl 3 Remove the compass card from the stem assembly and put the stem assembly in a clean container D Lamp Housing Assembly 230 1 Remove t...

Page 33: ...4001 2 Procedure WARNING OBEY HEALTH AND SAFETY DATA SHEETS FOR ALL CLEANING MATERIALS A Stem Assembly 80 1 Clean in Electrical Cleaner and dry in a jet of clean dry air 2 Polish the sapphire cup with...

Page 34: ...be flushed with clean water and dried with a clean dry jet of air E Compass Card Assy 130 NOTE Do not clean the compass card The compass card will be have a layer of silicone fluid on its surface If y...

Page 35: ...uipment Tools listed in Page Block 9001 Item Description Part No or Ref 17 Vernier gauge N A 18 Binocular microscope x30 magnification N A 3 Detailed Procedure A Compass Bowl 180 1 Examine carefully f...

Page 36: ...a spherical radius of 0 13mm The pivot tip must not show signs of wear 3 Replace the compass card if it is damaged or if the pivot is worn D Lamp Housing Assembly 230 1 Examine the lamp spring is cap...

Page 37: ...ows 10 1 The depth of the bellows must be 8 9mm 0 350 in Ref Fig 5001 If the dimension is different adjust as detailed in Page Block 6001 Repair 2 Examine the condition of the painted surfaces of the...

Page 38: ...signs of cloudiness sediment or discoloration discard the fluid 2 If the fluid is clean and transparent put it in a clean container and decrease it to a temperature of 40 C in an environmental chamber...

Page 39: ...e KCA0106W Paint air drying grey Code L481G SIRS Navigation Ltd Compass Bowl Model type KCA0106W Materials Table 6001 2 Procedure A Card Assembly 130 There is no repair procedure for this item Replace...

Page 40: ...ved If the bellows component is defective it must be replaced D Surface Finish CAUTION DO NOT USE SOLVENTS ON PLASTIC COMPONENTS DO NOT EXPOSE THE COMPASS TO TEMPERATURES HIGHER THAN 85 C E Compass Bo...

Page 41: ...l Fluid Balancing paste 9415 SIRS Navigation Ltd Compass Card Balancing paste thinners 8590X1 SIRS Navigation Ltd Balancing Paste Filter paper 234 0337 10 SIRS Navigation Ltd Silicone Fluid Electrical...

Page 42: ...le pointer If the compass card is not level identify the high spot and follow the procedures detailed in paragraphs 5 to 6 4 If the balance is satisfactory follow the procedure detailed in paragraphs...

Page 43: ...pass card 130 in the balancing bowl and cover the bowl with a sheet of glass 5 Turn the test head slowly and record the reading at each 30 heading The card must be replaced if the error is greater tha...

Page 44: ...e bowl 180 with two screws 90 8 The compass card assembly must rotate freely within the bowl E Bellows Assembly CAUTION DO NOT DAMAGE THE GASKET 60 WITH SHARP EDGES OF THE ASSEMBLY COMPONENTS NOTE The...

Page 45: ...es the same task 4 Assemble the Silicone Fluid Container SFC 1 to the compass bowl Ref Fig 7002 5 Put the assembly into a vacuum chamber and fill the silicone fluid container with 50ml of clean silico...

Page 46: ...he washer disc filling plug and do the filling procedure again from paragraph 1 16 Solder the end of the nut 40 to the screw 30 to lock the components together G Corrector Assembly 160 1 Apply vibrati...

Page 47: ...sting a Test the compass as detailed in Page Block 1005 Testing Silicone Fluid Filling Rig Figure 7002 PAGE 7007 APR 10 03 34 25 21 The document reference is online please check the correspondence bet...

Page 48: ...The document reference is online please check the correspondence between the online documentation and the printed version...

Page 49: ...Number or Reference Vendor 1 2 3 4 5 6 7 8 9 10 11 12 Divided Test Head Sighting Vane Adapter Tilt stand Adapter D Support Stand Adapter E Corrector Key Standard Magnetic Needle Balancing Bowl Bellow...

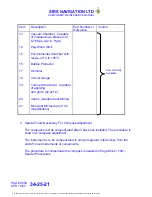
Page 50: ...rmer Binocular Microscope X 30 magnification Commercially Available 4 Special Tools Necessary For Compass Adjustment The compass must be compensated after it has been installed The procedure is known...

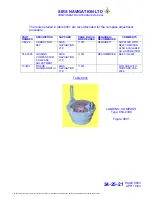
Page 51: ...D 11001 REQUIRED SUPPLIED WITH NEW COMPASS ALSO AVAILABLE AS A SPARE ITEM 954 2399 LANDING COMPASS FOR COMPASS ADJUSTMENT SIRS NAVIGATION LTD 11001 RECOMENDED SEE FIG 9001 130601 TRIPOD NON MAGNETIC S...

Page 52: ...The document reference is online please check the correspondence between the online documentation and the printed version...

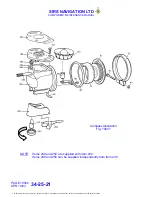
Page 53: ...and identification of replaceable parts and assemblies of units specified in this manual The abbreviation used for British Associated screw threads is BA NOTE MOD 01 compasses must be modified to stan...

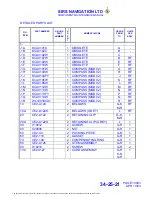
Page 54: ...g 10001 NOTE Items 240 and 250 are supplied with item 230 Items 240 and 250 can be supplied independently from item 230 PAGE 10002 APR 10 03 34 25 21 The document reference is online please check the...

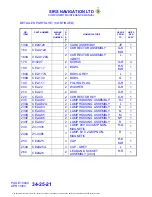
Page 55: ...12W 1 COMPASS MOD 02 M RF 1N KCA0113W 1 COMPASS MOD 02 N RF 1P KCA0113FY 1 COMPASS MOD 02 P RF 1Q KCA0114W 1 COMPASS MOD 02 Q RF 1R WL1001KCA1 1 COMPASS MOD 02 R RF 10 CE2 A124 2 BELLOWS G K M R RF 10...

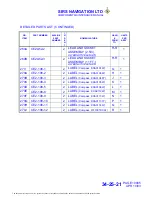
Page 56: ...G R 1 220 CE2 40 2 CORRECTOR KEY G R 1 230 CE2 A82 2 LAMP HOUSING ASSEMBLY HJ 1 230A CE2 A82G 2 LAMP HOUSING ASSEMBLY L 1 230B CE2 A83 2 LAMP HOUSING ASSEMBLY K 1 230C CE2 A84 2 LAMP HOUSING ASSEMBLY...

Page 57: ...1 270A CE2 108 2 2 LABEL Compass KCA0104W H 1 270B CE2 108 3 2 LABEL Compass KCA0104FY J 1 270C CE2 108 4 2 LABEL Compass KCA0105W K 1 270D CE2 108 5 2 LABEL Compass KCA0106W L 1 270E CE2 108 8 2 LAB...

Page 58: ...The document reference is online please check the correspondence between the online documentation and the printed version...

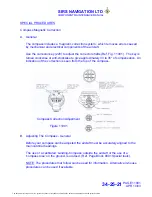
Page 59: ...is seen from the top of the compass Compass Correction Adjustment Figure 11001 B Adjusting The Compass General Before your compass can be adjusted the aircraft must be accurately aligned to the main...

Page 60: ...NOTE Example NORTH 3 EAST 2 SOUTH 7 WEST 8 3 2 7 8 10 10 4 2 5 Index Error 2 5 5 Do the adjustment for the index error as follows a Make a mark on the aircraft mounting bracket that is in line with th...

Page 61: ...e the compass does not move 7 Turn the aircraft to magnetic south 180 2 8 Turn the C corrector with the corrector key 220 until the compass shows 180 9 Remove the corrector key and make sure the compa...

Page 62: ...The document reference is online please check the correspondence between the online documentation and the printed version...

Page 63: ...d Assembly HERE Standby Compass HERE Transparent Polythene Bag 1 Heat seal the bag and remove as much air as possible during the procedure 2 Put the polythene bag in an ATA 300 category 2 foam lined c...

Page 64: ...fied 4 After re certification the compass can be stored for a further 5 years 5 After 10 years of storage the compass must be overhauled to replace the Silicone fluid and rubber gaskets ii Storage Lif...

Reviews:

Related manuals for KCA0101C