background image


USER´S MANUAL – Sitmed Equipamentos Médicos Ltda 


6 


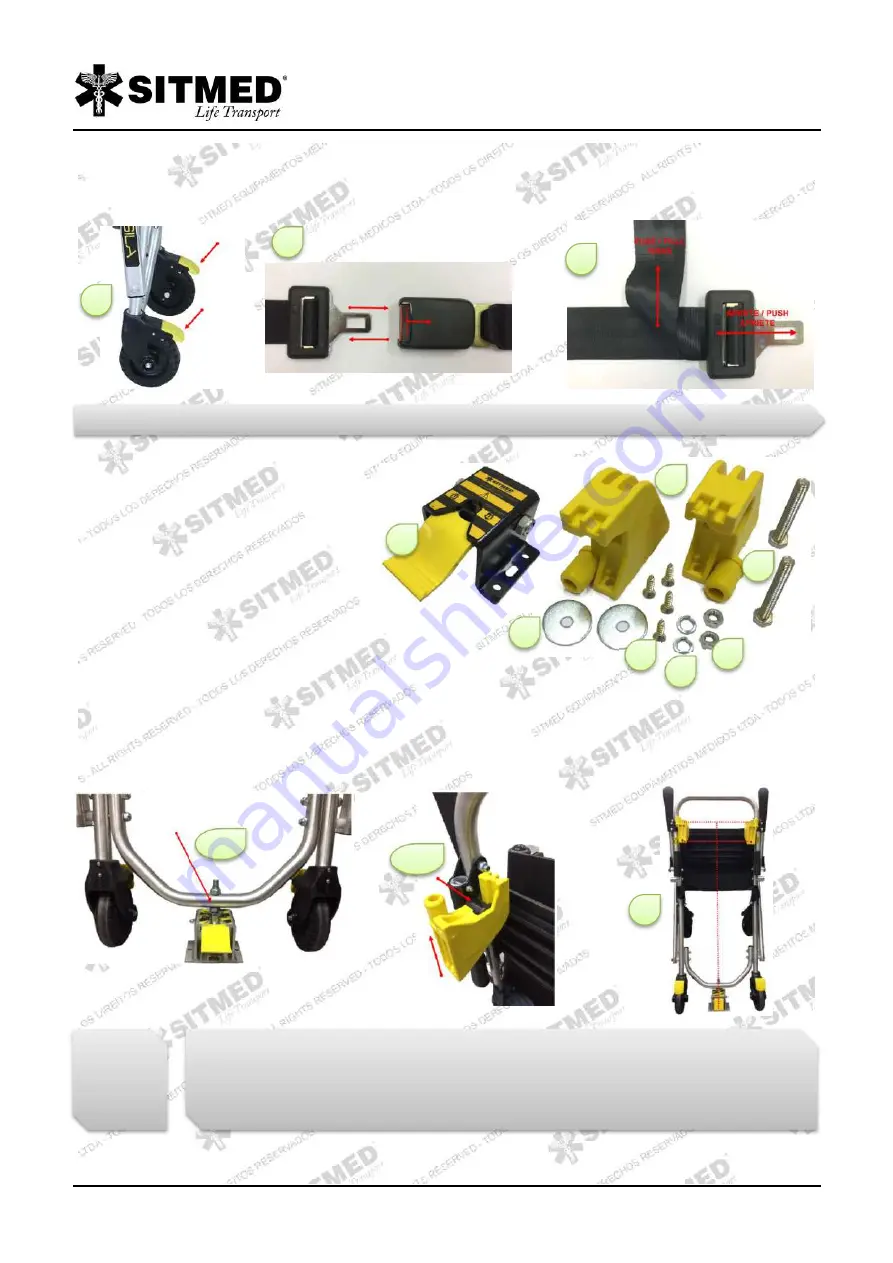
4. Before sitting or lifting the patient from the chair, lock the four casters (J) using the yellow "brake" in each of them. To lock it, simply push 
on the outer end of the part, causing it to be pressed against the wheel. To release, step on the opposite end causing the wheel to become 
free again. 5. Secure the patient using the safety belt (E). To open or close the belt, press the red button on the top of the engaging part by 
inserting or removing the metal coupling. 6. If necessary adjust the strap by pressing the metal coupling and pulling on the top of the strap. 


The ambulances chair installation kit contains the following items:


A)  01 – Locking ”Turtle”. 
B)  02 – Plastic stoppers.


C)  02 – 5/16 Plater washer. 
D)  04 – M6 X 25 self-tapping screws 
E)  02 – M8 Pressure washers 
F)  02 – M8 Nuts. 
G)  02 – M8 X 65 Screws. 


1. To install the chair, find a spot inside the ambulance where it can stand without any obstruction. 2. Attach the locking turtle (A) to the king 
pin and the plastic stoppers (B) in the rear couplers affixed to the chair. 3. Attach the assembly to the ambulance wall and mark the drilling 
to  be  performed  from  center  to  center  of  each  hole.  4.  Remove  the  assembly,  drill the marked  positions  and  attach the  locking  turtle and 
plastic stoppers with the supplied hardware. 5. Hold the chair simultaneously on the plastic stoppers and on the locking turtle, making sure it 
is firm and secure. 


4

5

6

SETTLING 

A

B

C

G

D

E

F

2A 

2B 

4


The rescue chair fasteners were not designed for patient transport. Never carry patients sitting in the chair while 
the ambulance is moving.


Summary of Contents for MCS 200

Page 1: ...or any content without the written consent of Sitmed SUMMARY DISCLAIMER 1 GENERAL INFORMATION 2 LIABILITY LIMITS 2 ATTENTION 2 FIRST AID POPULAR CONCEPT 2 PACKAGING AND STORAGE 2 EQUIPMENT S LIST 3 IDENTIFICATION AND TRACEABILITY 3 VISUAL COMMUNICATION 3 WARNINGS 4 RESCUE CHAIR MCS 200 ÁGILA 5 IMMOBILIZATION BOARD MIS 100 MEDUSE 7 FOLDABLE STRETCHER MPS 110 PANDORA 8 BI FOLDABLE STRETCHER MPS 120 ...

Page 2: ...s well as modifying the equipment by altering the original design generates risk of accidents and loss of warranty as well as the consequent liability of the owner for the damages it may cause Use only original parts provided by Sitmed and before servicing read this manual or contact Sitmed Technical Service for guidance and clarification Before using the equipment make sure that it is in perfect ...

Page 3: ...l which features model and reference number for tracking control To prevent loss wear and commitment in identifying serial equipment labels are affixed to hard to reach places yet easy viewing Look for the serial label on the bottom of your device to find the correct model you have so you can refer to the instructions in this manual Figure 1 Serial label template affixed to all Sitmed devices VISU...

Page 4: ... the load limit stipulated for each equipment Sanitize the same periodically or after each use Follow the preventive maintenance schedule performing the same according to the instructions in this manual All products and components used by Sitmed are recyclable Before disposing of parts or unused equipment check the need for disinfection or sterilization of the same If there is any doubt or difficu...

Page 5: ...nder handle H Footrest base I Fastener system for ambulances J Rubberized casters with 127mm diameter and brake system 1 Open the chair by pulling the arm and disarm bar F 2 Lock the arm and disarm bar and pushing it until the end of its course 3 Lower the armrest D lift the foldable arms B lower the footrest H and extend the extensor levers G as required RESCUE CHAIR MCS 200 ÁGILA A D G H J E C B...

Page 6: ...le B 02 Plastic stoppers C 02 5 16 Plater washer D 04 M6 X 25 self tapping screws E 02 M8 Pressure washers F 02 M8 Nuts G 02 M8 X 65 Screws 1 To install the chair find a spot inside the ambulance where it can stand without any obstruction 2 Attach the locking turtle A to the king pin and the plastic stoppers B in the rear couplers affixed to the chair 3 Attach the assembly to the ambulance wall an...

Page 7: ...s 1 2 3 and 4 Depending on the patient s weight two rescuers additional help may be necessary as they can be placed as illustrated at positions A and B Figure A Block transfer Lift the patient by keeping the spine stabilized and lying on the board Figure B 90 degrees rolling Roll the patient sideways keeping the spine stabilized placing the board underneath the patient and roll him back to the ori...

Page 8: ...opening or closing 2 Lay the patient on the stretcher whether or not immobilized to the immobilization board 3 Before transporting someone lock the patient with the seat belts B adjusting the buckle to ensure its stability FOLDABLE STRETCHER MPS 110 PANDORA D C A B E OPERATING INSTRUCTIONS 1 3 The MPS 110 PANDORA stretcher has a flexible synthetic base and it is not recommended to transport patien...

Page 9: ...tcher folding it lengthwise 4 Fold the stretcher 5 Store the stretcher inside its bag for transport BI FOLDABLE STRETCHER MPS 120 PANDORA 2 A B D C E F G OPERATING INSTRUCTIONS The MPS 120 PANDORA 2 stretcher has a flexible synthetic base and it is not recommended to transport patients with suspected cervical spine injury without being properly immobilized with a rigid board Do not use the stretch...

Page 10: ...M Adjustable backrest fowler with 8 adjusting positions N Air axle with rubberized casters and height adjustment system 1 Wheel brake To lock the wheels step on the bottom of the yellow part A and to release step on the top B 2 Double trigger side handles Press the top of the yellow trigger C simultaneously on both sides lowering the handle To close again simply return to the original position The...

Page 11: ...ve them or to put them in the cot pass the couplings inside the base handle trapping it in the structure of the cot The cot ambulance fastener installation kit contains the following items A 01 Aluminum V guide with stoppers B 01 Locking turtle with adjusting rail C 08 M8 pressure washer D 08 M8 X 65 Screws E 08 Plater washer 5 16 F 08 M6 X 50 self tapping screw G 08 M8 nuts The first step for ins...

Page 12: ...m and still After fixing the sets its necessary to perform a fine adjustment of the king pin and the locking turtle Test the cot anchorage by placing and pulling it out of its fastener with and without weight The perfect attachment consists of the simultaneous locking of the king pin on the turtle and the pins of the air axle on the frontal guide stoppers If necessary adjust the height of king pin...

Page 13: ...ng it in a 100 horizontal position until it is attached to the fastener system Pull the cot to make sure it is securely attached to its fastener 4 To remove the cot from inside the ambulance suspend the cot with one hand and use the other hand to trigger the locking turtle 5 Press the locking turtle lever down releasing the king pin 6 Pull the stretcher back holding the locking turtle lever until ...

Page 14: ...e operated by four rescuers placed in positions as indicated in the image PARTS AND FEATURES A Movable or fixed rear handle for transport B Steel set with king pin to lock on rear fastener C Polymer retraction lever D Safety belts with automotive couplings RETRACTILE COT MRS 340 TOP MOTION A D H L G E B I C F J M N K O Be alert when removing the cot from the ambulance while it is parked on steep o...

Page 15: ...damp cloth without the use of any abrasive product PARTS AND FEATURES A Safety belts with automotive couplings B 33 density mattress coated in 100 waterproof material electronically sewn C Hard tubular aluminum structure D Rubberized casters with 127mm diameter and brake system E Structural polymer unions of high strength and durability F Adjustable backrest fowler with 8 adjusting positions G Til...

Page 16: ... 100 waterproof material electronically sewn G Structural polymer unions of high strength and durability H Additional 3 casters for ground support I Tilting side handles with double trigger J Anti fall safety system K Articulated polymer joints L Hard tubular aluminum structure M Adjustable backrest fowler with 8 adjusting positions N Front stoppers coated with high impact PVC profile O Air axle w...

Page 17: ...ulance 6 until it locks to the fastener system The IV Pole and the O cylinder holder are both sold separately and may be attached to the Sitmed stretchers In the case of your stretcher having one of those accessories please proceed as follows IV POLE 1 Arm the bracket lifting the rod A in position 90 degrees until the yellow trigger automatically locks into the base of the bracket 2 Open the hitch...

Page 18: ...ried inside the ambulance D To install the clip choose a free wall inside the ambulance brace the clip on the wall mark the hole and secure with the supplied hardware PARTS AND FEATURES A Slim lightweight and compact B Additional support casters C Rubber castors with a diameter of 127mm and a brake system D Safety belts with automotive locks E Mattress density 33 coated in 100 waterproof material ...

Page 19: ... To remove the cot from the ambulance release it from the fasten system by pressing the locking lug as per instructions in this manual Pull the cot out of the ambulance without pulling any levers suspending the patient s weight and keeping the cot 100 level in the horizontal position Pull it until both legs lower by gravity and the telescopic system locks automatically INDEPENDENT RETRACTION SYSTE...

Page 20: ...est in second position use your both hands to pull up the straps E until the hooks clip in the under cavity F To back to the original position just pull up the system using your both hands G MULTI POSITIONS SYSTEM If your cot has the multi positions system you can use it to put the patient in several positions including Fowler position Trendelenburg and RCP position To put the patient in fowler po...

Page 21: ...e Med Rac as accessory The Med Rac are used as support for devices such as Monitors infusion pumps desfibrilators and others up to 30Kg To use your Med Rac you must open the side bases A loosening all gauntlets B in both sides Open the bases until the end and tight the gauntlets At this moment your Med Rac will look as a table C To fasten the equipment on the Med Rac use the velcro straps D adjust...

Page 22: ... with the cot in elevated position The blue area indicate where is possible the patient sit on the cot ADDITIONAL SAFETY SYSTEM Level Up II has a system that prevents accidental fall When unloading from the ambulance the system will set automatically making it impossible to pull the retraction levers To fold the legs to loading the cot into the ambulance use your thumb A and push the red lever out...

Page 23: ...hic articulation system X with height adjustment levels K Base in leaked plot for accessories transport with 15kg load capacity L Safety belts with automotive couplings M Adjustable backrest Fowler with 8 adjusting positions N Folding bed for transport in elevators and confined spaces O Air axle with rubberized casters and height adjustment system The cot ambulance fastener installation kit contai...

Page 24: ...try of the ambulance aligned with the fastener system so that there is room for the wheels frame to rise and fall freely 3 Attach the safety hook A on the movable bar B taking into account the movement of the bar causing it to be tensioned Mark the holes C remove the safety hook and the cot drill the marked holes be careful that the location chosen for the hook positioning does not compromise or d...

Page 25: ...onsists of raising his feet to at least 30 centimeters above the floor This position is called shock position This helps to keep the blood in vital organs where it is most needed 2 The MXS 330 ELEVEX cot makes it possible to place the patient in the shock position by activating the telescopic system similar to the movable backrest which is located under the patient s legs Pull the yellow trigger A...

Page 26: ...he anti recoil system A Pull the cot to be sure that it is fully engaged at the safety hook B 2 Lift the weight of the cot patient and pull the rear handle 3 Na additional rescuer C must be placed at one side of the cot to manually raise the wheels frame 4 Push the cot inside the ambulance until it gets locked on the fasteners 5 To remove the cot from inside the ambulance unlatch the king pin from...

Page 27: ...Components or loose parts with excessive wear and tear If bolts and nuts are tight and in their respective places Elastic pins out of position If casters are freely rotating and braking when brakes are triggered If all movable parts are correctly moving If the backrest is working in all tilt levels If the mattress is sanitized and free of perforations If the safety belts are sanitized well tight a...

Page 28: ...following schedule to perform periodic maintenance of your equipment thus ensuring its longest life and safety MONTH DATE RESPONSIBLE SHIFT VTR Nº NOTES JAN FEB MAR APR MAY JUN JUL AUG SEP OCT NOV DEC MONT DATE RESPONSIBLE SHIFT VTR Nº NOTES JAN FEB MAR APR MAY JUN JUL AUG SEP OCT NOV DEC ...

Page 29: ...e city of Flores da Cunha Brazil The buyer residing in another location will therefore be solely responsible for the costs and risks of the equipment transportation Warranty is valid only if duly proven defective manufacturing It will be necessary to prove the ownership of the equipment and the warranty period through the serial number and invoice of purchase of the equipment For full control of y...

Reviews: