background image

39

GB

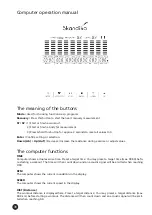
ODO

Shows the accumulated distance of all workouts with this device.

CAL (Calories)

The currently burned calories are displayed here.  The calorie consumption values registered and displayed 
with this computer merely serve as indicative values for a person of medium stature with medium resistance 
setting, and can deviate considerably from the actual medically precise calorie consumption. You may also 
set a target calorie consumption before training, max. value = 999 kcal.

WATT

Computer shows actual watt value.

PULSE

The computer is showing the user’s heart rate in beats per minute. For a correct display please ensure that 
you fully grasp the hand sensors. It may last up to 2 minutes before the pulse frequency will be measured 
correctly. You may also use a compatible chest belt - please find more about this topic in chapter „Using a 
chest belt“. If you use a chest belt, the measured frequency will also be displayed here. 

The different programs / modes

P1 - Manual mode

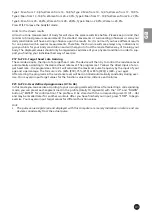
In manual mode you can adjust the load manually. You may select the tension level by using “UP” and 
“DOWN”. Press “ST/SP” to start or finish a workout. You may also enter target values for time and other 
functions.

P2 to P14: Mountain- and valley courses

Within this mode you can exercise with a preset programme profile and the computer will automatically 
change the tension level. You may additionally adjust the tension level with „UP“ and „DOWN“. You may
also input target values for different function values (e.g. time etc.)

P15: Exercise with preset Watt value

In this exercise mode, you can preset WATT and other values. After you have selected this mode, the device
will prompt you to input values (e.g. TIME, WATT etc.). Press „UP“ / „DOWN“ and „ENTER“ to input all these 
values. Press „ST/SP“ to start the exercise.
The Watt load depends on the rounds per minute and the level of resistance. The device is able to calculate
the Watt load and display the respective value. Your computer will control the tension automatically during
exercise. You can not adjust the resistance manually as usual in this programme!
Please pay attention, that if a watt preset value is of medical necessity in your case, you need definitely talk
to your doctor before using this device. Your doctor should accompany this exercise and should give you
advice on the use and surveillance.

P16: Body-fat measurement

This mode will process a body-fat measurement. In the following we will present you this technology and 
for what it is good. However, we strongly recommend to consult your physician before starting this body fat 
measurement in order to clarify if such a measurement by electrical current is suitable for you.

How to reach your ideal body type and improve your health
Being fit has many advantages, from helping you to control your weight to giving you a better night sleep.
Most important of all, there is impressive and mounting evidence that people who exercise regularly, and in
the right way, are less prone to killer diseases such as heart attacks and strokes and live longer than people
who do not exercise.
Different diseases like e.g. diabetes, heart diseases and certain forms of cancer can be controlled or even
avoided by controlling body fat levels.

Summary of Contents for ELSKLING E 520

Page 1: ...Art Nr SF 2460 SF 2461 Aufbau und Bedienungsanleitung Assembly instructions and user guide Instructions de montage et mode d emploi DE GB FR HEIMTRAINER ERGOMETER ELSKLING E 520...

Page 2: ...e mit Ihrem Smartphone Inhaltsverzeichnis Wichtige Sicherheitshinweise 3 Aufbauanleitung 4 Auf und Abw rmen 13 Computer Bedienungsanleitung 14 Benutzung eines Brustgurtes 18 Verwendung der Apps Fitnes...

Page 3: ...htspersonen sollten sich Ihrer Verantwortung bewusst sein da aufgrund des nat rlichen Spieltriebes und der Experimentierfreudigkeit der Kinder mit Situationen zu rechnen ist f r die Trainingsger te ni...

Page 4: ...tehenden Gesundheitsproblemen Personen wie Kinder Invaliden und behinderte Menschen sollten das Ger t nur im Beisein einer weite ren Person die eine Hilfestellung und Anleitung geben kann benutzen Ach...

Page 5: ...teller 1 Set Griffst tze Abdeckung Sensorkabel 1 Set Computer mit Schrauben 1 Set OPTIONAL Sattel mit Befestigungs material 1 Set Optional Hintere Griffst tzen abdeckung 1 Vordere Griffst tzen abdecku...

Page 6: ...hand der Checkliste ob alle notwendi gen Teile f r den Aufbau vorhanden sind Evtl sind schon einige Teile vormontiert um Ihnen den Aufbau zu erleichtern Wir empfehlen den Aufbau mit 2 Personen durchzu...

Page 7: ...chten Pedalarm durch Aufschrauben im Uhrzeigersinn das lin ke Pedal 23L wird entsprechend am linken Pedalarm befestigt Schraubrichtung entgegen dem Uhrzei gersinn Die Pedale sind zur besseren Zuordnun...

Page 8: ...en ber die Sattelst tze 3 wie abgebildet und diese dann in den Hauptrahmen 1 Richten Sie die Bohrungen zueinander aus und sichern Sie die St tze mit dem Fest steller 22 Die Sitzh he kann entsprechend...

Page 9: ...9 DE Schritt 4 Montieren Sie den optionalen Sattel 8 mit Hilfe des Festellers 19 und der Unterlegscheibe 57 an der Sattelverstellung 4...

Page 10: ...ie Abdeckung 43 von unten ber die Griffst tze 2 und verbinden Sie das obere Sensorkabel 48 mit dem unteren Sensorkabel 49 Setzen Sie die Griffst tze 2 in den Hauptrahmen 1 ein und befestigen Sie diese...

Page 11: ...n Handgriff 5 an der Griffst tze 2 mit Hilfe des T Feststellers 16 der vorderen Griff st tzenabdeckung 14 der H lse 46 und der Schraube 52 Anschlie end befestigen Sie die hintere Grifftst tzenabdeckun...

Page 12: ...ieferten Adapter welcher an eine normale Steckdose angeschlossen wird Bei einem evtl Neukauf Ersatz des Adapters ist darauf zu achten dass dieser T V GS gepr ft ist und dem Ger tesicherheitsgesetz und...

Page 13: ...gesteigert werden Aufw rmen Die Phase verbessert den Blutfluss und hilft der Muskulatur richtig zu arbeiten Durch Aufw rmen wird das Risiko eines Krampfes oder von Muskelverletzungen reduziert Es ist...

Page 14: ...ings oder ver ndert Eingabewerte Die Computerfunktionen TIME Zeit Der Computer zeigt die aktuelle Trainingszeit an Vor Beginn eines Trainings k nnen Sie die Trainingszeit auch vorgeben Die Zeit l uft...

Page 15: ...Bei diesem Betriebsmodus haben Sie die M glichkeit eine Leistung in WATT nebst weiteren Vorgaben ein zugeben Nach der Auswahl der Modus fragt der Computer verschiedene Werte wie z B TIME Zeit oder WAT...

Page 16: ...e Herzfrequenz von 60 oder darunter haben In diesen F llen kann die Messung bzw deren Ergebnis nicht als absolutes Ergebnis angesehen werden sondern lediglich als relativer Wert zur Ermittlung der Ver...

Page 17: ...quenz auf dem einge stellten Wert zu stabilisieren Das Programm 17 erlaubt die direkte Eingabe einer Zielherzfrequenz und die Programme 18 bis 20 ermittlen die maximale Pulsfrequenzvorgabe durch den g...

Page 18: ...erh ht die Kontaktsen sibilit t und erm glicht eine bessere Funk bertragung an den Empf nger 3 Legen Sie den Brustgurt so an dass die Elektroden auf der Innenseite direkt an der Brust anliegen Sie k n...

Page 19: ...laden oder die App zu teilen Mit diesem Icon gelangen Sie wieder zur Seite f r die Zielvorgaben Es folgt die Auswahl des Trainingsger tes Tippen Sie auf das Fahrradsymbol um automatisch nach verf g ba...

Page 20: ...wiedergeben lassen Wechselt zur Auswahlseite des Sportger tes Multianzeigefeld f r die Funk tionen Trainingszeit Tempo Entfernung Odometer Kalorien verbrauch Puls usw Ist SCAN aktiviert werden die ver...

Page 21: ...Store https itunes apple com nl app kinomap fitness id611177969 mt 8 Google Play Store https play google com store apps details id com kinomap fitness Installieren und ffnen Sie die App und melden Sie...

Page 22: ...22 Explosionszeichnung...

Page 23: ...23 DE...

Page 24: ...rollenendkappen 2 40 Abdeckung f r vorderen Stand fu 1 41 Rechte Abdeckung f hinteren Standfu 1 42 Linke Abdeckung f hinteren Standfu 1 43 Abdeckung 1 44 Lager 2 45 Feder 2 46 H lse 1 47 Kabel 1 48 Ob...

Page 25: ...r Wahl unentgeltlich instand gesetzt oder durch einwandfreie Teile ersetzt werden Die Kosten f r Material und Arbeits zeit werden von uns getragen Instandsetzungen am Aufstellungsort k nnen nicht verl...

Page 26: ...h your smartphone Table of contents Important safety notice 27 Assembly instructions 28 Warm up and cool down 37 Computer operation manual 38 Using a chest belt 42 Using the apps Fitness Data KinoMap...

Page 27: ...to situations which may arise for which the device has not been designed and which may occur due to children s natural play instinct and interest in experimenting If you do allow children to use this...

Page 28: ...health problems Children disabled and hadicapped persons should use the device only under supervision and in presence of another person who may give support and useful instructions Be sure that your b...

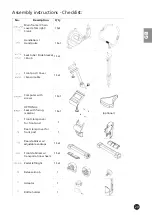
Page 29: ...cket Knob 1 Set Front post Cover Sensor cable 1 Set Computer with screws 1 Set OPTIONAL Seat with fixing material 1 Set optional Front clamp cover for front post 1 Rear clamp cover for front post 1 Re...

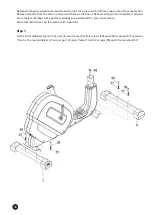
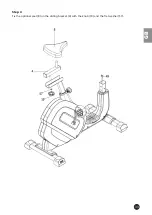
Page 30: ...ccording to the checklist if all parts are complete Perhaps some parts are already pre assembled for your convenience We recommend to set up the device with 2 persons Step 1 Fix the front stabilizer 6...

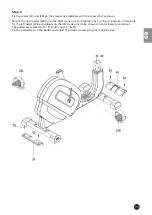
Page 31: ...dal 23R onto the right crank arm and tighten it by turning it clockwise Afterwards fix the left pedal 23L accordingly on the left crank arm to be screwed in anti clockwise direction The pedals are mar...

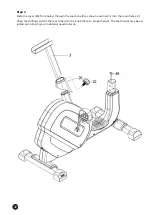
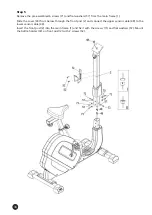
Page 32: ...m below through the seat tube 3 as shown and insert it into the main frame 1 Align the drillings and fix the seat tube with the knob 22 at a proper height The seat height may be ad justed according to...

Page 33: ...33 GB Step 4 Fix the optional seat 8 on the sliding bracket 4 with the knob 19 and the flat washer 57...

Page 34: ...ame 1 Slide the cover 43 from below through the front post 2 and connect the upper sensor cable 48 to the lower sensor cable 49 Insert the front post 2 into the main frame 1 and fix it with the screws...

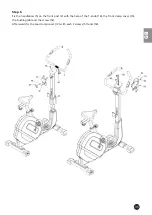
Page 35: ...Step 6 Fix the handlebars 5 on the front post 2 with the help of the T knob 16 the front clamp cover 14 the bushing 46 and the screw 52 Afterwards fix the rear clamp cover 13 with each 2 screws 51 an...

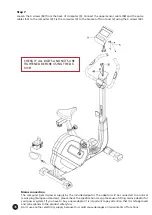
Page 36: ...CE Mains connection The computer gets its power supply by the included adaptor The adaptor will be connected to a normal mains plug European standard please check the specifications resp please use a...

Page 37: ...tely 30 seconds Never force or jerk yourself into a stretching position if you feel pain STOP immediately Warm up exercises may also include brisk walking jogging jumping jacks jump rope exercises or...

Page 38: ...or adjust values The computer functions TIME Computer shows actual exercise time Preset a target time You may preset a target time max 99 00 befo re starting a workout The time will then count down an...

Page 39: ...se with preset Watt value In this exercise mode you can preset WATT and other values After you have selected this mode the device will prompt you to input values e g TIME WATT etc Press UP DOWN and EN...

Page 40: ...ed if you belong to these groups People over 70 years of age Dialyse Patients People who suffer from Oedema Intensive sport people Bodybuilders Professional athletes If when relaxing your heart rate i...

Page 41: ...es require the input of a target heart rate The device will then try to control the resistance level automatically according to the desired heart rate level The programme 17 allows the direct input of...

Page 42: ...e belt with the 2 buttons Moisten the electrodes slightly before wearing the belt This increases the contact sensibility and enables a better wireless signal trans mitting 3 Put on the chest belt and...

Page 43: ...cise devices If the computer of your bike is not found check whether the Bluetooth function is not activated properly or if the computer is in sleep mode If the computer is in sleep mode start to peda...

Page 44: ...select local stored music files for playback Switch to selection page of exercise devices Multiple function value display for time speed distance odo meter calories pulse etc If SCAN is activated all...

Page 45: ...the links below Apple App store https itunes apple com nl app kinomap fitness id611177969 mt 8 Google Play Store https play google com store apps details id com kinomap fitness Install and open the a...

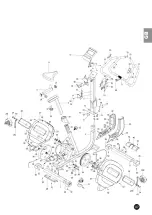
Page 46: ...46 Exploded diagram...

Page 47: ...47 GB...

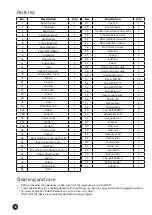
Page 48: ...40 Front stabilizer cover 1 41 Rear stabilizer cover R 1 42 Rear stabilizer cover L 1 43 Front clamp cover 1 44 Bearing 2 45 Spring 2 46 Bushing 1 47 Cable 1 48 Upper tension cable 1 49 Lower tension...

Page 49: ...e to environ mental influences and in case of improper handling maintenance e g due to non observance of the instruction manual or mechanical damages The customer service may authorize you to replace...

Page 50: ...ne Contenu Informations de s curit importantes 51 Instructions de montage 52 Echauffement et r cup ration 61 Mode d emploi de l ordinateur 62 Utilisation d une sangle de poitrine 66 Utiliser les appli...

Page 51: ...surveillance Les parents et autres surveillants doivent tre conscients de leur responsabilit car l instinct natu rellement joueur et la soif d exp rimentation des enfants peut tre l origine de situat...

Page 52: ...probl mes de sant Les personnes comme les enfants les invalides et les personnes handicap es ne sont autoris es uti liser l appareil qu en pr sence d une autre personne pouvant leur pr ter assistance...

Page 53: ...selle Vis de verrouillage 1 Ens Support de poign e Couverture C ble capteur 1 Ens Ordinateur avec vis 1 Ens EN OPTION Selle avec mat riel de montage 1 Ens en option Couverture 1 arri re Couverture ava...

Page 54: ...n constater combien il y en a Contr lez l aide de la liste de con tr le si toutes les pi ces n cessaires pour l assemblage sont pr sentes Nous recommandons d installer l appareil avec 2 personnes tape...

Page 55: ...rotation dans le sens horaire La p dale gauche 23L est viss e de la m me mani re sur le c t gauche Attention sens de rotation dans le sens antihoraire L attribution des pi ces d tach es ventuellement...

Page 56: ...er le couvercle 20 sur la tige de selle 3 par le bas comme illustr et ins rez la tige de selle 3 dans le cadre principal 1 et fixez l aide d un vis de verrouillage 22 La hauteur du si ge peut tre ajus...

Page 57: ...57 FR tape 4 Montez la selle optionnelle 8 sur le dispositif de r glage de la selle 4 l aide de la vis de verrouillage 19 et de la rondelle 57...

Page 58: ...ercle 43 par le bas sur le support de poign e 2 et connectez le c ble du capteur sup rieur 48 au c ble du capteur inf rieur 49 Ins rez le support de poign e 2 dans le cadre principal 1 et fixez le l a...

Page 59: ...R tape 6 Fixez la poign e 5 au support de poign e 2 l aide de la fixation en T 16 du couverture avant 14 du manchon guidage 46 et de la vis 52 Maintenant fixez le couverture arri re 13 avec 2 vis 51 e...

Page 60: ...appareils et aux autres sp cifications L appareil ne DOIT EN AUCUN CAS tre raccord A UNE AUTRE SOURCE DE COURANT cela pouvant causer des perturbations consid rables du fonctionnement tape 7 Retirez l...

Page 61: ...eur s appara t Les exercices de r chauffement peuvent galement inclure la marche rapide le jogging les sauts la corde les exercices de saut ou la course sur place TIRAGE Les muscles peuvent tre tir s...

Page 62: ...cice ou modifie les valeurs d entr e Les fonctions d ordinateur TIME Temps L ordinateur affiche le temps d entra nement actuel Saisie d un temps Avant de commencer l entra nement vous pouvez galement...

Page 63: ...toujours effectuer des r glages manuels de la r sistance l aide des boutons UP et DOWN Ce mode vous permet galement de r gler des valeurs cibles temps par exemple P15 Exercice avec valeur Watt pr d f...

Page 64: ...60 ou moins en tat de repos Dans ces cas le r sultat des mesures ne peut tre vu comme r sultat absolu mais seulement comme une valeur relative r sultant d un changement durant une certaine p riode Con...

Page 65: ...ent commande automatique en fonction de votre fr quence cardiaque Par cons quent une fr quence d impulsion cible doit tre d finie Si vous avez choisi le programme 17 vous devez entrer directement une...

Page 66: ...e de l metteur Cela augmente la sensibilit de contact et optimise la transmission radio vers l ordinateur 3 Portez la sangle de poitrine de mani re ce que les faces int rieures des lectrodes reposent...

Page 67: ...ppareils d exercice Si l ordinateur de votre v lo n est pas trouv v rifiez si la fonction Bluetooth n est pas activ e correctement ou si l ordinateur se trouve en mode veille Si l ordinateur est en mo...

Page 68: ...r et jouer des morceaux de musique enregistr s sur votre appareil Retour la page de s lection de l quipement sportif Affichage multifonctions dur e d entra nement rythme distance oxym tre calories br...

Page 69: ...iens ci dessous Apple App Store https itunes apple com nl app kinomap fitness id611177969 mt 8 Google Play Store https play google com store apps details id com kinomap fitness Installez puis ouvrez l...

Page 70: ...70 Vue explos e...

Page 71: ...71 FR...

Page 72: ...e droite 1 38 C ble du capteur 1 39 Rouleau de transport 2 40 Couverture pour stabilisateur avant 1 41 Couverture d pour stabilisa teur arri re 1 42 Couverture g pour stabilisa teur arri re 1 43 Couve...

Page 73: ...ou d un entretien mal r ali s non respect du manuel d utilisation ou de dommages m caniques Le service clients peut vous autoriser remplacer ou r parer des pi ces d fectueuses apr s consultation t l...

Page 74: ...__________________________________________________ _____________________________________________________ _____________________________________________________ _________________________________________...

Page 75: ...___________________________________________________ _____________________________________________________ _____________________________________________________ ________________________________________...

Page 76: ...Vertrieb Service durch MAX Trader GmbH Wilhelm Beckmann Stra e 19 45307 Essen Deutschland WEE Reg Nr DE81400428 SF 2460 2461 de_en_fr 12 2019 Ver 1 1...

Reviews: