background image

44

GUARANTEE CONDITIONS

For our devices we provide a warranty as defined below.
1.  In accordance with the following conditions (numbers 

2-5) we repair defect or damage to the device free of 
charge, if the cause is a manufacturing defect. There-
fore, these defects / damages need to be reported to us 
without delay after appearance and within the warranty 
period of 24 months after delivery to the end user. The 
warranty does not cover parts, which easily break (e. 
g. glass or plastic). The warranty does not cover slight 
deviations of the product, which are insignificant for 
usability and value of the device and damage caused 
by chemical or electrochemical effects and damages 
caused by penetration of water or generally force 
majeure damage.

2.  The warranty achievement is the replacement or repair 

of defective parts, depending on our decision. The 
cost of material and labor will be borne by us. Repairs 
at customer site cannot be demanded. The proof of 
purchase along with the date of purchase and / or 
delivery is required. Replaced parts become our prop-
erty.

3.  The warranty is void if repairs or adjustments are made, 

which are not authorized by us or if our devices are 
equipped with additional parts or accessories that are 
not adapted to our devices. Furthermore, the warranty 
is void if the device is damaged or destroyed by force 
majeure or due to environmental influences and in 
case of improper handling / maintenance (e.g. due to 
non-observance of the instruction manual) or mechan-
ical damages. The customer service may authorize you 
to replace or repair defective parts after telephone 
consultation. In this case, the warranty is not void.

4.  Warranty services do not extend the warranty period 

nor do they initiate a new warranty period.

5.  Further demands, especially claims for damages which 

occured outside the device, are excluded as long as a 
liability is not obligatory legal.

6.  Our warranty terms - which cover the requirements and 

scope of our warranty conditions - do not affect the 
contractual warranty obligations of the seller.

7.  Parts of wear and tear are not included in the warranty.
8.  The warranty is void if not used properly or if used in 

gyms, rehabilitation centers and hotels. Even if most 
of our units are suitable for a professional use, this 
requires a separate agreement.

In accordance with our policy 
of continual product impro-
vement, we reserve the right 
to make technical and visual 
changes without notice.

For spare parts please contact: 

service@skandika.de 

Service centre: 

MAX Trader GmbH, Wilhelm-Beckmann-Straße 19, 45307 Essen, 

Germany

ENVIRONMENTAL PROTECTION

At the end of its life cycle, this product must not be disposed of with household waste but must be taken to a 
collection unit for the recycling of electric and electronic equipment. The symbol on the product, the instruc-
tions for use or the packaging express mention of this. The basic materials can be recycled as specified on the 
labelling. When recycling the materials and finding other utilisation for used equipment, you are making a signi-
ficant contribution towards protecting our environment. Ask at your council about the respective local
disposal sites.

GUARANTEE CONDITIONS

Summary of Contents for Foldway X-2000

Page 1: ...DE GB FR Foldaway X 2000 Art Nr SF 1880...

Page 2: ...oaden findest Du auf unserer Skandika Service Seite F r weitere Informa tionen kannst Du einfach unsere Website besuchen www skandika com Importeur MAX Trader GmbH Adresse Wilhelm Beckmann Str 19 D 45...

Page 3: ...sen Als Spielzeug sind die Trainingsger te auf keinen Fall geeignet 11 Bitte beachten Sie beim Aufstellen des Ger tes dass in jede Richtung ausreichend Freiraum vorhanden ist 12 Bitte beachten Sie das...

Page 4: ...f ltig aufw rmen z B mit Dehnungs bungen 26 Bitte trainieren Sie mit einem Freibereich von 2 Metern um das Ger t SICHERHEITSHINWEISE CHECKLISTE 2 Meter 2 Meter 2 Meter 2 Meter CHECKLISTE Teil Nr Bezei...

Page 5: ...x 13 x 1 5t 2 20 Schnellversteller 1 25 Schraube M8x50L 2 26 Federscheibe 8mm 4 27 Schraube M8x45L 6 28 Unterlegscheibe 8 3x 25x2 0t 2 34 Schraube M8x60L 4 100 Maulschl ssel 1 101 Innensechskantschl s...

Page 6: ...34 Schraube M8x60L 4 35 Flaschenhalter 1 36 Halterung f Flaschenhalter 1 37 Federscheibe 1 38 Verbindungskabel 1 39 Unterlegscheibe 4 5 x 9 x 1 0t 2 Teil Nr Bezeichnung Menge 40 Platte 2 41 Magnetsyst...

Page 7: ...toffgriff f r hinteren Handlauf 2 87 Mutter M6x5 0t 1 88 Endkappe f r hinteren Standfu 2 89 Schraube M10x8t 2 90 Schraube M8x80L 1 Teil Nr Bezeichnung Menge 91 Sensor 1 92 Sensorkabel 2 93 Rolle 1 94...

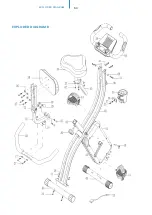
Page 8: ...8 EXPLOSIONSZEICHNUNG EXPLOSIONSZEICHNUNG B...

Page 9: ...stigen Sie dann den vorderen Standfu 05 am Vorderteil des Hauptrahmens 01 mit 2 Schrau ben 34 2 Wellscheiben 17 und 2 Muttern 16 Befestigen Sie den hinteren Standfu 06 am hinteren Teil des Hauptrahmen...

Page 10: ...sind zur besseren Zuordnung mit R f r rechts und L f r links markiert SCHRITT 4 Montieren Sie den Sattel 10 mit 3 Muttern 07 und 3 Un terlegscheiben 21 oben auf der Sattelst tze 03 Schieben Sie die S...

Page 11: ...terlegscheiben 28 und Muttern 07 an der Sattelst tze 03 Montieren Sie dann das R ckenpolster 30 mit 4 Schrauben 27 und 4 Federscheiben 26 am R ckenpolster Halter 23 SCHRITT 6 Befestigen Sie den hinter...

Page 12: ...auben 12 2 Wellscheiben 18 und 2 Feder scheiben 11 Verbinden Sie nun das Sensorkabel 08 mit dem Anschluss auf der R ckseite des Computers 29 SCHRITT 8 Befestigen Sie den Flaschenhalter 35 mit einer Sc...

Page 13: ...er eine Ein Ausschaltautomatik welche ihn bei Pedalbewegung oder durch Dr cken einer Taste einschalten bzw nach ca 4 Minuten ohne jedes Signal automatisch in den Standby Modus schalten l sst Computerf...

Page 14: ...bedeutet AUSREICHEND 4 0 F 5 9 bedeutet UNTERDURCHSCHNITTLICH 6 0 bedeutet SCHLECHT Fehlermeldungen Die Anzeige ERR bedeutet dass kein Ergebnis ermittelt werden konnte da der Kontakt nicht ausreichend...

Page 15: ...dient zur Best tigung von eingegebenen Werten b W hrend einer Trainingsunterbrechung kann diese Taste durch Dr cken und Halten f r mind 2 Sekunden einen Reset Zur cksetzen aller Werte auf 0 ausl sen...

Page 16: ...ning zu beginnen Sie k nnen die Widerstandsstufe jederzeit mit Hilfe der UP und DOWN Tasten kontrollieren Sie k nnen auch wieder Zielwertvorgaben f r folgende Werte eingeben a TIME Trainingszeit b DIS...

Page 17: ...ter und gehen Sie auf Systemeinstellungen Allgemein Profile f r iOS Sys teme und stellen Sie DelighTech Corporation als verifizierter Entwickler ein wie unten dargestellt 5 Aktivieren und verbinden Si...

Page 18: ...tion Virtuelle Karte Sie k nnen 2 Punkte auf der Karte ausw hlen Sie k nnen dann durch das Training auf Ihrem Ger t virtuell die Route abfahren Sofern gefragt wird erlauben Sie die Nutzung des aktuell...

Page 19: ...inscannen oder suchen Sie nach Kinomap Installieren und ffnen Sie die App und melden Sie sich an bzw registrieren Sie sich Schalten Sie Bluetooth ein F gen Sie nun das Trainingsger t wie folgt hinzu A...

Page 20: ...rieben Jede Dehnung sollte f r ca 30 Sekunden gehalten werden dabei sollte keine Gewalt oder zu starker Druck ausge bt werden treten Schmerzen auf h ren Sie auf 2 Die Trainingsphase In dieser Phase so...

Page 21: ...ie nicht so lange trainieren k nnen wie gew nscht Wenn Sie jedoch auch Ihre Fitness trainieren m chten m ssen Sie Ihr Trainingsprogramm abwechslungsreicher gestalten Sie sollten normal w hrend der Auf...

Page 22: ...telefonischer R cksprache zur Reparatur bzw zum Tausch von Teilen welche Sie zugesandt bekommen erm chtigen In diesem Fall erlischt der Garantieanspruch selbstverst ndlich nicht 4 Garantieleistungen...

Page 23: ...____________________________________________________ _____________________________________________________ _____________________________________________________ _______________________________________...

Page 24: ...ructions 35 Computer operation manual 39 Using apps 42 Warm up and cool down Exercise instructions 43 Cleaning and care 44 Guarantee Conditions Importeur MAX Trader GmbH Adresse Wilhelm Beckmann Str 1...

Page 25: ...proper use of the device The device is not a toy 11 Make sure there is sufficient free space around the appli ance when you set it up 12 Please note that an improper and excessive work out may be harm...

Page 26: ...als 25 Before using the device always do stretching exercises to properly warm up 26 Please exercise with a free area of 2 metres around the unit SAFETY PRECAUTIONS PRE ASSEMBLY CHECK LIST PRE ASSEMBL...

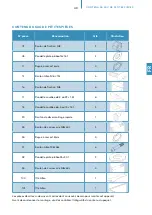
Page 27: ...x 1 5t 6 18 Curved washer 6 5 x 13 x 1 5t 2 20 Quick release knob 1 25 Carriage bolt M8x50L 2 26 Spring washer 8mm 4 27 Allen bolt M8x45L 6 28 Flat washer 8 3x 25x2 0t 2 34 Carriage bolt M8x60L 4 100...

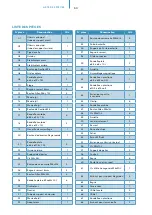
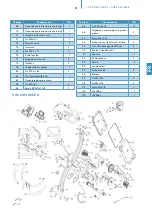
Page 28: ...age bolt M8x60L 4 35 Bottle holder 1 36 Support bracket 1 37 Spring washer 1 38 Connection wire 1 39 Flat washer 4 5 x 9 x 1 0t 2 Part No Description Q ty 40 Plate 2 41 Magnetic assembly 1 42 Plastic...

Page 29: ...T4 2x20L 12 86 Foam grip for rear handlebar tube 2 87 Hex head nut M6x5 0t 1 88 End cap for rear stabilizer 2 89 Hex head bolt M10x8t 2 90 Allen bolt M8x80L 1 Part No Description Q ty 91 Sensor 1 92 S...

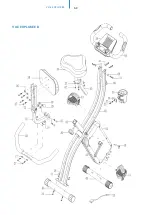
Page 30: ...30 EXPLODED DIAGRAM EXPLODED DIAGRAM B...

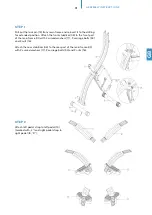
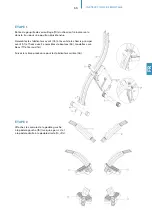
Page 31: ...t stabilizer 05 to the front part of the main frame 01 with 2 curved washers 17 2 carriage bolts 34 and 2 nuts 16 Attach the rear stabilizer 06 to the rear part of the main frame 02 with 2 curved wash...

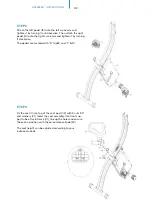
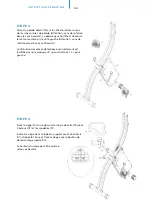
Page 32: ...and tighten it by turning it clockwise The pedals are marked with R right and L left STEP 4 Fix the seat 10 on top of the seat post 03 with 3 nuts 07 and washers 21 Insert the seat assembly into front...

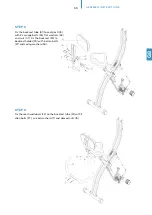
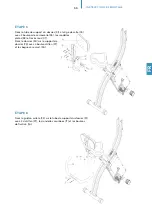
Page 33: ...iage bolts 25 flat washers 28 and nuts 07 Fix the backrest 30 to backrest holder 23 with 4 allen bolts 27 and spring washers 26 STEP 6 Fix the rear handlebars 22 on the backrest tube 31 with 2 allen b...

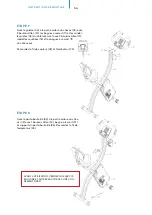
Page 34: ...llen bolts 12 curved washers 18 and spring washers 11 from front side Connect sensor wire 08 to back of computer 29 STEP 8 Fix the bottle holder 35 at rear part of main frame 02 with one allen screw 2...

Page 35: ...on off function so that it switches on when the pedals move or when any but ton is pressed and turns into stand by mode automatically if no signal has been received for approx 4 minutes Computer funct...

Page 36: ...ular training 1 0 means OUTSTANDING 1 0 F 2 0 means EXCELLENT 2 0 F 2 9 means GOOD 3 0 F 3 9 means FAIR 4 0 F 5 9 means BELOW AVERAGE 6 0 means POOR Error messages ERR means that the contact to the ha...

Page 37: ...ess the button to confirm any input b In stop mode press and hold button for min 2 seconds to reset all data c During clock setting mode press the button to confirm hour minute 5 PULSE RECOVERY Press...

Page 38: ...on level at any time during exercise with UP and DOWN You may also input target values for the following function values a TIME b DISTANCE c CALORIES d PULSE To enter a target value do not press START...

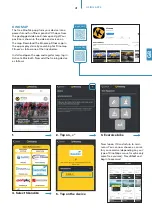
Page 39: ...on in system security settings 4 Download the app and enter System Settings General Profiles for iOS System and adjust De lighTech Corporation as verified developer as shown below 5 Enable and connect...

Page 40: ...ts on the map You may then virtually explore the route by exercising with your fitness device If asked allow to use the current location of user Where street views are available these will be shown in...

Page 41: ...store by searching for Kinomap Fitness or follow one of the links below Install and open the app and register resp log in Activate Bluetooth Now add the training device as follows Apple Store Google P...

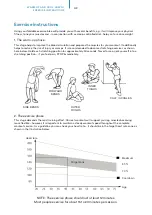
Page 42: ...h stretching position for approximately 30 seconds Never force or jerk yourself into a stretching position if you feel pain STOP immediately 2 The exercise phase This stage demands the most training e...

Page 43: ...se you to break up your exercise earlier If you want to improve your fitness level as well you need to modify your exercise program in this way that you train on a moderate level for the first minutes...

Page 44: ...cal damages The customer service may authorize you to replace or repair defective parts after telephone consultation In this case the warranty is not void 4 Warranty services do not extend the warrant...

Page 45: ...___________________________________________________ _____________________________________________________ _____________________________________________________ ________________________________________...

Page 46: ...uctions de montage 57 Mode d emploi de l ordinateur 61 Utilisation des apps 64 Echauffement et r cup ration Consignes d entra nement 65 Nettoyage et entretien 66 Conditions de garantie Importeur MAX T...

Page 47: ...leur temp rament Vous devez surveillez les enfants si n cessaire et surtout attirer leur attention sur l utilisation correcte de l appareil Les appareils d entra nement ne sont en aucun cas con us pou...

Page 48: ...d utiliser le produit vous devez r chauffer plus attentivement par exemple avec des exercices d tirement 26 Veuillez vous entra ner en laissant un espace libre de 2 m tres autour de l appareil INFORMA...

Page 49: ...20 Bouton de d verrouillage rapide 1 25 Boulon de carrosserie M8x50L 2 26 Bague ressort 8mm 4 27 Boulon Allen M8x45L 6 28 Rondelle plate 8 3x 25x2 0t 2 34 Boulon de carrosserie M8x60L 4 100 Cl Allen...

Page 50: ...n M8x45L 6 28 Rondelle plate 8 3x 25x2 0t 6 29 Ordinateur 1 30 Dossier 1 31 Tube de support du dossier 1 32 Manivelle d 1 33 Adaptateur 1 N pi ce D nomination Qt 34 Boulon de carrosserie M8x60L 4 35 P...

Page 51: ...ort pour capteur 1 80 Vis ST2 9 x 8L 5 81 Plot anti vibratile EVA 1 82 Couvercle d cor arri re 1 83 Vis M5 x 8L 2 84 crou M10x7tx1 25P 2 N pi ce D nomination Qt 85 Vis ST4 2x20L 12 86 Poign e en mouss...

Page 52: ...52 VUE EXPLOS E VUE EXPLOS E B...

Page 53: ...ilisateur avant 05 l avant de la ch ssis principal avant 01 et fixez avec 2 ensembles de boulons 34 rondelles cour b es 17 et crous 16 Suivez la m me proc dure pour le stabilisateur arri re 06 TAPE 2...

Page 54: ...sens de rotation dans le sens antihoraire L attribution des pi ces d tach es ventuellement est facilit e par un marquage R pour droite et L pour gauche TAPE 4 Fixez le si ge 10 sur le dessus de la tig...

Page 55: ...ons de carrosserie 25 les rondelles plates 28 et les crous 07 Fixez le dossier 30 sur le support de dossier 23 avec 4 boulons Allen 27 et les bagues ressort 26 TAPE 6 Fixez le guidon arri re 22 sur le...

Page 56: ...rb es 18 et les bagues ressort 11 du c t avant Raccordez le fil de capteur 08 et l ordinateur 29 TAPE 8 Fixez le porte bouteille 35 la partie arri re du ch s sis 02 avec 1 boulons Allen 24 bague resso...

Page 57: ...matique allumant l cran automatiquement en mode d entra nement d s que vous commencez p daler ou appuyez sur une touche Si la suite l entra nement est arr t pendant environ 4 minutes pas de r ception...

Page 58: ...S BIEN 1 0 F 2 0 EXCELLENT 2 0 F 2 9 BON 3 0 F 3 9 PASSABLE 4 0 F 5 9 SOUS LA MOYENNE 6 0 MAUVAIS Messages d erreur ERR signifie que vous n avez pas bien empoign les lectrodes ou que vos mains n avai...

Page 59: ...top restez appuy pendant au moins 2 secondes pour r initialiser toutes les donn es c Durant le mode de param trage de l heure appuyez sur ce bouton pour confirmer l heure les minu tes 5 PULSE RECOVERY...

Page 60: ...mode vous permet galement de r gler des valeurs cibles pour les valeurs de fonction suivantes a TIME Temps b DISTANCE c CALORIES d PULSE Pouls Pour saisir ces donn es vous avez la possibilit apr s av...

Page 61: ...de s curit 4 T l chargez l application et rendez vous sur Param tres du syst me G n ral Profils pour iOS et d finissez DelightTech Corporation comme d veloppeur v rifi comme indiqu ci dessous 5 Active...

Page 62: ...tionner 2 points sur la carte Vous pouvez ensuite explorer la route virtuellement l aide de votre appareil fitness Le cas ch ant autorisez l utilisation de la position actuelle de l utilisateur Lorsqu...

Page 63: ...erchant Kinomap Fitness ou en cliquant sur l un des liens ci dessous Installez et ouvrez l application et enregistrez vous ou connectez vous Activez Bluetooth Ajoutez maintenant l appareil comme suit...

Page 64: ...ndant environ 30 secondes tirer seulement si loin que aucune douleur s appara t 2 Phase d entra nement Lors de l entra nement le palier de la contrainte physique doit d passer le point d effort normal...

Page 65: ...nir une croissance musculaire le r glage de la r sistance de votre MINI ELLIPTICAL EXERCISEUR doit tre tr s lev En raison de la haute tension sur les muscles des jambes une s ance d entra nement longu...

Page 66: ...parer des pi ces d fectueuses apr s consultation t l phonique Dans ce cas l la garantie n est pas nulle 4 Les services de garantie ne s tendent pas au del de la dur e de la garantie Elle n entame pas...

Page 67: ..._ _____________________________________________________ _____________________________________________________ _____________________________________________________ ____________________________________...

Page 68: ...SF 1880 X 2000 DE_GB_FR Ver 2 1 Vertrieb Service durch Sales Service by Ventes et services par MAX Trader GmbH Wilhelm Beckmann Stra e 19 45307 Essen Germany...

Reviews: