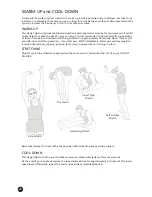
background image

17

UK


WARNING

To reduce risk of injury, read and understand this instruction manual before using the device!  
This machine is intended for home use only in accordance with the instructions provided in this manu-
al. Read the instruction manual carefully before using this device and keep the instruction manual for 
future use.

IMPORTANT SAFETY NOTICE

•  To ensure the best safety of the device, regularly check it on damages and worn parts.

•  If you pass on this device to another person or if you allow another person to use it, make sure that 

that person is familiar with the content and instructions in these instructions.

•  Only one person should use the exerciser at a time. The maximum load of this device is 150 kg (330 

lbs).

•  Before the first use and regularly make sure that all screws, bolts and other joints are properly tigh-

tened and firmly seated.

•  Before you start your work-out, remove all sharp-edged objects around the equipment.

•  Only use the exercise for your work-out if it works flawlessly.

•  Any broken, worn or defective part must immediately be replaced and/or the device must no  

longer be used until it has been properly maintained and repaired.

•  Parents and other supervisory persons should be aware of their responsibility, due to situations which 

may arise for which the device has not been designed and which may occur due to children’s natural 
play instinct and interest in experimenting.

•  If you do allow children to use this device, be sure to take into consideration and assess their mental 

and physical condition and development, and above all their temperament. Children should use the 
device only under adult supervision and be instructed on the correct and proper use of the device. 
The device is not a toy.

•  Make sure there is sufficient free space around the appliance when you set it up.

•  Please note that an improper and excessive work-out may be harmful to your health.

•  Please note that levers and other adjustment mechanisms are not projecting into the area of move-

ment during the workout.

•  When setting up the device, please make sure that the device is standing in a stable way and that 

any possible unevenness of the floor is evened out.

•  Always wear appropriate clothing and shoes which are suitable for your work-out on the device. The 

clothes must be designed in a way so that they will not get caught in any part of the device during 
the work-out due to their form (for example, length). Be sure to wear appropriate shoes which are 
suitable for the work-out, firmly support the feet and which are provided with a non-slip sole.

•  Be sure to consult a physician before you start any device program. He may give you proper hints 

and advice with respect to the individual intensity of stress for you, your workout and sensible eating 
habits.                                          

Summary of Contents for PARANTAJA SF-2170

Page 1: ...PARANTAJA Art Nr SF 2170 Aufbau und Bedienungsanleitung Assembly instructions and user guide Instructions de montage et mode d emploi DE GB FR...

Page 2: ...nformationen www skandika com Scannen Sie den QR Code mit Ihrem Smartphone Inhaltsverzeichnis Wichtige Sicherheitshinweise 3 Teileliste 5 Aufbauanleitung 6 Generelle Hinweise 9 Auf und abw rmen 10 bun...

Page 3: ...aufgrund des nat rlichen Spieltriebes und der Experimentierfreudigkeit der Kinder mit Situationen zu rechnen ist f r die Trainingsger te nicht gebaut sind Wenn Sie Kinder an dem Ger t trainieren lass...

Page 4: ...ie sofort das Training und konsultieren Sie Ihren Arzt Personen wie Kinder Invaliden und behinderte Menschen sollten das Ger t nur im Beisein einer weite ren Person die eine Hilfestellung und Anleitun...

Page 5: ...19 Fu st tze kappe polster 9 R ckenpolster 20 Verl ngerungsrohr 5 Schraube M8x20 8 St 6 Schraube M8x65 8 St 8 Mutter M8 10 St 7 Unterlegschei 14 Mutter 15 Unterleg 11 Schraube M8x55 be12x8x1 5 10St M6...

Page 6: ...en und Verletzungen zu vermeiden Verbinden Sie Rahmenteil A 1 Rahmenteil B 2 die hintere Stange 3 und die vordere Stange 4 mit den Schrauben M8x20 5 wie unten abgebildet Schritt 2 Befestigen Sie nun d...

Page 7: ...heiben 7 und Muttern 8 wie abgebildet Schritt 4 Verbinden Sie das Verl ngerungsrohr 20 mit der Fu st tze 19 den Fu polstern 16 18 und den Endkappen 17 wie abgebildet unter Zuhilfenahme der Schrauben M...

Page 8: ...s ein und fixieren Sie das Rohr nun in einer f r Ihre K rpergr e passenden L nge F r die korrekte Einstellung des Verl ngerungsrohres 20 gem Ihrer K rpergr e beachten Sie bitte die Markierungen auf de...

Page 9: ...ter von allein in Richtung Ausgangsposition wenn Sie Ihre H nde unter die Taille bewegen Bewegt sich das R ckenpolster nicht ist das Verl ngerungsrohr 20 m glicherweise nicht korrekt gem Ihrer K rperg...

Page 10: ...l w chentlich gesteigert werden Aufw rmen Die Phase verbessert den Blutfluss und hilft der Muskulatur richtig zu arbeiten Durch Aufw rmen wird das Risiko eines Krampfes oder von Muskelverletzungen red...

Page 11: ...beschrieben positionieren und die Schaumstoffrol len korrekt justieren Legen Sie sich auf das R ckenpolster und halten Sie Ihre H nde in einer niedrigen Position auf beiden Seiten Ihres K rpers Bewege...

Page 12: ...Erh hen Sie den Drehwinkel nur wenn es angenehm ist erh hen Sie mindestens in der ersten Woche den Winkel nicht ber 25 Erh hen Sie den Drehwinkel jeweils immer nur um wenige Grad Die Effektivit t des...

Page 13: ...ren Organen eine Erholungsphase Ist Inversionstraining f r jeden geeignet Sollten Sie unter einem der folgenden Probleme leiden d rfen Sie ein Inversionstrai ning AUSSCHLIESSLICH nach R cksprache mit...

Page 14: ...Wahl unentgeltlich instand gesetzt oder durch einwandfreie Teile ersetzt werden Die Kosten f r Material und Arbeits zeit werden von uns getragen Instandsetzungen am Aufstellungsort k nnen nicht verla...

Page 15: ..._ _____________________________________________________ _____________________________________________________ _____________________________________________________ ____________________________________...

Page 16: ...skandika com Scan the QR code with your smartphone Table of contents Important safety notice 17 Parts list 19 Assembly instructions 20 General precautions 23 Warm up and cool down 24 Exercise instruc...

Page 17: ...device has not been designed and which may occur due to children s natural play instinct and interest in experimenting If you do allow children to use this device be sure to take into consideration a...

Page 18: ...case of doubt consult your physician immediately Children disabled and hadicapped persons should use the device only under supervision and in presence of another person who may give support and useful...

Page 19: ...17 Endcap 16 18 19 Footrest Foot pads 9 Back frame 20 Extension tube 5 Screw M8x20 8 pcs 6 Screw M8x65 8 pcs 8 Nut M8 10 pcs 7 Washer 14 Nut 15 Washer 11 Screw M8x55 12x8x1 5 10 pcs M6 2 pcs 12 2 pcs...

Page 20: ...h the assistance of a second person to avoid injuries and damages Connect frame A 1 frame B 2 the rear 3 and front 4 rod with the screws M8x20 5 as shown below Step 2 Now fix the handlebars 10 with th...

Page 21: ...rresponding washers 7 and nuts 8 as shown Step 4 Connect the extension tube 20 with the footrest 19 the foot pads 16 18 and the endcaps 17 as shown by fixing the parts with the screws M6x40 12 and M6x...

Page 22: ...r end of backrest frame and secure in a matching position for your body height For correct adjustment of the extension tube 20 according to your body height please check the markings on the tube Pleas...

Page 23: ...ly the backrest of the inversion trainer should return to upright position when you move your hands below your waist If the back rest does not move the extension tube 20 is probably not correctly adju...

Page 24: ...ly 30 seconds Never force or jerk yourself into a stretching position if you feel pain STOP immediately Warm up exercises may also include brisk walking jogging jumping jacks jump rope exercises or ru...

Page 25: ...efully Make sure it is adjusted to your height properly by locking your ankles as described before and lie on the backrest with your hands at your sides Now slowly move your hands to a position across...

Page 26: ...ach day Change gradually Increase the angle only if it is comfortable start at 25 degrees for a week or more Increase only a few degrees at a time You can gain all the benefits of Inversion without ev...

Page 27: ...added benefits of reversing blood flow and allows relief to organs that are under continual downward stress Is inversion suitable for everyone In case you have any of the following problems ONLY exerc...

Page 28: ...to environ mental influences and in case of improper handling maintenance e g due to non observance of the instruction manual or mechanical damages The customer service may authorize you to replace o...

Page 29: ..._ _____________________________________________________ _____________________________________________________ _____________________________________________________ ____________________________________...

Page 30: ...com Scannez ce QR Code avec votre smartphone Contenu Informations de s curit importantes 31 Liste des pi ces 33 Instructions de montage 34 Pr cautions g n rales 37 chauffement et r cup ration 38 Inst...

Page 31: ...surveillants doivent tre conscients de leur responsabilit car l instinct natu rellement joueur et la soif d exp rimentation des enfants peut tre l origine de situations pour lesquelles les appareils...

Page 32: ...es sympt mes anormaux arr tez imm diatement l entra nement et consultez votre m decin Les personnes comme les enfants les invalides et les personnes handicap es ne sont autoris es uti liser l appareil...

Page 33: ...arri re 17 Ca 16 18 19 Repose pied puchon Tampons 9 Cadre arri re 20 Tube d extension 5 Vis M8x20 8 pc 6 Vis M8x65 8 pc 8 crou M8 10 pc 7 Rondelle 14 crou 15 Rondelle 11 Vis M8x55 2 pc 12x8x1 5 10 pc...

Page 34: ...personne afin d viter les blessures et les dommages ventuels Fixez la pi ce 1 cadre A la pi ce 2 cadre B la pi ce 3 tige arri re et la pi ce 4 tige avant en utilisant les vis M8 x 20 5 comme indiqu ci...

Page 35: ...x65 6 les rondelles 7 et les crous 8 comme indiqu tape 4 Raccordez le tube d extension 20 au repose pied 19 aux tampons 16 18 et aux capuchons 17 comme indiqu l aide des vis M6x40 12 et M6x45 13 crous...

Page 36: ...bas travers le lo gement de capitonnage travers et d assurer un appariement position pour votre hauteur Pour r gler correctement le tube d extension 20 en fonction de votre taille veuillez consulter l...

Page 37: ...le dossier de la table d inversion dev rait retourner en position debout lorsque vous placez vos mains en dessous de vos hanches Si le dossier ne bouge pas le tube d extension 20 n est probablement p...

Page 38: ...ur s appara t Les exercices de r chauffement peuvent galement inclure la marche rapide le jogging les sauts la corde les exercices de saut ou la course sur place TIRAGE Les muscles peuvent tre tir s p...

Page 39: ...pour votre taille en calant vos chevilles comme indiqu plus haut et allongez vous sur le dossier avec vos mains le long de chaque c t du corps D placez maintenant lentement vos mains vers votre poitri...

Page 40: ...me moment de la journ e Faites des changements graduels N augmentez l angle que si vous tes l aise commencez 25 pendant une semaine ou plus N augmentez l angle que de quelques degr s chaque fois Vous...

Page 41: ...antages suppl mentaires elle permet le renversement du flux sanguin et fait en sorte que des organes qui subissent une pression continue vers le bas soient soulag s L inversion convient elle tout le m...

Page 42: ...ou d un entretien mal r ali s non respect du manuel d utilisation ou de dommages m caniques Le service clients peut vous autoriser remplacer ou r parer des pi ces d fectueuses apr s consultation t l p...

Page 43: ..._ _____________________________________________________ _____________________________________________________ _____________________________________________________ ____________________________________...

Page 44: ...Vertrieb Service durch MAX Trader GmbH Wilhelm Beckmann Stra e 19 45307 Essen Deutschland WEE Reg Nr DE81400428 SF 2170 de_en_fr 09 2018 Ver 1 0...

Reviews: