background image

48

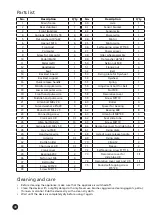
No.

Description

Q‘ty

1

Main frame

1

2

Rear stabilizer

1

3

Front stabilizer

1

4

Carriage bolt M10 x 55

4

5

Flat washer ø10*ø22

4

6

Hex nut M10

4

7

Front post

1

8

Computer

4

9

Screw for computer 

4

10

Pedal (Right)

1

11

Pedal (Left)

1

12

Handlebars

1

13

Seat

1

14

Backrest board 

1

15

Backrest support

1

16

Quick release handle

1

17

Middle computer wire

1

18

Lower computer wire

1

19

Front hand pulse wire

1

20

Middle hand pulse wire

1

21

Allen bolt M8 x 20

3

22

Curved washer ø8*ø20

4

23

Round bolt M5 x 25

2

24

Connecting screw

1

25

Crank arm L/R

1/1

26

Allen bolt M8 x16

16

27

Carriage bolt M8 x 50

2

28

Hex nut M8

2

29

Hand pulse wire

1

30

Adaptor

1/1

32

Bottle holder

1

33

Chain cover L/R

1/1

34

Crank cover

2

35

Bearing 6203

2

36

Nylon nut M6

4

37

Belt pulley

1

38

Screw M5*20

2

39

Screw M6*15

4

No.

Description

Q‘ty

40

Axle

1

41

Sensor bracket

1

42

Sensor wire

1

43

Power wire

1

44

Motor

1

45

Motor wire

1

46

Self-tapping screw ST5*40

3

47

Power spacer

1

48

Idler wheel assembly

1

49

Flat washer ø8*ø17

5

50

Nylon nut M8

5

51

Flange nut

4

52

Belt

1

53

Fixing plate for flywheel

2

54

Flywheel

1

55

Spring

1

56

Adjustment bolt for belt

1

57

Nut M8

1

58

Decorative cover 

1

59

Screw M5*10

6

60

Roller

4

61

Spacer for bearing

8

62

Bearing 608

8

63

Allen bolt M8*40

4

64

Seat slide tube 

1

65

Screw M6*10

4

66

Decorative cover for slide tube

2

67

Fixing plate 

1

68

Axle of quick release handle

1

69

Fixing plate

1

70

Clip ø12

2

71

Sleeve

2

72

Self-tapping screw ST5*16

10

73

Decorative cover for 

slide tube L/R

1/1

74

Decorative cover seat post L/R

1/1

75

Round self-tapping screw 

ST5*20

21

Parts list

Cleaning and care

•  Before cleaning the appliance, make sure that the appliance is switched off. 
•  Clean the device with a slightly damp cloth only. Never use brushes, aggressive cleaning agents, petrol, 

thinners or alcohol. Rub the device dry with a clean dry cloth. 

•  Wait until the device is completely dry before using it again.

Summary of Contents for VEIEN

Page 1: ...Art Nr SF 2390 Aufbau und Bedienungsanleitung Assembly instructions and user guide Instructions de montage et mode d emploi DE GB FR RECUMBENT BIKE VEIEN...

Page 2: ...en Sie den QR Code mit Ihrem Smartphone Inhaltsverzeichnis Wichtige Sicherheitshinweise 3 Aufbauanleitung 5 Auf und Abw rmen 11 Computer Bedienungsanleitung 12 Verwendung der Apps iConsole KinoMap 19...

Page 3: ...mals unbeauf sichtigt allein in einem Raum mit dem Ger t Eltern und andere Aufsichtspersonen sollten sich Ihrer Verantwortung bewusst sein da aufgrund des nat rlichen Spieltriebes und der Experimentie...

Page 4: ...n oder andere abnormale Symptome versp ren stoppen Sie sofort das Training und konsultieren Sie Ihren Arzt Konsultieren Sie Ihren Arzt bevor Sie mit dem Training beginnen Dies ist insbesondere wichtig...

Page 5: ...herheit wurden teilweise selbst sichernde Muttern verwendet Diese lassen sich etwas schwer auf die jeweiligen Schrauben drehen l sen sich aber nicht wieder von selbst Durch mehrfaches Anschrauben verl...

Page 6: ...2 Unter legscheiben 5 und 2 Muttern 6 Schritt 3 Verbinden Sie die Kabelenden 17 18 sowie 19 20 Befestigen Sie die Lenkerst tze 7 mit den Schrauben 21 und Wellscheiben 22 am Hauptrahmen 1 Montieren Sie...

Page 7: ...7 DE Schritt 4 Befestigen Sie den Schnellverstellhebel 16 wie dargestellt mit 2 Schrauben M5x25 23 Schritt 5 Montieren Sie den Sitz 13 wie dargestellt am Hauptrahmen mit 4 Schrauben M8x16 26...

Page 8: ...Schritt 6 Setzen Sie die R ckenlehnen Halterung 15 in den Hauptrahmen 1 ein und befestigen Sie diese mit 6 Schrauben M8x16 26 Schritt 7 Befestigen SIe dann die R ckenlehne 14 mit 4 Schrauben M8x16 26...

Page 9: ...tigen Sie das rechte Pedal 10 am rechten Pedalarm 25R durch Aufschrauben im Uhrzeigersinn das linke Pedal 11 wird entsprechend am linken Pedalarm 25L befestigt Schraubrichtung entgegen dem Uhrzeigersi...

Page 10: ...s dieser T V GS gepr ft ist und dem Ger tesicherheitsgesetz und den entsprechenden Spezifikationen entspricht Das Ger t darf an KEINE ANDERE STROMQUELLE angeschlossen werden da dies zu Funktionsbeeint...

Page 11: ...gesteigert werden Aufw rmen Die Phase verbessert den Blutfluss und hilft der Muskulatur richtig zu arbeiten Durch Aufw rmen wird das Risiko eines Krampfes oder von Muskelverletzungen reduziert Es ist...

Page 12: ...Kalorienverbrauch dienen lediglich als Anhaltspunkt f r eine Person mittlerer Statur bei mittlerer Widerstandseinstellung und k nnen erheblich von dem tats chlichen medizinischen Kalorienverbrauch abw...

Page 13: ...einen Reset Zur cksetzen aller Werte auf 0 W hrend einer Trainingsunterbrechung kommen Sie durch kurzen Druck auf diese Taste wieder zur ini tialen Anzeige Start Stop Ein Training beginnen oder beende...

Page 14: ...TOP Mit UP und DOWN l sst sich der Tretwiderstand auch w hrend des Trainings jederzeit ver stellen Sie k nnen auch Zielwerte f r folgende Funktionen eingeben a TIME Trainingszeit Abb 8 b DISTANCE Dist...

Page 15: ...13 in der Anzeige W hlen Sie eines der 4 Programme 1 bis 4 und dr cken Sie MODE ENTER zur Best tigung Sie k nnen nun einen Zielwert f r die Trainingszeit eingeben mit UP DOWN und MODE ENTER Dr cken S...

Page 16: ...Trainingszeit ein geben mit UP DOWN und MODE ENTER Dr cken Sie START STOP um mit dem Training zu beginnen Mit UP und DOWN l sst sich der Tretwiderstand auch w hrend des Trainings jederzeit verstellen...

Page 17: ...t dieser Spezialfunktion ist es m glich die Herzerholungsrate nach einem Training zu ermitteln wel che ein Indikator f r die sportliche und k rperliche Verfassung des Trainierenden ist Je besser die H...

Page 18: ...e sicher dass Sie die Handpulssensoren mit gr t m glicher Handfl che auf beiden Seiten richtig umfassen bzw den Brustgurt richtig angelegt haben damit der elektrische Impuls richtig flie en kann Start...

Page 19: ...t Sie k nnen diese ber die App Suchfunktion Ihres Ger tes finden oder ber den hier dargestellten QR Code Systemvoraussetzungen Android 5 0 oder neuer mit Bluetooth 4 0 iOS 10 oder neuer mit Bluetooth...

Page 20: ...nomap App im App Store oder Play Store siehe Links unten herunter oder suchen Sie nach Kinomap Fitness Apple App Store https itunes apple com nl app kinomap fitness id611177969 mt 8 Google Play Store...

Page 21: ...dann auf OK und kehren Sie ins Hauptmen zur ck Sie k nnen nun eine Strecke f r Ihr Training ausw hlen abh ngig vom Kontotyp ggf nur bestimmte freie Strecken Tippen Sie auf Starten 4 Exercise bike 5 Ic...

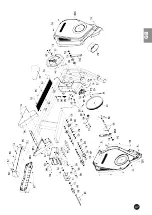
Page 22: ...22 Explosionszeichnung...

Page 23: ...23 DE...

Page 24: ...l 1 43 Stromkabel 1 44 Motor 1 45 Motorkabel 1 46 Schraube ST5 40 3 47 Abstandsst ck 1 48 Andruckrolleneinheit 1 49 Unterlegscheibe 8 17 5 50 Mutter M8 5 51 Flanschmutter 4 52 Keilriemen 1 53 Schwungr...

Page 25: ...r Wahl unentgeltlich instand gesetzt oder durch einwandfreie Teile ersetzt werden Die Kosten f r Material und Arbeits zeit werden von uns getragen Instandsetzungen am Aufstellungsort k nnen nicht verl...

Page 26: ...e QR code with your smartphone Table of contents Important safety notice 27 Assembly instructions 29 Warm up and cool down 35 Computer operation manual 36 Using the apps iConsole KinoMap 43 Exploded d...

Page 27: ...d other supervisory persons should be aware of their responsibility due to situations which may arise for which the device has not been designed and which may occur due to children s natural play inst...

Page 28: ...ical symptoms In case of doubt consult your physician immediately Before beginning any exercise program consult your physician This is especially important for individu als with pre existing health pr...

Page 29: ...e used Maybe it is a little difficult to screw them tightly onto the respective screws but they will not get loose easily to ensure a safe connection If you should loose and fix those lock nuts severa...

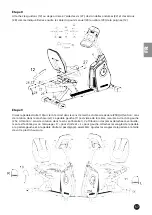
Page 30: ...in frame 1 using 2 screws 4 2 washers 5 and 2 nuts 6 Step 3 Connect the wire ends 17 18 and 19 20 Fix the front post 7 with the screws 21 and curved washers 22 on main frame 1 Attach computer 8 to bra...

Page 31: ...31 GB Step 4 Fix the quick release handle 16 with 2 bolts M5x25 23 as shown Step 5 Mount the seat 13 on main frame with 4 bolts M8x16 26 as shown...

Page 32: ...32 Step 6 Insert the backrest support 15 into the main frame 1 and fix it with 6 bolts M8x16 26 Step 7 Fix the backrest board 14 with 4 bolts M8x16 26...

Page 33: ...ebars 12 Step 9 Attach the right pedal 10 onto the right crank arm 25R and tighten it by turning it clockwise Afterwards fix the left pedal 11 accordingly on the left crank arm 25L to be screwed in an...

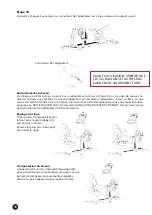
Page 34: ...please use a fitting mains adaptor for your power system If you have to buy a new adaptor it is important to pay attention that it is GS approved and corresponds to the product safety law and the belo...

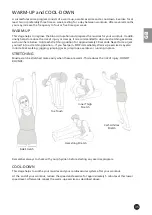
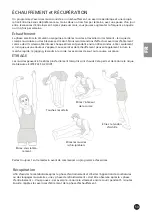
Page 35: ...tely 30 seconds Never force or jerk yourself into a stretching position if you feel pain STOP immediately Warm up exercises may also include brisk walking jogging jumping jacks jump rope exercises or...

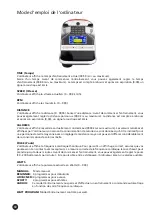
Page 36: ...e consumption values regis tered and displayed with this computer merely serve as indicative values for a person of medium stature with medium resistance setting and can deviate considerably from the...

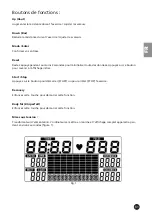
Page 37: ...button for approx 2 seconds to reset all values to 0 Press this button in a training pause to return to the initial display Start Stop Start or stop a workout Recovery Press this button to start the h...

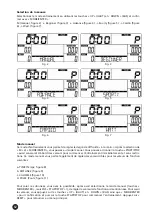
Page 38: ...UP DOWN and MODE ENTER to select Press START STOP You may change the tension level at any time during exercise with UP and DOWN You may also input target values for the following function values a TIM...

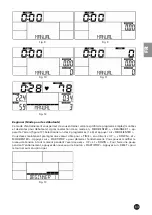
Page 39: ...or confirmation BEGINNER 1 appears on the display figure 13 Choose one of the 4 programs 1 to 4 and press MODE ENTER to confirm You may now preset a target value for TIME by using UP DOWN and MODE ENT...

Page 40: ...to confirm You may now preset a target value for TIME by using UP DOWN and MODE ENTER Press START STOP to start workout You may change the tension level at any time during exercise with UP and DOWN T...

Page 41: ...ion This is a very important indication for the physical condition of your body Try to improve your recovery rate with re gular training sessions The aim is to calm down to a normal pulse frequency fr...

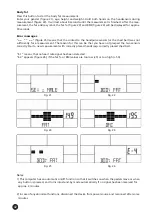
Page 42: ...measurement The reason for this can be that you have not grasped the two sensors correctly Start a new measurement with correctly placed hands resp correctly placed chest belt E 1 means that no heart...

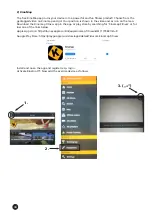
Page 43: ...You may use the app search function of your mobile device or the following QR code to find the app System requirements Android 5 0 or newer with Bluetooth 4 0 iOS 10 or newer with Bluetooth 4 0 For A...

Page 44: ...Download the Kinomap Fitness app in the app or play store by searching for Kinomap Fitness or fol low one of the links below Apple App store https itunes apple com nl app kinomap fitness id611177969...

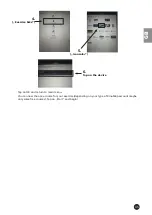
Page 45: ...OK and return to main menu You can now choose a course for your exercise depending on your type of KinoMap account maybe only some free courses Tap on Start and begin 4 Exercise bike 5 Iconsole 6 Tap...

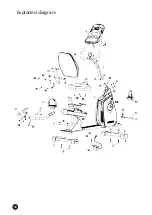
Page 46: ...46 Exploded diagram...

Page 47: ...47 GB...

Page 48: ...ire 1 43 Power wire 1 44 Motor 1 45 Motor wire 1 46 Self tapping screw ST5 40 3 47 Power spacer 1 48 Idler wheel assembly 1 49 Flat washer 8 17 5 50 Nylon nut M8 5 51 Flange nut 4 52 Belt 1 53 Fixing...

Page 49: ...e to environ mental influences and in case of improper handling maintenance e g due to non observance of the instruction manual or mechanical damages The customer service may authorize you to replace...

Page 50: ...de avec votre smartphone Contenu Informations de s curit importantes 51 Instructions de montage 53 Echauffement et r cup ration 59 Mode d emploi de l ordinateur 60 Utiliser les applications iConsole K...

Page 51: ...ou les animaux s approcher de l appareil Les enfants ne devraient pas se trouver proximit de l appareil sans surveillance Les parents et autres surveillants doivent tre conscients de leur responsabili...

Page 52: ...es des douleurs abdominales ou d autres sympt mes anormaux arr tez imm diatement l entra nement et consultez votre m decin Consultez votre m decin avant de commencer votre entra nement Ceci est partic...

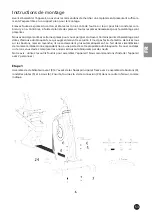
Page 53: ...rous autobloquants ce qui augmentera votre s curit Il n est pas facile de mettre de tels crous sur les boulons mais en revanche ils ne se desserrent plus automatiquement Le fait de les visser d visser...

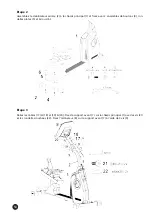
Page 54: ...et fixez avec 2 ensembles de boulons 4 ron delles plates 5 et crous 6 tape 3 Reliez les c bles 17 18 et 19 20 Fixez le support avant 7 sur la ch ssis principal 1 avec les vis 21 et les rondelles cour...

Page 55: ...55 FR tape 4 Fixez le levier de d gagement rapide 16 l aide de 2 vis M5x25 23 comme indiqu tape 5 Montez le si ge 13 sur le cadre principal l aide de 4 vis M8x16 26 comme indiqu...

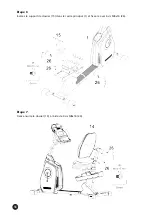
Page 56: ...56 tape 6 Ins rez le support de dossier 15 dans le cadre principal 1 et fixez le avec 6 vis M8x16 26 tape 7 Fixez ensuite le dossier 14 l aide de 4 vis M8x16 26...

Page 57: ...che du bras de p dale 25R Attention sens de rotation dans le sens horaire La p dale gauche 11 est viss e de la m me mani re sur le c t gauche 25L Attention sens de rotation dans le sens antihoraire L...

Page 58: ...T V GS et soit conforme la loi sur la s curit des appareils et aux autres sp cifications L appareil ne DOIT EN AUCUN CAS tre raccord A UNE AUTRE SOURCE DE COURANT cela pouvant causer des perturbations...

Page 59: ...eur s appara t Les exercices de r chauffement peuvent galement inclure la marche rapide le jogging les sauts la corde les exercices de saut ou la course sur place TIRAGE Les muscles peuvent tre tir s...

Page 60: ...par l ordinateur concernant la consommation de calories ne sont donn es qu titre indicatif pour une personne de taille moyenne avec un r glage de r sistance moyen et peuvent diff rer consid rablement...

Page 61: ...tialiser toutes les donn es Appuyez sur ce bouton pour revenir l affichage initial Start Stop Appuyez sur le bouton pour d marrer START ou pour arr ter STOP l exercice Recovery Enfoncez cette touche p...

Page 62: ...ir d abord des valeurs pour commencer l entra nement imm diatement et sans restric tions Ce mode manuel vous permet galement de r gler des valeurs cibles pour les valeurs de fonction suivantes a TIME...

Page 63: ...t l cran figure 13 S lectionner un des 4 programmes 1 4 et appuyer sur MODE ENTER Vous devez maintenant pr r gler une valeur cible pour TIME en utilisant UP DOWN et MODE ENTER Appuyez sur START STOP p...

Page 64: ...utilisant UP DOWN et MODE ENTER Appuyez sur START STOP pour d marrer l entra nement Vous pouvez modifier le niveau de tension tout moment pendant l exercice avec UP et DOWN Pour faire une pause pendan...

Page 65: ...outon START STOP Appuyez sur RESET pour retourner au menu principal Fig 18 Recovery Fonction sp ciale A l aide ce cette fonction sp ciale vous pouvez mesurer le pouls apr s l entra nement qui sert d i...

Page 66: ...z pas bien serr la sangle de poitrine Veillez ce que vos doigts soient bien en contact avec les capteurs E 1 signifie qu aucun signal de fr quence cardiaque n a t d tect E 4 appara t figure 26 si les...

Page 67: ...aide de la fonction de recherche d application de votre appareil ou l aide du code QR ci dessous Conditions syst me Android 5 0 ou plus r cent avec Bluetooth 4 0 iOS 10 ou plus r cent avec Bluetooth...

Page 68: ...l chargez l application Kinomap Fitness dans l App Store ou le Play Store en recherchant Kinomap Fitness ou en cliquant sur l un des liens ci dessous Apple App Store https itunes apple com nl app kin...

Page 69: ...au menu principal Vous pouvez maintenant s lectionner une distance pour votre entra nement en fonction du type de compte le cas ch ant uniquement certains itin raires gratuits Appuyez sur START D marr...

Page 70: ...70 Vue explos e...

Page 71: ...71 FR...

Page 72: ...u capteur 1 42 C ble du capteur 1 43 Cordon d alimentation 1 44 Moteur 1 45 C ble pour moteur 1 46 Vis ST5 40 3 47 Espaceur 1 48 Galet presseur 1 49 Rondelles 8 17 5 50 crou M8 5 51 Bride 4 52 Courroi...

Page 73: ...ou d un entretien mal r ali s non respect du manuel d utilisation ou de dommages m caniques Le service clients peut vous autoriser remplacer ou r parer des pi ces d fectueuses apr s consultation t l...

Page 74: ...__________________________________________________ _____________________________________________________ _____________________________________________________ _________________________________________...

Page 75: ...___________________________________________________ _____________________________________________________ _____________________________________________________ ________________________________________...

Page 76: ...Vertrieb Service durch MAX Trader GmbH Wilhelm Beckmann Stra e 19 45307 Essen Deutschland WEE Reg Nr DE81400428 SF 2390 de_en_fr 10 2019 Ver 1 0...

Reviews: