19
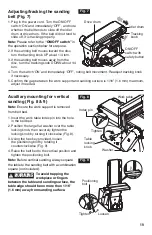
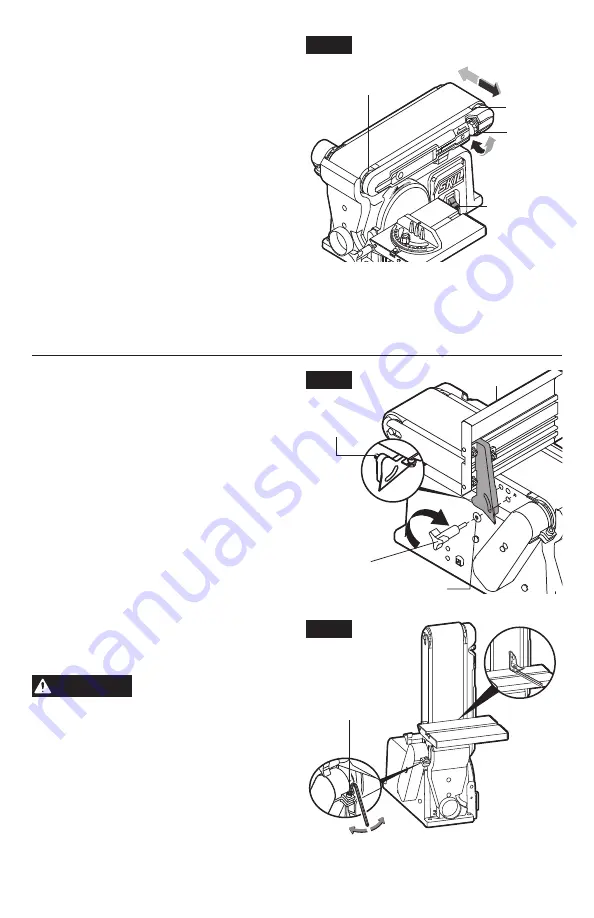
Adjusting/tracking the sanding
belt (Fig. 7)
1. Plug in the power cord. Turn the ON/OFF
switch ‘ON’ and immediately ‘OFF’, and note
whether the belt tends to slide off the idler
drum or drive drum. If the belt did not tend to
slide off, it is tracking properly.
Note: Please refer to the “ON/OFF switch” in
the operation section below for step one.
2. If the sanding belt moves toward the disc,
turn the tracking knob UP about 1/4 turn.
3. If the sanding belt moves away from the
disc, turn the tracking knob DOWN about 1/4
turn.
4. Turn the switch ‘ON’ and immediately ‘OFF’, noting belt movement. Readjust tracking knob
if necessary.
5. Confirm the gap between the work support and sanding surface is 1/16” (1.6 mm) maximum,
adjust if needed.
Auxiliary mounting for vertical
sanding (Fig. 8 & 9)
Note:
Ensure the work support is removed
from belt bed.
1. Insert the work table index pin into the hole
in the belt bed.
2. Position the large flat washer over the table
locking knob, then securely tighten the
locking knob by turning it clockwise (Fig. 8).
3. Using the hex key provided, loosen
the positioning bolt by rotating it
counterclockwise (Fig. 9).
4. Raise the belt bed to the vertical position and
tighten the positioning bolt.
Note:
Before vertical sanding, always square
the table to the sanding belt with a combination
square (not included).
WARNING
To avoid trapping the
workpiece or fingers
between the table and sanding surface, the
table edge should be no more than 1/16”
(1.6 mm) away from sanding surface.
0
0
Fig. 9
Fig. 7
Drive drum
Idler drum
Tracking
knob
ON/OFF
switch with
safety button
Fig. 8
Index pin
Table
locking
knob
Tighten
Washer
Work table
Positioning
bolt
Tighten
Loosen

