21
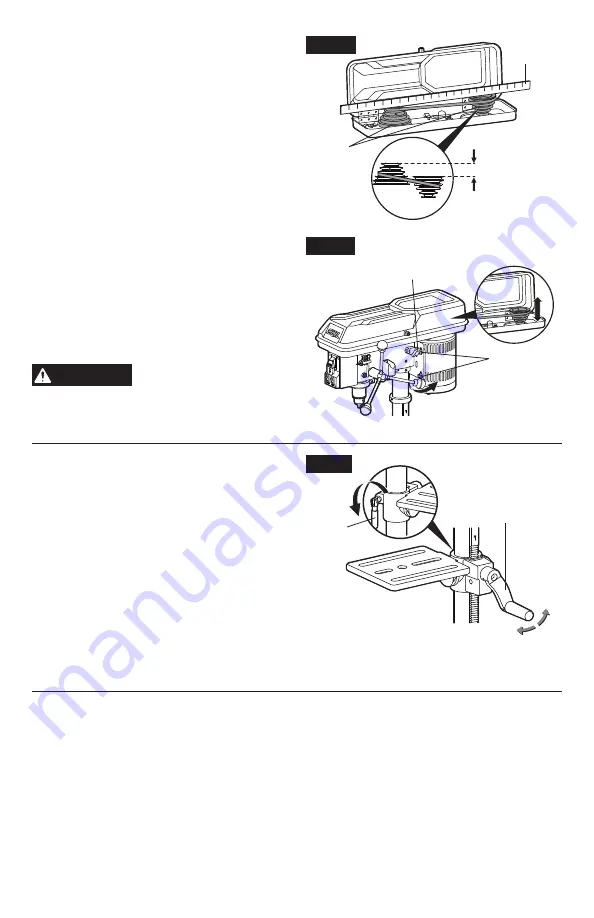
Align the belt pulleys
(Fig . 15a & 15b)
1. Check the alignment of the pulleys with
a straight edge (such as a ruler, level, or
framing square) by laying the straight edge
across the top of the pulleys (Fig. 15a).
2. If the pulleys are NOT aligned, release belt
tension by loosening the belt tension lock
knob counterclockwise (Fig. 15b).
3. Loosen the two motor mount nuts (M8 X 16)
with an adjustable wrench (not included),
and lower or raise the motor until the pulleys
are aligned.
Note: The height difference between the two
pulleys shall not exceed 1/16” (1.6 mm).
4. Tighten the motor mount nuts with an
adjustable wrench to maintain the position.
5. Lock the motor for the proper belt tension
and tighten the tension lock knob clockwise.
WARNING
Never operate drill press
with pulley housing cover
open.
Raise, lower, or rotate the table
(Fig . 16)
1. To raise or lower the table, loosen the table
support lock handle counterclockwise and
turn the crank handle until the table is at the
desired height.
2. Tighten the lock handle clockwise before
drilling!
3. To rotate the table around the column,
loosen the table support lock handle
counterclockwise and rotate the table around
the column to the desired position.
4. Tighten the lock handle clockwise before drilling!
Fig . 15a
1/16′′
(1.6mm)
Straight
edge
Pulleys
Fig . 16
Loosen
Crank
handle
Lower
Raise
Lock
handle
Fig . 15b
Tension lock knob
Loosen
Motor mount
nuts
Summary of Contents for DP9505-00
Page 95: ......
Page 96: ...06 22 ...


