8
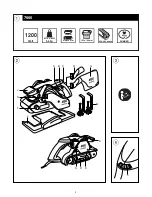
• Speed control
4
For optimal sanding results on different materials
- with wheel C you can set the desired sanding speed
- adjust speed to grit size used
- before starting a job, fi nd the optimal speed and grit
by testing out on spare material
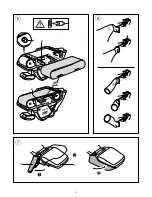
• Changing of sanding belts
5
! disconnect
the
plug
- lift
lever
D
- remove sanding belt
- insert new belt with arrows printed at inner side of
belt pointing in same direction as arrow E on tool
- push
lever
back
! change sanding belts in time
! never fold sanding belts
In case belt runs off tool (mostly caused by inferior belt
quality), you should
- switch on the tool
- turn knob F
2
till the sanding belt is running in line
with the fl at side of the tool
- use new belt, if belt still runs off tool
• Dust suction
6
- mount dustbag G as illustrated (2 positions)
- empty dustbag regularly for optimal dust pick-up
performance
- when using tool with vacuum cleaner, mount vacuum
cleaner adaptor H as illustrated (3 positions)
! do not use dustbag/vacuum cleaner when
sanding metal
• Auxiliary handle
7
Use lever K for adjusting auxiliary handle J (2 positions)
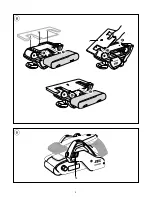
• Mounting of sanding frame
8
- mount sanding frame L for equalizing surfaces
without scratches or grooves, and ensure it is in
place securely
! sanding frame L becomes hot during use; do not
touch it before it has cooled down
! remove sanding frame L before storing the tool
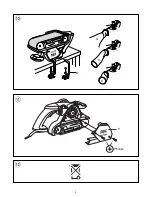
• Holding and guiding the tool
9
- guide the tool parallel to the working surface
! while working, always hold the tool at the grey-
coloured grip area(s)
! do not apply too much pressure on the tool; let
the sanding surface do the work for you
- do not tilt the tool in order to avoid unwanted
sanding marks
- keep ventilation slots N
2
uncovered
APPLICATION ADVICE
• For sanding bare wood surfaces move the tool in
straight movements in line with the grain
• For sanding all other surfaces move the tool in oval
movements over the material
• For stationary use mount tool on workbench by means
of 2 clamps M
! mount dustbag G as illustrated
! mount vacuum cleaner adaptor H as illustrated
• Never use the same sanding belt for wood and metal
• Vibration level
The vibration emission level stated at the back of this
instruction manual has been measured in accordance
with a standardised test given in EN 60745; it may be
used to compare one tool with another and as a
preliminary assessment of exposure to vibration when
using the tool for the applications mentioned
- using the tool for different applications, or with
different or poorly maintainted accessories, may
signifi cantly
increase
the exposure level
- the times when the tool is switched off or when it is
running but not actually doing the job, may
signifi cantly
reduce
the exposure level
! protect yourself against the effects of vibration by
maintaining the tool and its accessories, keeping
your hands warm, and organizing your work
patterns
MAINTENANCE / SERVICE
• Always keep tool and cord clean (especially the
ventilation slots N
2
)
- remove adhering sanding dust with a brush
! disconnect the plug before cleaning
• Should the dust suction not function properly anymore,
you may open housing part P as illustrated and remove
possible accumulated sanding dust
!
! disconnect the plug before cleaning
• If the tool should fail despite the care taken in
manufacturing and testing procedures, repair should be
carried out by an after-sales service centre for SKIL
power tools
- send the tool
undismantled
together with proof of
purchase to your dealer or the nearest SKIL service
station (addresses as well as the service diagram of
the tool are listed on www.skileurope.com)
ENVIRONMENT
•
Do not dispose of electric tools, accessories and
packaging together with household waste material
(only for EU countries)
- in observance of European Directive 2002/96/EC on
waste of electric and electronic equipment and its
implementation in accordance with national law,
electric tools that have reached the end of their life
must be collected separately and returned to an
environmentally compatible recycling facility
- symbol
@
will remind you of this when the need for
disposing occurs
Summary of Contents for Masters 7660
Page 3: ...3 F D E 5 H G 6 K J 7 ...
Page 4: ...4 L 8 N 9 ...
Page 5: ...5 H H G M 0 Phillips P ...
Page 9: ... 96 ...
Page 13: ......


