7
•
On/off
2
-
press button B
-
LCD display E will show pressure
information
-
press button B again to turn off
! after approx. 5 minutes
of inactivity the tool will
automatically turn off
•
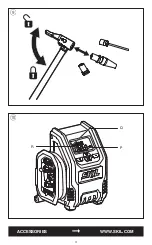
Set target pressure
q
-
target pressure Q can be increased
and decreased with + and – buttons
C to the desired value (between 0.2
and 11.0 bar)
-
to change the pressure unit P press
+ and – buttons together
!
to avoid over inflation, read the
instruction provided with the
items to be inflated and never
exceed recommended pressures
•
Inflating
-
to start inflating, press button D
-
the actual pressure R is shown
! when the actual pressure is
higher than the target pressure,
the tool will not start inflating
-
to pause or stop inflating, press
button D again
-
the tool stops when the target
pressure is reached
! allow the tool to cool down for 5
minutes after each 15 minutes of
continuous use
MAINTENANCE / SERVICE
•
This tool is not intended for
professional use
•
Clean the tool with a dry, soft cloth (do
not use cleaning agents or solvents)
! remove battery from tool before
cleaning
•
If the tool should fail despite the care
taken in manufacturing and testing
procedures, repair should be carried
out by an after-sales service centre for
SKIL power tools
-
send the tool
undismantled
together with proof of purchase to
your dealer or the nearest SKIL
service station (addresses as well
as the service diagram of the tool
are listed on www.skil.com)
•
Be aware that damage due to overload
or improper handling of the tool will
be excluded from the warranty (for
•
Removing/installing the battery
2
•
Battery level indicator
7
-
press the battery level indicator
button L to show the current battery
level
7
a
! when the lowest level of the
battery indicator starts flashing
after pressing button L
7
b, the
battery is empty
! when 2 levels of the battery
indicator start flashing after
pressing button L
7
c, the
battery is not within the
allowable operating temperature
range
•
Battery protection
The tool is suddenly being switched
off or prevented from being switched
on, when
-
the load is too high
--> remove
load and restart
-
the battery temperature is not
within the allowable operating
temperature range of -20 to
+50°C
--> 2 levels of the battery
level indicator start flashing when
pressing button L
7
c; wait until
battery has returned within the
allowable operating temperature
range
-
the battery is nearly empty (to
protect against deep discharge)
--> a low battery level or flashing low
battery level
7
b is shown by the
battery level indicator when pressing
button L; charge battery
! do not continue to press the
on/off switch after the tool is
switched off automatically;
battery may be damaged
•
Connecting the air hose
8
-
unlock the air chuck clamp N
-
place the air chuck M on valve stem
! for Presta and Dunlop valves
screw the adapter K on the valve
stem before placing the air chuck
-
push the air chuck down so that the
threaded section of the valve stem is
inside the air chuck
-
lock the air chuck clamp N
•
Removing/installing adapters
9
-
unlock the air chuck clamp N
-
push the adapter into the air chuck
M until it stops
-
lock the air chuck clamp N
Summary of Contents for PWRCORE 12 2153
Page 2: ...2 2153 1 ʾʿ ÇÄÌ ʾƓˁ Ã ʿƓʽ À ʾƓ Ã ˁƓʽ À Å Ð ʾʾƖʽ º Ê 2 H J K L A E F G C D B ...
Page 3: ...3 7 8 7 7 7 F a b c N M 3 4 5 6 L ...
Page 4: ...4 ACCESSORIES WWW SKIL COM q 9 P R Q ...
Page 117: ...117 WWW SKIL COM q 9 P R Q ...
Page 118: ...118 7 8 7 7 7 F a b c N M 3 4 5 6 L ...
Page 119: ...119 1 ʾʿ ÇÄÌ Å Ð ʾʾƖʽ º Ê 2 H J K L A E F G C D B 2153 ʾƓˁ Ã ʿƓʽ À ʾƓ Ã ˁƓʽ À ...
Page 120: ... شارژی باد پمپ كونينانبرج ڨ ب سكيل هولندا بريدا د ب 2610S00931 04 20 2153 TM ...

