background image

SKIPPER

 Electronics AS  

Telephone: 

+47 23 30 22 70

Enebakkveien 150 


www.skipper.no

P. O. Box 151, Manglerud  

E-mail:  support@skipper.no

0612 Oslo, Norway 


Co. reg. no: NO-965378847-MVA

Summary of Contents for CU-M001-SA

Page 1: ...Dual Axis Doppler Speed Log System SKIPPER Electronics AS Telephone 47 23 30 22 70 Enebakkveien 150 www skipper no P O Box 151 Manglerud E mail support skipper no 0612 Oslo Norway Co reg no NO 965378847 MVA Document no DM M003 SA Rev 2124 For software ver 1 2 0 Date 2021 06 24 ...

Page 2: ...ì como su uso indebido y o su exhibición o comunicación a terceros De los infractores se exigirá el correspondiente resarcimiento de daños y perjuicios Weitergabe sowie vervielfältigung dieser unterlage verwertung und mitteilung ihres Inhaltes nicht gestattet soweit nicht ausdrücklich zugestanden Zuwiderhandlungen verpflichten zu schadenersatz Toute communication ou reproduction de ce document tou...

Page 3: ...R Electronics AS P O Box 151 Manglerud NO 0612 Oslo Norway Phone 47 23 30 22 70 Fax 47 23 30 22 71 E mail support skipper no SOFTWARE UPDATES AND TECHNICAL SUPPORT Find us on the internet www skipper no YOUR FEEDBACK IS APPRECIATED If you find errors misspellings or poorly explained sections in this document please do not hesitate to contact us at support skipper no ...

Page 4: ...this value kn NM to change to other units 11 Page A Primary Data 12 Page B User selectable 13 Page C Resultant and direction 14 Page D Docking 15 Page E Depth 16 Page 2nd Data From DL1 Only in DL21 17 CONFIGURATION MENU 20 RUNTIME SCREEN SETUP 22 CALIBRATION 23 Calibration Status 24 Calibration Installation angle 25 Calibration Speed 27 Calibration Temperature 31 Calibration Tilt 31 ALERT INFORMAT...

Page 5: ...s In addition the following abbreviations are used WT Water track BT Bottom track STW Speed through water SOG Speed over ground TripW TripG Text for trip total through water W and over ground G ECDIS Electronic Chart Display and Information System INS Inertial Navigation System VDR Voyage Data Recorder ROT Rotation from Gyro GYRO Gyroscopic heading rotation sensor HDG Heading DL2 2 Axis Doppler Lo...

Page 6: ...olising the data is transversal port or starboard Symbolising the resultant speed direction Simulator Mode The system is using a simulator to generate the speed and depth Option Mute Mode The system has a sync option activated and the system is currently being muted No acoustics Symbol warning Warning Alert Status Sound Unrectified unacknowledged 2 beep Rectified unacknowledged No beep Unrectified...

Page 7: ...ese echoes is translated to speed By having 2 transducers pointing in 90 deg directions the speed can be measured in two axis The DL2 system sends from both beams at the same time The transducers are moulded into the same sensor head together with the amplifiers and detection circuitry transceiver In addition the sensor sends at two frequencies giving accurate values The sensor also contains tempe...

Page 8: ...sel Note The Distance over ground measures only when the bottom is within range The control unit The user can operate the system via a touch screen or using an application on the conning unit The displays are intuitive and have a menu system but also allows the user to click on the screen to adjust the relevant parameters Full setup calibration and diagnostics are available from the screens Calibr...

Page 9: ...ges A E all except A can be deactivated Additional an optional page 2 nd system is available for use on DL21 systems to show STW from DL1 part of DL21 Page A Basic Page B Combination Programmable Optional Page C Rose diagram Optional Page D Docking Optional Page E Depth Optional Page 2nd system Optional for DL21 systems ...

Page 10: ...red information Page A is not possible to disable SOG is always on in page A Configuration and enabling of pages is performed in config See Runtime Screen setup Brightness Dimming The brightness can be set from 1 to 100 If an unacknowledged alert is present the screen cannot be dimmed to the lowest settings If the screen is dimmed too low to see press and hold on the left of the screen the dimming...

Page 11: ...Rate of turn is connected from an external source the speed will be shown with a symbol when the depth 150m bt this will n ot be sent out of the system as this system is not the source of the data Press this value kn NM to change to other units Information 1 5 Informations can be set to the following Water temperature Trip Total Alert Hi Alert lo Pitch Roll SOG from GPS ROT from gyro Heading from ...

Page 12: ...ata The angle of the movement is shown in the symbol of a vessel with a moving arrow If the system is a DL21 then the information from the DL1 can also be shown on this display as shown above An option exists in DL2 setup to change the DL2 system tinto a SOG only system The STW param eter coming from DL1 part In this case the STW information will not be available except from DL1 If selected The GP...

Page 13: ...l Page B User selectable Options This Screen can be used to display combinations of data either as a vector with large arrows as shown or as a resultant and direction symbol The Information sidebar can be programmed to show whatever is available ...

Page 14: ...e current flows sets This option is default off and can only be turned on if there are a satisfactory number of calibrations 3 If the bottom tracking of the system fails too deep or poor signal and a GPS input is connected then this display can be made to compensate the current using that signal Options This screen can show the resultant speeds of the vessel and also the direction of the current I...

Page 15: ... designed to clearly show the speed over ground of the vessel and is particularly useful during docking manouvres and general manouvring If Gyro is connected with a valid ROT signal the system will calculate the Aft speed based on the vessel length measurements entered in DL2 Menu ...

Page 16: ...nder for the vessel The average value takes the forward looking beam and calulates the depth at that point and using the meas ured speeds predicts when that point is vertically under the vessel The graphic on the left shows an echogram of the depth below the vessel This graphic is unusual in that it uses the speed to calulate where the displayed points are relative to the vessel If the vessel sail...

Page 17: ...e second DL1 Single axis system communicates internally no ad ditional wiring needed with the DL2 and allows it to display the calibrated speeds from that system The Information on the sidepanel is from the this DL2 system The Colour background is in place to highlight that this is secondary information In the case of an alert on the DL2 the system will jump back to page A ...

Page 18: ...ernally for quality control of data Depth is measured from all beams These beams are slanted at approx 30 degrees and will therefore not measure directly underneath the vessel For this reason they cannot be used as an approved sounder However they cvan be ouput as a PSKPDPC NMEA message Trip The trip values measure the distance travelled through water or over the ground The total is the distance s...

Page 19: ...m of the vessel In some cases the vessel may drag water with it and this is compensated by calibration This unit meausres within the first 3 m but if required the sampling volume can be moved out from the vessel in the DL2 setup pages to give better results At low depths the system will adjust its sampling volume down to be within the water volume This may increase the STW noise Depth Depth is cal...

Page 20: ...Page 20 of 40 2021 06 24 CU M001 User manual CONFIGURATION MENU By pressing the Config button on the top left a set of configuration menus are entered ...

Page 21: ...ic unit communication setup DL2 SETUP DL2 sensor vessel specific setup COMMUNICATION SETUP Setup of NMEA input Output AUX SETUP Setup of AUX input output To return back to page A D from Config press BACK which is in the top left Cofiguration screens marked are Password protected Please see Installation manual for more details If communication with JB70 Electronic unit is not possible from display ...

Page 22: ...On the right it is possible to select the main information to be displayed and the information panels can be changed to show other relevant information More information of the main display options can be found on the page descriptions Page A Setup Page B Setup Page C Setup Page D Setup Page E Setup Page 2nd Setup Current parameters are calulated by combining the SOG and STW parameters As currents ...

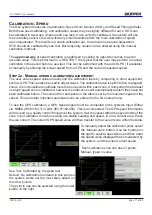
Page 23: ...eed changes due to drag are usually linear with speed In most cases a single calibration is adequate however on some vessels more may be required Speed logs are calibrated in the factory to give reasonable results after installation however installation and hydrodynamics vary from vessel to vessel It is therefore necessary to calibrate speed logs once in place SKIPPER speed logs have 4 parameters ...

Page 24: ...red speed and GPS SOG if available The table to the right indicates the likely quality of this data The vessel should always have at least one Sea test calibration at a high speed To adjust or to look closer at any of these settings The type of adjustment can be selected at the bottom of the page Pressing BACK will return the user to the previous menu or displays Calibration curves Blue line STW c...

Page 25: ...ts will be incorrect An offset will result in the vessel typically showing too much transversal speed but may also result in speed calibration failing Measuring Installation angle A software measument of installation angle is only possible on 2 axis longitudal transversal speed logs such the DL2 The installation angle measurement must be performed when the vessel is in steady speed and steady head...

Page 26: ...speeds Fine adjust Installation angle in software Installation angle offset in the software is recommended to fine adjust the angle inside 10deg Allthough the installation error in the software may be set to 180deg The software will present live NOW speed and angle of STW and SOG Any deviation between the two measurements will in most cases be caused by current in the water Installation angle cali...

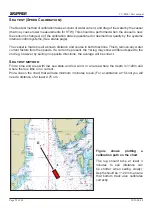
Page 27: ...table is split into five real speed zones It is not possible to calibrate more than one point within each zone It is important that at least one high speed zone is calibrated however the other zones will automatically adjust if they have not been calibrated before The scale of the real speed on the table is set by the maximum speed of the vessel This and other important parameters can be entered i...

Page 28: ...nsor is changed or if the calibration data is questioned or deemed low quality by the systems internal control systems See status page The vessel is made to sail a known distance and course in both directions This to remove any water current factors from the speeds If a current is present the 1st leg may show a different speed to the 2nd leg however by sailing in opposite directions the average wi...

Page 29: ...t Leg 1 and Stop Leg 1 at the beginning and end as instructed Turn the vessel and perform Leg 2 along the same line in opposite direction in the same speed If the system has GPS on an input VTG then the system can be made to automatically stop the leg when the desired distance has been sailed In this case it is not necessary to sail exact legs but just make sure leg 2 is parallel and in the same a...

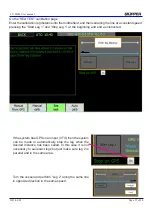
Page 30: ...he right If you wish to perform a second calibration at another speed move to the next calibration number and repeat Avg measured STW The Water Speed measured in leg Avg measured SOG The bottom Speed measured in leg Calcul real speed The Real speed calculated by distance set time taken GPS AVG the average speed during the leg Max and Min are below This should be within 0 2 kn the real speed if not...

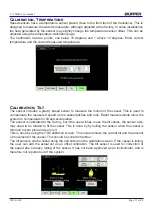
Page 31: ...te the measured speed as the vessel pitches and rolls Rapid measurements allow the system to compensate for tilt and acceleration The sensor is calibrated at the factory but if the user wishes to use the tilt values the sensor axis may need to be rotated to fit the vessel This is done by by nulling the sensor when the vessel is trimmed to zero pitch and zero roll This is done by using the Tilt Cal...

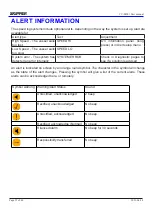
Page 32: ...d an error internally SYSTEM ERROR Check in Diagnostic pages to see if a solution is advised An alert is indicated on screen by an orange round symbol The character in the symbol will change as the state of the alert changes Pressing the symbol will give a list of the current alerts These alerts can be acknowledged here or remotely Symbol warning Warning Alert Status Sound Unrectified unacknowledg...

Page 33: ...tinue to flash No communication with the sensor the speed Depth and temp data will be but other functions will work Bad data from sensor Check the diagnostics menu Other internal error detected Check the diagnostic menu Speed alerts Alerts can be set for high speed and low speed If in use they should be made accessible as informations on the right hand side In this case they can be changed by pres...

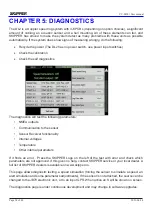
Page 34: ...following parameters NMEA outputs Communication to the sensor Sensor Receiver functionality Internal voltages Temperature Other internal parameters If it finds an error Press the SKIPPER Logo on the left of the test with error and check which parameters are not approved If this gives no help contact SKIPPER service or your local dealer A full list of SKIPPER dealers is available on www skipper no ...

Page 35: ...software set the raw data type to the parameter with problems and press start The system will present the GPS data while this function is in use to prevent interference with navigation This data should be collected when the vessel is experiencing the issue if the system has problems stopping this function a restart of the electronic unit may be required In coastal areas it is not uncommon to find ...

Page 36: ...res These pages are password protected to reduce the risk of user error More information of these is available in the Installation manual CU M001 SETUP Display communication setup JB70 SETUP Electronic unit communication setup DL2 SETUP DL2 sensor vessel specific setup COMMUNICATION SETUP Setup of NMEA input Output AUX SETUP Setup of AUX input output ...

Page 37: ...res careful calibration in very calm conditions and may require all 5 calibration points activation of options It is possible to activate some options by entering a code number in the DL2 Setup In the bottom left of the screen the screen select options and enter the code to enable the option you require The option will be activated and can then be enabled or disabled by the user These codes can be...

Page 38: ...Page 38 of 40 2021 06 24 CU M001 User manual This page is intentionally left blank ...

Page 39: ...2021 06 24 Page 39 of 40 CU M001 User manual This page is intentionally left blank ...

Page 40: ...SKIPPER Electronics AS Telephone 47 23 30 22 70 Enebakkveien 150 www skipper no P O Box 151 Manglerud E mail support skipper no 0612 Oslo Norway Co reg no NO 965378847 MVA ...

Reviews: