background image

Technical User Guide 


DA 74BC Winch Motor 

Product Description 

DA 74BC is a 24V winch motor with a wall fitting and an arm which is used to adjust wall inlets, ceiling inlets 
or emergency opening of windows and doors in houses. 

DA 74BC can be mounted for either ON/OFF or stepless regulation and is controlled by a house computer. The 
winch motor can be operated manually by disconnecting power, activating the push button for the manual 
release and turning the wall fitting arm. 


Before activating the manual release, you 

must

 retain the wall fitting arm. 

DA 74BC can be set to ON/OFF, stepless, ON/OFF reverse or stepless reverse using the jumper on the PCB. 

DA 74BC is controlled by 24V DC, ensuring safe emergency opening in case of a power failure or other 
failure. 

DA 74BC is easy to clean thanks to its compact design. 


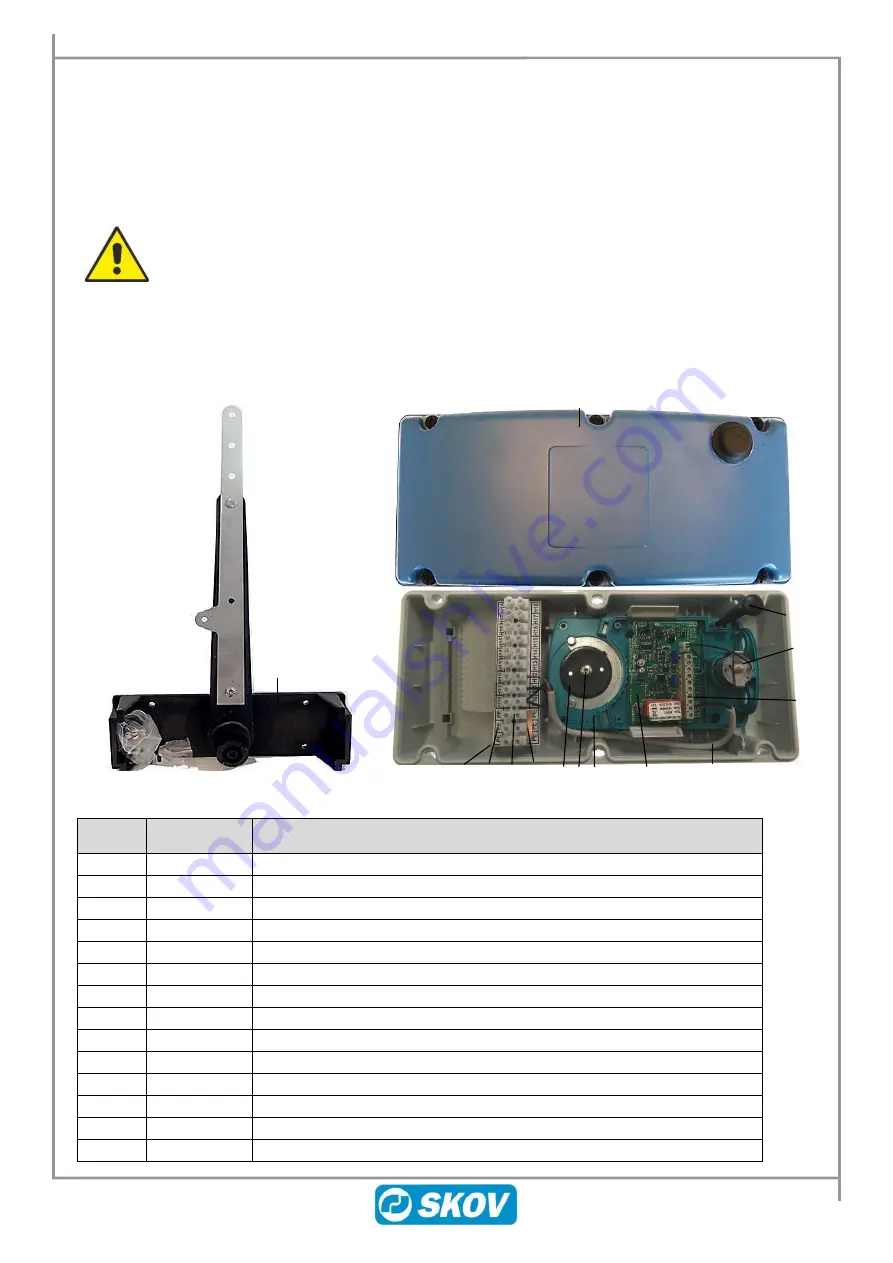
Figure 1: DA 74BC 


Position 

Article no. 

Winch motor DA 74BC  

527272 

DA 74 cover incl. quarterturn screws 

301074 

Relay cable 0.75 mm 2x300 + 1x80 


Retaining disc 


Locking screw 

432950 

Gear unit complete (green) 

290074 

PCB 


Connection terminals on PCB 

432952 

Motor 


Push rod manual release 

10 

310323 

Mounting clip for DIN rail, black 

11 

344174 

Label for DA 74 terminal block 12p 

12 

310000 

Terminal block 12P 4 mm2 

13 

310237 

Phase busbar cobber 3p 10mm-spacing 

14 

432090 

DA 74 wall fitting for wire pull 

14 

4  5 

10  11 

13  3 

12 

Summary of Contents for DA 74BC

Page 1: ...User Guide English For other language variants of this document we refer to Espa ol Para otras variantes del idioma de este documento visite Fran ais Pour les versions dans d autres langues de ce docu...

Page 2: ...of this manual may be reproduced in any manner whatsoever without the express written permission from SKOV A S SKOV A S has made all reasonable efforts to ensure the accuracy of the information contai...

Page 3: ...le Routing 8 4 1 2 Connection and Circuit Diagram for DA 74BC 8 4 1 2 1 Connection in DA 74BC ON OFF 8 4 1 2 2 Circuit Diagram for DA 74BC ON OFF 9 4 1 2 3 Connection in DA 74BC Stepless 9 4 1 2 4 Cir...

Page 4: ...OFF stepless ON OFF reverse or stepless reverse using the jumper on the PCB DA 74BC is controlled by 24V DC ensuring safe emergency opening in case of a power failure or other failure DA 74BC is easy...

Page 5: ...e tools are not supplied by SKOV A S Item Description Multimeter Screwdriver set Side cutting pliers Long nose pliers Knife Water pump pliers Cordless drill Drill bits various sizes Adjustable spanner...

Page 6: ...on the wall Screws and rawlplugs B are included They may however be inadequate depending on the wall material Figure 2 Wall fitting Turn the pull arm C so that the wide groove D in the plastic shaft f...

Page 7: ...r and the inlet window door and the like to be adjusted Check that 1 The inlet window door and the like can open close completely If not readjust the mechanical connection and check again 3 1 4 Instal...

Page 8: ...be carried out in a dead environment Supply isolator is not supplied by SKOV A S 4 1 1 Cable Routing All cables must be mounted in M25 glands protection class minimum IP65 Cables are to be secured in...

Page 9: ...gnal 0 5V O C turns ON Feedback signal 9 2V 85 degree opening relay turns ON Figure 10 Connection stepless H1 H2 H3 H6 H7 H8 H9 H H10a 11a CALIBRATE 0V 0 10V 24V 24V 24V 12a Example of terminal number...

Page 10: ...BC Stepless Figure 11 Circuit diagram stepless Example of terminal number For correct connection see the setup menu Show Installation in Computer Supply from emergency opening or internal 24 V Q1 F6 Q...

Page 11: ...ack signal 0 5V O C turns ON Feedback signal 1 8V 15 degree opening relay turns ON STEPLESS REVERSE Control voltage 24V 0V Open 0V 24V Close Feedback signal 0 5V O C turns ON Feedback signal 9 2V 85 d...

Page 12: ...Pay attention to the shaft sealing and the sealing of cable lead throughs 2 Activate the manual release and check that the swivel shutter moves unobstructedly in its entire working range 5 2 Dismantli...

Page 13: ...to the connection and circuit diagram Has the motor plug been mounted Mount the plug Has calibration been forgotten Press the CALIBRATE button the LED must be constantly on while the winch motor opens...

Page 14: ...nning time no load 70 secs Running time max load 120 secs Max torque 24Nm Cable knock out pieces 6 25 5mm for M25 cable gland Environment Ambient temperature 10 C to 45 C Warehouse temperature 25 C to...

Page 15: ...Motor 6 2 Pull Length and Force The measurements are from the centre of the wall fitting arm Arm length mm Max pull force kg Pull length mm 392 6 2 532 357 6 8 483 322 7 6 439 290 8 4 395 176 13 9 251...

Page 16: ...SKOV A S Hedelund 4 Glyng re DK 7870 Roslev Tel 45 72 17 55 55 Fax 45 72 17 59 59 www skov com E mail skov skov dk 2017 01 31 604150 8 02 03 EN Made in Denmark...

Reviews: