Sky Climber
ZEABORN GUIDELINES
18.11.2020 Version 1
- Page 21
-
STEP 2:
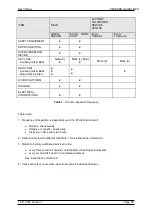
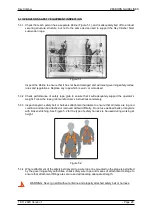
Lay out swing stage and assemble stirrups. Be sure to install end rails if stirrups are located more
than 45cm or more in from end of platform. Install guard-rails, toeboards and screening as required
by governing safety codes. Tighten bolts. Figure 3.6 illustrates a typical assembly.
Figure 3.6
STEP 3:
Lift the Hoist, insert stirrup strap into recess in stirrup, and retain by use of the lock nuts
and Grade 5 retaining bolts provided. Tighten nuts securely. Test Sky Lock operation
following pre-reeving inspection procedures in Section 5.4.2.1. Assemble the Sky Lock
brake to the hoist entrance guide, making certain that the rectangular link is assembled to
provide adequate clearance for the straight passage of the rope without interference. Set
the Sky Lock brake by rotating the reset handle.
STEP 4: Connect power
STEP 5: With the Hoist and stirrup maintained in the vertical position, thread the prepared top (see
Section 4.1.2) into the hoist entrance guide. Push rope into the unit until it stops. Then move
directional switch/lever in UP direction, while maintaining downward pressure on wire
rope, until self-reeving starts. Also insert the secondary rope into the Sky Lock.
WARNING: Keep hands clear of pinch pint where wire rope enters Sky Lock brake and
Hoist entrance.
CAUTION: Be sure that exit guide is clear, and that the wire rope can run freely away from the Hoist.
STEP 6: Test rigging by raising Hoist and platform or other suspended equipment about 0.5 meter off
the ground. Have an assistant jump on suspended equipment while an experienced
operator/rigger checks all rigging. Visually inspect all bolted connections of rigging and
suspended equipment.
Test emergency lowering system by raising suspended equipment about 1 Meter off the
ground, then manually releasing and re-engaging main Hoist brake using Controlled
Lowering Lever. (see Section 3.2.2)
Test Sky Lock trip performance as described in Section 5.4.2.2.
Test Sky Lock load performance as described in Section 5.4.2.3.


