background image

1) Flying Over Water

Do not use any kind of airbased protection 

(Bump‘air, Cygnus-type Airbag, or Airtec)  under 

any circumstances if there is a risk of landing in 

water. If you land in water using a Bump‘air, 

there is a real danger that its buoyancy under the 

base plate and behind the pilot’s back will cause 

pushing the pilot‘s head under the water. During 

SIV or fl ying over water, we recommend the use 

of a lifejacket equipped with a collar which will 

keep the pilot’s head above water in case of 

losing consciousness.

2) Landing

Never land in a seat position, it could result in 

serious injury, a back protector is not intended to 

replace the landing gear.

Safety Information

9

1) Advice on Maintanance



The harness must be checked at regular 

intervals, to eliminate the   possibility of wear 

and damages .



Any damaged parts should be repaired or 

replaced by the manufacturer.



The carabiners must be replaced by new ones 

every 5 years.



These carabiners must never be used for 

anything else than a paraglider (not for 

climbing or towing...).



All repairs must be carried out by the 

manufacturer or by qualifi ed persons who have 

been authorized to do so by the manufacturer, 

and always using the original materials (thread, 

webbing, buckle s).



The zip fasteners should be lubricated from 

time to time, using a silicone spray.

The harness may be cleaned using mild soap 

and a soft brush. If your harness gets wet, it is 

advisable to treat your automatic buckles and 

carabiners with silicone grease from time to time.

2) Disposal

The harnesses cannot be discarded. Please, 

send the disused harnesses back to 

Sky Paragliders or to your dealer. The used 

harnesses will be disassembled and discarded 

appropriately.

Maintenance & Checks

10

3) Guarantee

REVERSE 2 is guaranteed for 2 years against 

any production fault since the date of purchase.

The guarantee does not cover:

Damage that was caused by misuse, by 

neglecting the regular maintenance, or in case of 

overloading the glider.

The guarantee also does not cover any damage 

caused by inappropriate landings.

In case you are ever unsure about the information 

contained in the manual, contact your SKY 

dealer.

4) Conclusion

Aircrafts can become dangerous in critical fl ying 

conditions. Always remember that your security 

lies in your hands. Do not underestimate the 

power and forces of nature.

Last but not least do not forget to enjoy fl ying.

The SKY Team wishes you a lot of exciting fl ights 

and happy moments with your REVERSE 2.

15

Summary of Contents for REVERSE 2

Page 1: ...REVERSE 2 SKY User Manual for REVERSE 2 Harness Handbuch für Gurtzeug REVERSE 2 Mode d empoi de la REVERSE 2 ...

Page 2: ...ENG DE FR ...

Page 3: ...enungsanleitung sorgfältig durch Bei auftretenden Fragen oder bei Problemen wenden Sie sich bitte an den Fachhändler Importeur oder direkt an Sky Paragliders Dieses Produkt wurde zum Gleitschirmfliegen entwickelt Die Benutzung erfolgt immer auf eigene Gefahr Der Pilot trägt alleine die volle Verantwortung für die Inbetriebnahme des Produkts Mercide voler avec un produit Sky Paragliders nous vous re...

Page 4: ...Contents Page 5 Inhalt Seite 16 Index Page 26 REVERSE 2 S M L XL ENG DE FR 4 ...

Page 5: ...Profile 6 3 Reverse 2 Scheme 7 4 Harness Set Up 8 1 Reserve Chute Installation 10 11 2 Speed System Adjustments 12 5 Check Before Flight 12 6 Take Off 13 7 Landing 13 8 Adjustments of the Flying Position 14 9 Safety Information 15 10 Maintenance Checks 15 Contact 37 5 ...

Page 6: ...ty All liability is excluded by the manufacturer or the distributor The pilot is responsible for airworthiness of his her aircraft The pilot must comply with legal regulations Model name REVERSE 2 Total maximum weight in flight see the technical data Integrated reserve pocket with a large and easy to grab handle Auto buckles SKY SAFETY STRAP SYSTEM Reversible Bar tacks as standard stitching procedu...

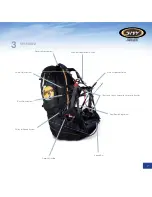
Page 7: ...nt Straps Main Suspention Points Chest and Legs Straps with Automatic Buckles Seat Board Adjustment Speed Bar Reserve Handle Pulley for Speed System Back Adjustement Lateral Adjustement Reserve Attachement REVERSE 2 3 7 ...

Page 8: ...ops on the parachute deployment bag inside the pocket it can also be sewn in at an appropriate place which must be done by a qualified person only WARNING After the installation of the reserve parachute in the harness it is ABSOLUTELY ESSENTIAL to do a simulation under a static swing making sure that the parachute release system operates correctly and the parachute comes out easily The elastic cord...

Page 9: ...9 ...

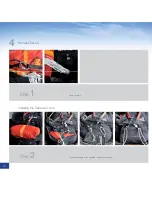
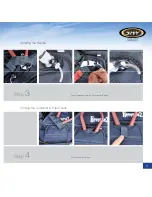
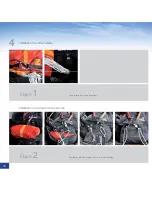
Page 10: ...Installing the Reserve Chute Reserve risers Step 1 Place the reserve in the container and close the flaps Step 2 Harness Set Up 4 10 ...

Page 11: ...Close the pocket and put the needles in place Step 3 Put the handle in place Step 4 Installing the Handle Closing the Container Final Check 11 ...

Page 12: ...ts Test all adjustments familiarise yourself with using the reserve handle Check that the reserve handle and the needle are in the right position What Else to Check Before Take Off Make sure that there are no twists on the lines and risers that connect the harness to the glider Check chest side and shoulder straps adjustments Check that all buckles are locked Check your reserve handle 2 Speed Syst...

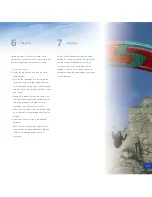
Page 13: ...d according to the size of the pilot but must allow some free movement so that one can run easily 5 Check that the lumbar straps are well adjusted so as to enable the required position after the take off 6 Check that the chest strap is pre adjusted correctly 7 Make sure that the leg straps and the chest strap buckles are fastened correctly closing the buckles improperly often results in accidents ...

Page 14: ...y feel more stable in the harness in turbulent conditions the wing will be more stable in case of an asymmetric collapse however it may be less inclined to bank when turning The stabilization brought about by tightening the chest strap of REVERSE 2 remains reasonable thanks to the integrated Auto Balance System REVERSE 2 is suitable for pilots who wish to fly their wings using the weight displaceme...

Page 15: ...orized to do so by the manufacturer and always using the original materials thread webbing buckles The zip fasteners should be lubricated from time to time using a silicone spray The harness may be cleaned using mild soap and a soft brush If your harness gets wet it is advisable to treat your automatic buckles and carabiners with silicone grease from time to time 2 Disposal The harnesses cannot be...

Page 16: ...7 3 Reverse 2 Schema 18 4 Gurteinstellungen 19 1 Installieren des Rettungsschirms 20 21 2 Beschleunigersystem Einstellungen 22 5 Überprüfungen vor dem Flug 22 6 Start 23 7 Landen 23 8 Verstellung der Sitzposition im Flug 24 9 Sicherheitsinformation 25 10 Wartung und Kontrolle 25 Kontakt 37 16 ...

Page 17: ...er Pilot trägt die Verantwortung für die Lufttüchtigkeit seines Fluggerätes Es wird vorausgesetzt dass der Pilot die gesetzlichen Bestimmungen respektiert und seine Fähigkeiten den Ansprüchen des Gleitschirms entsprechen 17 Name des Gleitschirm Models Reverse 2 Zugelassenes Gewicht beim Flug siehe technische Daten Integrierter Rettungsschirmcontainer Automatikverschlüsse SKY SAFETY STRAP SYSTEM Du...

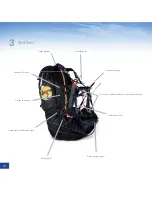
Page 18: ...Hauptaufhängung Brustgurt und Beinschlaufe mit Automatikschnallen Sitzbrettstützung Beschleunigersystem Rettungsgriff Umlenkrollen für Beschleuniger Rückenabstützung Seitlicher Brustgurt Rettungsleinen REVERSE 2 3 18 ...

Page 19: ...ontainer des REVERSE 2 passt für nahezu alle gängigen Gleitschirmrettungssysteme Sollte das zu verwendende Rettungssystem am Innenkontainer keine Möglichkeit bieten den Auslösegriff des Gleitschirmgurtzeugs einzuschlaufen so kann dieser auch an geeigneter Stelle des Innenkontainers angenäht werden Diese Arbeit muss durch einen Fachbetrieb ausgeführt werden Die Verschlussschlaufe des Rettungsschirm...

Page 20: ...en des Rettungsgerätes Verbindung Rettungsgerät mit Gurtzeug mittels Schraubschäkel Schritt 1 Einbau des Rettungsgerätes in den Rettercontainer und Schließen des Rettercontainers Schritt 2 Gurteinstellungen 4 20 ...

Page 21: ...en des Containers und Sichern der Splinte mit O Ring Gummis Schritt 3 Einsetzen des Griffs in die Griffhalterung Schritt 4 Installieren des Griffs Schließen des Außencontainers mit anschließender K Prüfung 21 ...

Page 22: ...e sich vertraut mit all den Einstellmöglichkeiten des Gurtzeuges Verwenden Sie alle Verstellmöglichkeiten um die beste Sitzposition zu erreichen Trainieren Sie auch das Werfen des Retters indem Sie ein paar Mal versuchen den Rettungsgriff zu erreichen Überprüfen Sie ob der Rettungsgriff in der richtigen Position ist 2 Beschleunigersystem Einstellungen Das Beschleunigersystem sollte auf die richtig...

Page 23: ...e Seitengurte entsprechend der gewünschten Sitzposition eingestellt sind 6 Die korrekte Voreinstellung des Brustgurtes prüfen 7 Ein letztes Mal prüfen dass die Bein und Brustgurte richtig verschlossen sind Überprüfung vor dem Start anhand der Check Liste Überprüfen Sie ob die Verbindung vom Gurtzeug zum Schirm nicht verdreht ist Einstellungen für Brust Seiten und Schultergurte Vergewisseren Sie si...

Page 24: ...Anti Balance Systems Der Pilot sitzt so bei unruhiger Luft stabiler im Gurtzeug und der Gleitschirm wird bei turbulenzbedingten asymmetrischen Einklappern stabilisiert und dreht normalerweise weniger weit ab Beim Schließen des Brustgurtes tritt bei den REVERSE 2 nur ein mäßiger Stabilisierungseffekt durch das integrierte Auto Balance System ein REVERSE 2 eignet sich deshalb vor allem für Gleitschi...

Page 25: ...n Betrieb und immer mit Originalersatzteilen oder Original Materialien ausgeführt werden Die Reißverschlüsse sollten ab und zu mit Silikonspray geschmiert werden Das Gleitschirmgurtzeug kann mit einem milden Waschmittel und einer weichen Bürste gereinigt werden Wenn Ihr Gurtzeug öfter mal nass geworden ist dann denken Sie daran die Automatikschließen und die Karabiner mit etwas Silikonfett zu schm...

Page 26: ...27 3 Vue Reverse 2 28 4 Installation Votre Sellette 29 1 Installer le parachute de secours 30 31 2 Réglage de l accélérateur 32 5 Prévol 32 6 Décollage 33 7 Atterrissage 33 8 Réglage de la position en vol 34 9 Informations de sécurité 35 10 Entretien et contrôles 35 Contact 37 26 ...

Page 27: ...igabilité de son aéronef Le pilote doit se conformer aux législations en vigueur Nom du model Reverse 2 Poids total maximum en vol voir caractéristiques technique Poche parachute intégrée avec poignée facilement préhendable Boucles automatique Système anti oubli Reversible Assemblage coutures automatiques Tissu Cordura Version du manuel d utilisation du 29 août 2011 Informations générales 1 La Rev...

Page 28: ... d attache principaux Boucles automatiques ventrale et cuissardes Réglage d assiette du plateau Accélérateur Poignée parachute Poulies passage accélérateur Réglages profondeur Réglage latéral Attaches parachute REVERSE 2 3 28 ...

Page 29: ...ecours à l intérieur de la poche on peut également la coudre à l endroit approprié Ce travail doit être effectué par un atelier spécialisé ATTENTION Après installation du parachute dans la sellette effectuez IMPERATIVEMENT une simulation sous portique pour vérifier que le système de libération fonctionne et que le parachute sort facilement L élastique qui sert au verrouillage de la poche parachute ...

Page 30: ...lation du parachute de secours Connecter le parachute de secours Étape 1 Positionner le parachute de secours et fermer les volets Connecter le parachute de secours Étape 2 Installation de votre sellette 4 30 ...

Page 31: ...Fermer la poche et positionner les aiguilles Étape 3 Positionner la poignée Étape 4 Positionnement de la poignée Fermeture du container vérification 31 ...

Page 32: ...oignée de parachute de secours Vérifier que la poignée soit correctement installée et que les aiguilles soient bien positionnées N oubliez pas d inclure dans votre check list d avant décollage Votre sellette doit être connectée au parapente sans twist Vérifier les réglages des épaules latéraux et ceux de la ventrale Vérifier que toutes les boucles soient fermées Vérifier la poignée du parachute 2 Régl...

Page 33: ...doivent laisser une certaine liberté de mouvement pour pouvoir courir facilement 5 Vérifier que les sangles latérales soient réglées conformément à la position désirée après décollage 6 Vérifier que la ventrale soit correctement préréglée 7 Vérifier une dernière fois que cuissardes et ventrale soient correctement fermées c est malheureusement la raison de trop nombreux accidents Décollage 6 Sans trop...

Page 34: ...uée Le pilote est alors plus stable dans la sellette en cas de turbulence l aile est stabilisée en cas de fermeture asymétrique et s engage théoriquement moins en virage La stabilisation induite par le serrage de la sangle de poitrine de la REVERSE 2 reste raisonnable grâce au dispositif Anti Balance System intégré La REVERSE 2 est bien adaptée aux ailes que l on désire piloter par déplacement du ...

Page 35: ...s doivent être effectuées uniquement par le fabricant ou un atelier autorisé par le fabricant et toujours avec des matières premières fils sangles et boucles d origines Les fermetures Eclairs doivent être de temps en temps lubrifiées avec un spray silicone La sellette peut être nettoyée avec un savon doux et une brosse souple Si vous utilisez régulièrement votre sellette en milieu humide pensez à re...

Page 36: ...36 ...

Page 37: ...Sky Paragliders a s Okružní 39 739 11 Frýdlant nad Ostravicí Czech Republic Tel 420 558 676 088 info sky cz com www sky cz com Contact Kontakt Contact 37 ...

Page 38: ... 2011 Sky Paragliders a s ...

Reviews: