background image

14

Parts & Repair

REMINDER: Pilots are responsible for any damage caused by improper use. 

Parts Replacement 

Standard parts such as extra batteries and remotes are available online for purchase when 
in stock. However, any non-standard parts such as cameras, screws, bodies, SD cards etc. 
can be ordered by placing an inquiry with our parts department at: 

partsinfo@dpiinc.com.

Rotor Replacement

The craft comes with replacement rotors if the originals are broken or badly damaged. To 
replace a rotor, gently pull it upwards and off of the motor shaft, then place the new rotor 
on the shaft and gently push down. Take special care not to bend or break the motor shaft 
or the rotor. If the rotors are difficult to remove by hand, try using a small set of pliers for 
a firmer grip on the rotor. 

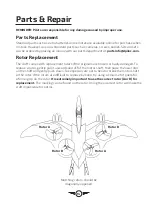
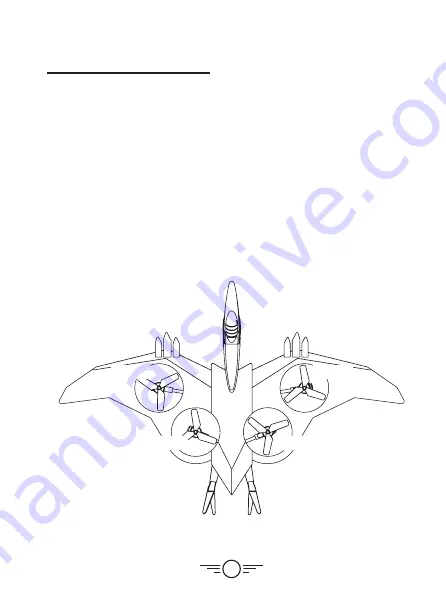
It is extremely important to use the correct rotor (A or B) for 

replacement. 

The marking can be found on the rotor. Using the incorrect rotor will make the 

craft impossible to control.

Matching rotors should be 

diagonally opposed.

Rotor A

Rotor A

Rotor B

Rotor B

Summary of Contents for Drone-asaur DR397 v1903-01

Page 1: ...User s Guide for Model DR397 v1903 01 ...

Page 2: ...ipment does cause harmful interference to radio or television reception which can be determined by turning the equipment off and on the user is encouraged to try to correct the interference by one or more of the following measures Reorient or relocate the receiving antenna Increase the separation between the equipment and receiver Connect the equipment into an outlet on a circuit different from th...

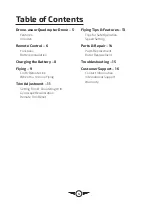
Page 3: ...ying 9 Craft Remote Link When You re Done Flying Trim Adjustment 11 Setting Trim Countering Drift Gyroscope Recalibration Remote Trim Reset Flying Tips Features 13 Tips for Safe Operation Speed Setting Parts Repair 14 Parts Replacement Rotor Replacement Troubleshooting 15 Customer Support 16 Contact Information International Support Warranty ...

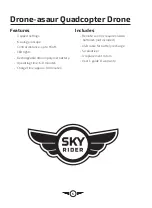
Page 4: ...D lights Rechargeable lithium polymer battery Operating time 6 8 minutes Charge time approx 90 minutes Includes Remote control requires 4 AAA batteries not included USB cable for battery recharge Screwdriver 4 replacement rotors User s guide warranty Drone asaur Quadcopter Drone ...

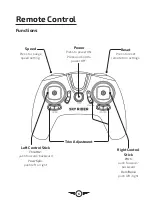
Page 5: ...g Left Control Stick Throttle push forward backward Yaw Spin push left or right Right Control Stick Pitch push forward backward Roll Bank push left right Reset Press to reset remote trim settings Trim Adjustment Power Press to power ON Press and hold to power OFF ...

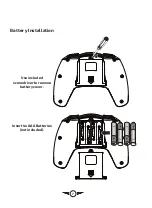
Page 6: ...7 Battery Installation Insert 4x AAA Batteries not included AAA 1 5V AAA 1 5V AAA 1 5V AAA 1 5V AAA 1 5V AAA 1 5V Use included screwdriver to remove battery cover ...

Page 7: ...maximum performance and flight time Connect the USB charging cable included to the USB port of a powered ON computer or USB power adapter not included then connect the charging plug to the battery plug While charging the USB plug will display a solid red light When charging is complete the RED LED on the USB charger will be OFF Be sure to correctly match the charging plugs or damage may occur REMI...

Page 8: ...ill sound and the lights on the craft and the remote will blink in unison when they have linked with each other Step 3 Push the Left Control Stick throttle fully forward then pull the stick fully rearward When a chime has sounded the craft is ready to fly Step 1 Power ON the craft by inserting the battery in the compartment and connecting it to the power cable attached to the craft The LED lights ...

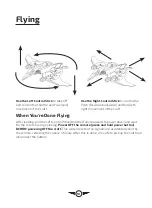
Page 9: ...ring OFF the craft This will ensure that no signals are accidentally sent by the remote reducing the chance of injury After this is done it is safe to pick up the craft and disconnect the battery Flying Use the Right Control Stick to control the Pitch forward backward and Roll left right movement of the craft Use the Left Control Stick to take off and control the throttle and Yaw spin movement of ...

Page 10: ...ial damage adjust the trim while attempting a stable hover Try to avoid making any exaggerated movements with the flight controls Adjust one trim setting at a time to avoid confusion Adjusting the trim will help with drift but it will not entirely eliminate it Turbulence and other factors may still influence the craft s flight characteristics Craft yaws spins in place Adjust Yaw Trim Craft banks r...

Page 11: ...ote should already be linked together Pull down and to the left on both controls sticks for 2 3 seconds The remote will chime once and the LEDs on the craft will blink rapidly When the LEDs have stopped blinking the recalibration is complete and the craft is ready to fly Remote Trim Reset If you are still having difficulty flying it may help to reset the trim controls on the remote Do not attempt ...

Page 12: ...e craft s flying characteristics Try using one control at a time Practice basic flight operations like take off hovering and landing If you get into trouble or if anything obstructs the rotors cut power immediately and safely clear the obstruction Check for possible damage before flying again Speed Setting Press the Speed button once to set the craft s speed Low Provides smooth and predictable con...

Page 13: ...t rotors if the originals are broken or badly damaged To replace a rotor gently pull it upwards and off of the motor shaft then place the new rotor on the shaft and gently push down Take special care not to bend or break the motor shaft or the rotor If the rotors are difficult to remove by hand try using a small set of pliers for a firmer grip on the rotor It is extremely important to use the corr...

Page 14: ...y connected Be sure the remote has an unobstructed line of sight to the craft Remain within the remote s 164 ft range Craft is difficult to control or flies erratically Gyroscopes may be misaligned Power OFF remote and craft and reconnect see pg 9 Craft drifts while in flight Trim not set or needs adjustment Adjust trim settings see pg 11 Reset trim settings see pg 12 Craft suffers from mechanical...

Page 15: ...s à des questions fréquemment posées consultez la rubrique d assistance sur www gpx com Contact Information Website www gpx com Email Support prodinfo dpiinc com Email Parts partsinfo dpiinc com Phone Support 1 888 999 4215 Warranty See included 30 Day Warranty for warranty information Warranty and the most up to date version of this User s Guide can also be found at www gpx com Protect for Today ...

Reviews: