background image

reedinstruments

www

com

10

Pantone 534 Blue

Pantone 123 Yellow

Pantone 485 Red

Pantone 123 Yellow

Pantone 534 Blue

Black

Rich Black - 

20/20/20/100

Blue -  100/80/30/5

Yellow - 0/27/100/0

Red - 10/100/100/5

Yellow - 0/27/100/0

Blue -  100/80/30/5

Only if you REALLY need them:

Pantone 534 Blue -  100/80/30/5

Pantone 485 Red - 10/100/100/5

Pantone 123 Yellow - 0/27/100/

Operating Instructions

ON/OFF

The   button switches the meter on and off. Press the   button once 
to turn the meter on and then hold the   button for two seconds to turn 
the meter off. Once the meter is on, it begins to auto-calibrate. While it’s 
calibrating, the display will go from CAL 9 to CAL 0. Wait until the meter 
has finished before pressing anything or opening the jaws. Once the 
calibration is completed, the meter will return to the measurement mode 
that was last used. If it was in resistance mode, the LCD will display the 
primary resistance measured value.

Ground Resistance Measurement

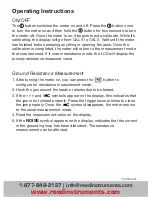
1. After turning the meter on, you can press the 

 button to 

configure for resistance measurement mode.

2. Hook the jaw around the leads or electrodes to be tested.
3. If the 

 and 

 symbols appear on the display, this indicates that 

the jaw is not closed properly. Press the trigger several times to close 
the jaw properly. Once the 

 symbol disappears, the meter returns 

to the usual measurement mode.

4. Read the measurement value on the display.
5. If the 

NOISE

 symbol appears on the display, indicates that the current 

in the grounding loop has been disturbed. The resistance  
measurement can be affected.

continued ...

www.reedinstruments.com

1-877-849-2127 | info@reedinstruments.com


Summary of Contents for MS2301

Page 1: ...com Model Black Pantone 534 Blue 100 80 30 5 Pantone 485 Red 10 100 100 5 Pantone 123 Yellow 0 27 100 MS2301 Ground Resistance Clamp Meter Instruction Manual www reedinstruments com 1 877 849 2127 info reedinstruments com ...

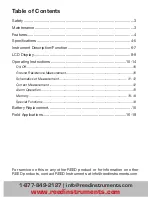
Page 2: ... of Contents Safety 3 Maintenance 3 Features 4 Specifications 4 5 Instrument Description Function 6 7 LCD Display 8 9 Operating Instructions 10 14 On Off 10 Ground Resistance Measurement 10 Schematics of Measurement 11 12 Current Measurement 12 Alarm Operation 13 Memory 13 14 Special Functions 14 Battery Replacement 15 Field Applications 16 18 For service on this or any other REED product or for i...

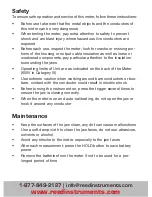
Page 3: ... well as loose or weakened components pay particular attention to the insulation surrounding the jaws Operating limits of Unit are as indicated on the back of the Meter 600V in Category III Use extreme caution when working around bare conductors or bus bars contact with the conductor could result in electric shock Before turning the instrument on press the trigger several times to ensure the jaw i...

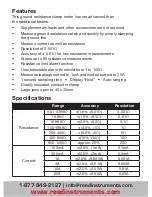
Page 4: ... resistance Resolution of 0 001Ω Accuracy of 0 01Ω for low resistance measurements Stores up to 99 resistance measurements Resistance limit alarm function User selectable alarm threshold from 1 to 100Ω Measures leakage current to 1mA and neutral current to 20A 1 second sampling time Display Hold Auto ranging Doubly insulated conductor clamp Large jaws open to 45 x 32mm Specifications Range Accurac...

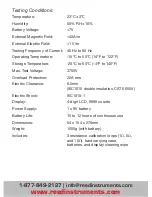
Page 5: ...l Electric Field 1 V m Testing Frequency of Current 45 Hz to 65 Hz Operating Temperature 10 C to 50 C 14 F to 122 F Storage Temperature 20 C to 60 C 4 F to 140 F Max Test Voltage 3700V Overload Protection 20A rms Electric Clearance 6 5mm IEC1010 double insulation CAT II 600V Electric Shock IEC1010 1 Display 4 digit LCD 9999 counts Power Supply 1 x 9V battery Battery Life 10 to 12 hours of continuo...

Page 6: ...34 Blue Black Rich Black 20 20 20 100 Blue 100 80 30 5 Yellow 0 27 100 0 Red 10 100 100 5 Yellow 0 27 100 0 Blue 100 80 30 5 Only if you REALLY need them Pantone 534 Blue 100 80 30 5 Pantone 485 Red 10 100 100 5 Instrument Description Function www reedinstruments com 1 877 849 2127 info reedinstruments com ...

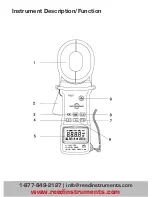
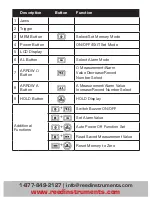
Page 7: ...tion Button Function 1 Jaws 2 Trigger 3 MEM Button Select Set Memory Mode 4 Power Button ON OFF EXIT Set Mode 5 LCD Display 6 AL Button Select Alarm Mode 7 ARROW Ω Button Ω Measurement Alarm Value Decrease Record Number Select 8 ARROW A Button A Measurement Alarm Value Increase Record Number Select 9 HOLD Button HOLD Display Additional Functions Switch Buzzer ON OFF Set Alarm Value Auto Power Off ...

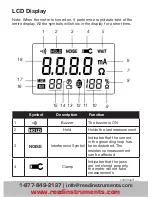
Page 8: ...ed on it performs a rapid auto test of the entire display All the symbols will show in the display for a short time 1 2 3 4 5 6 7 8 9 10 11 12 13 14 15 16 17 18 Symbol Description Function 1 Buzzer The buzzer is ON 2 Hold Holds the last measurement 3 Interference Symbol Indicates that the current in the grounding loop has been disturbed The resistance measurement can be affected 4 Clamp Indicates ...

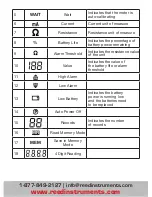
Page 9: ...rent unit of measure 7 Resistance Resistance unit of measure 8 Battery Life Indicates the percentage of battery power remaining 9 Alarm Threshold Indicates the resistance value of the unit 10 Value Indicates the value of the battery life or alarm threshold 11 High Alarm 12 Low Alarm 13 Low Battery Indicates the battery power is running low and the batteries need to be replaced 14 Auto Power Off 15...

Page 10: ...e jaws Once the calibration is completed the meter will return to the measurement mode that was last used If it was in resistance mode the LCD will display the primary resistance measured value Ground Resistance Measurement 1 After turning the meter on you can press the button to configure for resistance measurement mode 2 Hook the jaw around the leads or electrodes to be tested 3 If the and symbo...

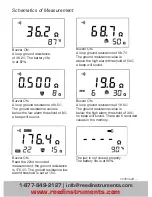
Page 11: ...ance of 68 7Ω The ground resistance value is above the high alarm threshold of 50Ω a beep will sound Buzzer ON A loop ground resistance of 0 5Ω The ground resistance value is below the low alarm threshold of 8Ω a beep will sound Buzzer ON A loop ground resistance of 19 6Ω The ground resistance value is below the high alarm threshold of 30Ω no beep will sound There are 6 recorded values in the memo...

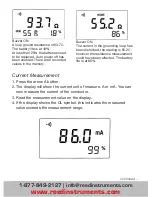
Page 12: ...u can now measure the current of the conductor 3 Read the measurement value on the display 4 If the display shows the OL symbol this indicates the measured value exceeds the measurement range continued Buzzer ON A loop ground resistance of 93 7Ω The battery life is at 18 At less than 20 the batteries need to be replaced Auto power off has been enabled There are 6 recorded values in the memory Buzz...

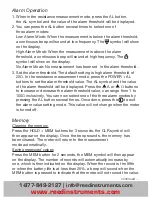
Page 13: ...arm threshold of 20Ω In the resistance measurement mode press the POWER AL buttons to set the alarm threshold value The AL symbol and the value of the alarm threshold will be displayed Press the A or Ω buttons to increase or decrease the alarm threshold value can range from 1 to 100Ω inclusively You can now select one of the three alarm modes by pressing the AL button several times Once done press...

Page 14: ... buttons the buzzer symbol will disappear from the display and the buzzer is now off When the buzzer is off there will be no beep sound when pressing the buttons and the alarm function is disabled Press the POWER Ω buttons to turn the buzzer back on Turning the auto power off ON OFF Press the POWER HOLD buttons the P symbol will appear on the display and the auto power off function will be enabled...

Page 15: ...eed to be replaced 1 Turn the meter off 2 Remove the screw on the battery cover 3 Remove the cover and the battery box 4 Remove the battery from the battery box 5 Install new battery respecting the correct polarity 6 Reinstall the battery box and the cover 7 Reinstall the screw on the battery cover Note Use of the instrument for the first time requires the batteries to be charged for 10 hours For ...

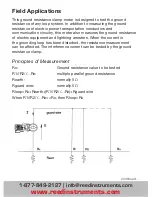
Page 16: ...ing the ground resistance of electric power transportation conductors and communication circuitry this meter also measures the ground resistance of electric equipment and lightning arresters When the current in the grounding loop has been disturbed the resistance measurement can be affected The interference current can be tested by the ground resistance clamp Principles of Measurement Rx Ground re...

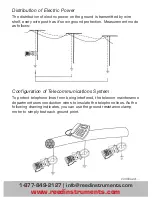
Page 17: ...Electric Power The distribution of electric power on the ground is transmitted by wire shelf every wire post has it s own ground protection Measurement mode as follows Configuration of Telecommunications System To protect telephone lines from being interfered the telecom maintenance department uses conduction wires to insulate the telephone lines As the following drawing indicates you can use the ...

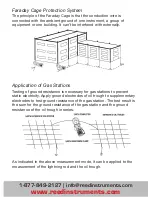
Page 18: ...nt ground of one instrument a group of equipment or one building It can t be interfered with externally Application of Gas Stations Testing of ground resistance is necessary for gas stations to prevent static electricity Apply ground electrodes of oil trough to supplementary electrodes to test ground resistance of the gas station The test result is the sum for the ground resistance of the gas stat...

Page 19: ...________________________________ ________________________________________________ ________________________________________________ ________________________________________________ ________________________________________________ ________________________________________________ ________________________________________________ ________________________________________________ ________________________...

Page 20: ...________________________________ ________________________________________________ ________________________________________________ ________________________________________________ ________________________________________________ ________________________________________________ ________________________________________________ ________________________________________________ ________________________...

Reviews: