T
RIPOD
SET UP
T
ELESCOPE
ASSEMBLY
3
1.
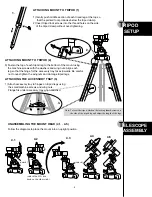
ATTACHING MOUNT TO TRIPOD (2)
3) Fasten the top of each tripod leg to the bottom of the mount using
the machine screws with the washers and wing nuts. Align each
leg so that the hinge for the accessory tray faces inwards. Be careful
not to over-tighten the wingnuts and damage tripod legs.
ATTACHING THE ACCESSORY TRAY (3)
1) Attach accessory tray to hinges on tripod legs using
the small machine screws and wing nuts.
Flange fits under accessory tray when attached.
2.
3.
ATTACHING MOUNT TO TRIPOD (1)
1) Gently push middle section of each tripod leg at the top so
that the pointed foot protrudes below the tripod clamp.
2) Insert tripod lock screws into the thread holes on the side
of the tripod clamp without over-tightening.
Note: To level the tripod, slacken the locking thumb screws on
the side of the tripod leg and adjust the length of the legs.
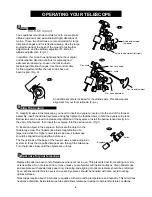
UNASSEMBLING THE MOUNT HEAD (4.1 _ 4.5)
Follow the diagrams to place the mount into an upright position.
4.4
4.5
4.1
(unlock)
4.2
(unlock the R.A. lock
knob on the other side.)
4.3
(unlock)


