background image

17

PART VI: Observing the sky

6.4 Cooling the Telescope

Telescopes require at least 10 to 30 minutes to cool down to outside air temperature. This 
may take longer if there is a big difference between the temperature of the telescope and 
the outside air. This minimizes heatwave distortion inside telescope tube (tube currents). 
Allow a longer cooling time for larger optics. 

6.5 Adapting Your Eyes

Do not expose your eyes to anything except red light for 30 minutes prior to observing. 
This allows your pupils to expand to their maximum diameter and build up the levels of 
optical pigments, which are rapidly lost if exposed to bright light. It is important to observe 

cover the non-used eye with your hand or an eye patch. Use averted vision on faint ob-
jects: The center of your eye is the least sensitive to low light levels. When viewing a faint 
object, don’t look directly at it. Instead, look slightly to the side, and the object will appear 
brighter.

6.8 Wireless Telescope Control


The VIRTUOSO GTi mount will be equipped with a telescope optical tube for astronomy observa-

tion purpose. Please refer to the telescope optical tube manual for use of the telescope and its 

accessories. 

Aiming the telescope automatically with the VIRTUOSO GTi mount, connected to your smart 

device equipped with WiFi (smartphone, tablet, laptop):

6.9 Wireless Terrestrial Photography Control

The VIRTUOSO GTi mount can be equipped with a camera for terrestrial panorama photography, 

timelapse photography etc.

The connection procedure is identical. The app to be installed is different: SynScan Photo.

The Wi-Fi will be turned off automatically to conserve energy if no connection is established 

within 15 minutes after being turned on.
By default, the SSID of the built-in Wi-Fi is “SynScan_xxxx” with no password.
Reset Wi-Fi configuration to factory default by turning on the power without the SynScan hand 

control connected and no app operations via the Wi-Fi connection for 1 hour.
Entry-level users are recommended to start with SynScan app, the SynScan Pro app is for 

experienced users.

Make sure the freely available software (SynScan or SynScan Pro) app is installed on your smart 

device. You can find them in your App Store, Google Play  or on our webpage

Switch on the VIRTUOSO GTi mount.

Connect your smart device with the WiFi signal with identification “SynScan …..”

Refer to SynScan App User’s Manual.

-

-

-

-


6.6 Download SynScan or SynScan Pro APP

http://www.skywatcher.com/download/software/synscan-app/

http://www.skywatcher.com/download/manual/synscan-hand-control-and-synscan-app/

6.7 Download SynScan App User’s Manual

Summary of Contents for VIRTUOSO GTi

Page 1: ...INSTRUCTION MANUAL VIRTUOSO GTi Copyright Sky Watcher 202102V1...

Page 2: ...bles 6 2 5 Power Supply Requirements 6 Parts Diagram PART IV Assembling Your Telescope 4 2 Eyepiece Assembly 13 PART V Operating Your Telescope 5 2 Focusing the Telescope 15 5 1 Using the Red Dot Find...

Page 3: ...gram Dovetail Groove Altitude Clutch Wheel Bubble Level Battery Compartment for 8x AA Batteries LED Indicator Hand Controller Port External Power Power Switch SNAP Port Azimuth Clutch Knob Dovetail Lo...

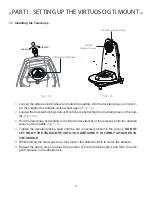
Page 4: ...dovetail bar of the telescope into the dovetail groove of the saddle Fig 1 1b 4 Tighten the dovetail locking knob until the bar is securely locked in the groove DO NOT LET GO OF THE TELESCOPE UNTIL YO...

Page 5: ...onnecting the SynScan hand controller SNAP This is a stereo jack outlet to connect with a camera s shutter control port The SynScan hand control can control the camera to take pictures automatically v...

Page 6: ...ony cameras See the table below to select the appropriate cable for your camera model it can be ordered from the local Skywatcher dealer Part Number Camera Interface Style Controller Interface Compati...

Page 7: ...rder to control the telescope and mount for astronomical observation Please refer to the SynScan hand control manual for operation instructions Users can download the free SynScan App from the App Sto...

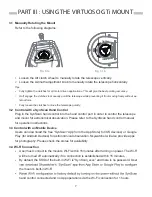
Page 8: ...ture can be disabled with the SynScan hand controller or the SynScan App If an user does not need to rotate the mount manually after alignment it is recommended to dis able this feature to obtain the...

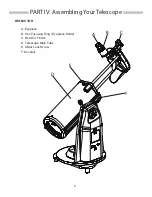
Page 9: ...9 A Eyepiece B Hex Focusing Ring Eyepiece Holder C Red Dot Finder D Telescope Main Tube E Slider Lock Screw F Dovetail PART IV Assembling Your Telescope REFLECTOR A B C D E F...

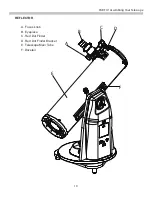
Page 10: ...10 A Focus knob B Eyepiece C Red Dot Finder D Red Dot Finder Bracket E Telescope Main Tube F Dovetail PART IV Assembling Your Telescope REFLECTOR A B C D E F...

Page 11: ...11 A Red Dot Finder B Red Dot Finder Bracket C Telescope Main Tube D Eyepiece E Dovetail F Diagonal G Focus knob PART IV Assembling Your Telescope MAKSUTOV A B C D E G F...

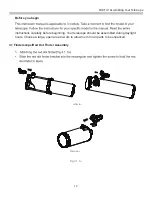
Page 12: ...ctions carefully before beginning Your telescope should be assembled during daylight hours Choose a large open area to work to allow room for all parts to be unpacked reflector Fig 4 1 1a 1 PART IV As...

Page 13: ...and re tighten the thumbscrew to hold the diagonal in place Loose the thumbscrews on the diagonal Insert the desired eyepiece into diagonal and secure by re tightening thumbscrews reflector Maksutov F...

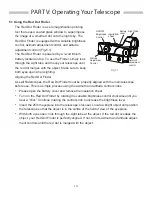
Page 14: ...sight tube and move your telescope until the red dot merges with the object Make sure to keep both eyes open when sighting Turn on the Red Dot Finder by rotating the variable brightness control clock...

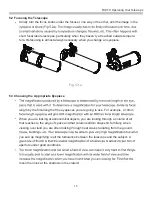
Page 15: ...osing the Appropriate Eyepiece length by the focal length of the eyepieces you are going to use For example a 10mm When you are looking at astronomical objects you are looking through a column of air...

Page 16: ...tmosphere complete with turbulence dust particles and increased light pollution 6 2 Selecting an Observing Site Travel to the best site that is reasonably accessible It should be away from city lights...

Page 17: ...telescope automatically with the VIRTUOSO GTi mount connected to your smart device equipped with WiFi smartphone tablet laptop 6 9 Wireless Terrestrial Photography Control The VIRTUOSO GTi mount can...

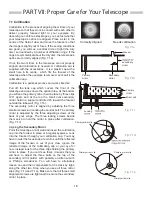
Page 18: ...which covers the front of the telescope and look down the optical tube At the bottom you will see the primary mirror held in place by three clips 120 apart and at the top the small oval secondary mir...

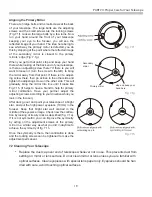
Page 19: ...the primary mirrors edge Fig 7 1g When you get to that point stop and keep your hand there while looking at the back end of your telescope is there an adjusting screw there If there is you will want...

Page 20: ...VIRTUOSO GTi Mount...

Reviews: