59
Skydio X2
Color/Thermal - Operator Manual
© 2022 Skydio, Inc. All rights reserved.
Maintenance
INFO:
Do not reuse screws even if they look to be in good condition. Whenever you replace your X2 propellers, use the
new screws provided in your replacement kit.
Replace propeller blades
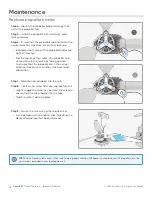
Step 4
- Identify the propeller blade markings that
match the propeller hub
Step 5
- Install the propeller with matching marks
facing upward
Step 6
- Ensure that the propellers are oriented in the
correct direction clockwise or counter-clockwise
•
located on both sides of the propeller blades are
distinct markings
•
find the markings that match the propeller hub
and install with the markings facing upward,
to ensures that the propeller are in the correct
direction (clockwise or counter-clockwise) and
orientation.
Step 7
- Slide the new propeller into the hub
Step 8
- Insert a new screw from your replacement kit
•
slightly wiggle the screw as you insert the screw to
ensure that it seats properly into the hub
•
hold the motor hub to stabilize
Step 9
- Fasten the screw using the torque driver
•
turn clockwise until you hear a click indicating the
desired torque level has been achieved


