15. INSTALLING THE MAINSHOG POWER SUPPLY
As each mains powered installation will be slightly different, this is just a general guide.
The MainsHog contains a transformer which provides a 12 V supply to the DataHog or MiniMet logger. As it
contains full mains voltages, the MainsHog housing itself is not suitable for an outdoor installation and is
usually placed near the connecting PC.
The cable running from the MainsHog to the datalogger has two purposes, it not only takes power to the
logger, but also acts as the data connection cable.
15.1 Standard MainsHog
If the distance between the MainsHog and the DataHog or MiniMet is less than 50m, you will have
been supplied with a standard Mains Hog version.
Connect the unit to the 110V or 220V mains supply as appropriate, preferably near a PC. Run the
long cable out to the DataHog or MiniMet datalogger, connect and screw up (do not overtighten)
the 8 pin connector into the logger socket marked RS232. Install the long cable carefully to prevent
cable movement and damage from chafing.
To link the DataHog or MiniMet to the PC, connect the 1m datalead and USB Serial/USB converter
between the RS232 socket on the MainsHog unit, and a USB port of the computer. Install and run
SkyeLynxComms (please refer to the separate manual).
15.2 Mains Hog with Signal Boosters
If the distance between the MainsHog and the DataHog or MiniMet is greater than 50m, you will
probably have purchased the MainsHog version with Signal Boosters. In which case you will also
have a second outdoor unit fitted with a mounting bracket, ready to install out with the datalogger.
Install the outdoor unit near the DataHog or MiniMet. The mounting bracket has four holes on its
back plate, suitable for bolting to a wall or vertical surface. It is supplied as standard with a pair of
'V' bolts, washers, nuts and end caps used for fixing to a pole or mast up to a maximum diameter of
50 mm. Plug in and screw up (do not overtighten) the 8 pin connector on the short cable into the
logger socket marked RS232. Use plastic cable ties to prevent cable movement and damage from
chafing.
Connect the long cable between the MainsHog and the outdoor unit as described in the
instruction manual. Install this cable carefully to prevent cable movement and damage from chafing.
Connect the MainsHog unit to the 110V or 220V mains supply as appropriate, preferably near a PC.
29
MiniMet Installation
Summary of Contents for MiniMet
Page 1: ...MiniMet Installation Manual Iss 2 0...
Page 45: ...APPENDIX 2 CONCRETE BASE FOR A 2M MAST 44 MiniMet Installation...
Page 46: ...APPENDIX 3 SITE LOCATION 45 MiniMet Installation...
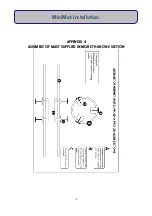
Page 47: ...APPENDIX 4 ASSEMBLY OF MAST SUPPLIED IN MORE THAN ONE SECTION 46 MiniMet Installation...
Page 49: ...APPENDIX 6 RAINGAUGE BASEPLATE 48 MiniMet Installation...
Page 50: ...APPENDIX 7 MOUNTING OF GSM GPRS ENCLOSURE TO BRACKET 49 MiniMet Installation...
Page 51: ...APPENDIX 8 MOUNTING THE GSM GPRS MODULE ON THE MAST NO SOLAR PANEL 50 MiniMet Installation...
Page 55: ...APPENDIX 12 TYPICAL MINIMET INSTALLATION WITH GSM GPRS 54 MiniMet Installation...
Page 56: ...APPENDIX 13 TYPICAL MINIMET INSTALLATION WITHOUT GSM GPRS 55 MiniMet Installation...
Page 57: ...APPENDIX 14 56 MiniMet Installation...
Page 58: ...APPENDIX 15 FITTING THE BATTERY COVER 57 MiniMet Installation...

