178
SJ6826RT, SJ6832RT
213560ABA
Section 5 – Procedures
Scissors
5.6 Scissors
5.6-1 High Speed Cutout Limit Switch
(LS5) Replacement and Adjustment
Machine Preparation
1.
Ensure the aerial platform is parked on a firm
level surface.
2.
Chock or block the wheels to keep the aerial
platform from rolling forward or backward.
Limit Switch Removal
1.
Raise the platform to give access to the limit
switch cable, and deploy the maintenance stand.
2.
Turn the main power disconnect switch off.
3.
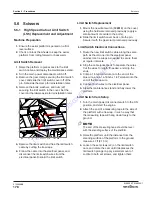
Remove the gear clamp securing the limit switch
cover, and slide the limit switch cover off of the
pin. Set aside the clamp for reinstallation later.
4.
Remove the bolts, washers, and nuts (x2)
securing the limit switch to the cover. Set the
cover and hardware aside for reinstallation later.
5.
Remove the limit switch and free the limit switch
cable by cutting the tie wraps.
6.
Follow the cable into the electrical panel, and
disconnect the limit switch wires from the
electrical panel. Discard the limit switch.
Limit Switch Replacement
1.
Mount the new limit switch (
122010
) on the cover,
using the hardware removed previously (apply a
small amount of Loctite to the bolts).
2.
Slide the limit switch cover back onto the pin.
Secure it with the gear clamp removed previously.
Limit Switch Electrical Connections
1.
Route the new limit switch cable along the same
path as the old one into the electrical panel
cabinet. Use tie wraps as needed to secure them
at regular intervals.
2.
Strip the cable jacket back to separate the wires.
Cut the wires to length if needed, and strip the
ends.
3.
Crimp a 18 GA red ferrule onto the end of the
blue wire, and a 14-16 GA x 1/4 Terminal onto the
end of the brown wire.
4.
Connect both wires to the electrical panel.
5.
Stow the maintenance stand and fully lower the
platform
.
Limit Switch Cam Setup
1.
Turn the main power disconnect switch to the ON
position, and start the engine.
2.
Attach the end of a measuring tape to the side of
the platform with a tie wrap, in such a way that
the measuring tape will hang down freely to the
ground.
NOTE
The end of the measuring tape should be level
with the standing surface of the platform .
3.
Raise the platform until the distance from the
standing surface of the platform to the ground
measures 7 ft (2.13 m).
4.
Loosen the set screws (x2) on the limit switch
cam, and rotate the cam until it depresses the
limit switch plunger. Apply a small amount of
Loctite to both set screws, and tighten them.
To
order
go
to
Discount-Equipment.com


