4
Catch the Movable Table with the left hand and push against
the Blade cutting the product at constant speed.
After finishing the whole slice remove it with the right hand.
The slice shall ALWAYS be removed behind the Blade to
avoid the hand to contact the Blade
Place the slices upon the Fixed Table # 05 (Pic. 01).
Bring back the Movable Table to the front side of the
machine and repeat the above steps until to have finished
to cut all the product.
After the end of the last slice turn the ON/OFF Switch to the
position “O” (OFF) # 13 (Pic 01).
5. CLEANING
When the equipment must go through a complete cleaning
and sanitization process:
-
Before to be used first time.
- After every day end of operations
- When the saw is not going to be used for a long period.
- Before to start operation after a long period it has not been
used.
Some components may be removed to clean:
- Door
- Fixed Table Block
- Blade
- Thickness Guide
- Blade Scraper
Follow below instructions to remove the above mentioned
components:
Doors
Turn the two Doors handle counterclockwise until they get
free from their screws. Open the Door #01 (Pic. 03), hold it
firmly and lift it.
Fixed Table Block
Remove the Fixed Table Block #01 (Pic. 04) just lifting it , see
picture 04.
Blade
Turn the Blade Tension Regulator Handle # 01 (Pic 05)
counter clockwise to get the Blade # 02 (Pic. 05) free to be
removed.
Thickness Guide
Turn the handle # 01 (Pic.06) counterclockwise and slide the
shaft to the left until it loose from the base. Lift up the Cut
Regulator and remove it.
Blade Scraper
Once the blade is removed, Blade Scraper #01 (Pic.06) is
free to remove.
Use a clean cloth or a soft brush to remove residues.
Wash, sanitize, rinse and dry all the components.
Assemble back all the components following the inverse
path, and make sure all the components are correctly in
place.
Use Your QR Code Reader to access more
information regarding cautions with
stainless steel.
01
01
Picture 04
02
01
Picture 05
Picture 07
01
01
Picture 06
01
Picture 03
Summary of Contents for SFL-282HD
Page 6: ...6 8 ELECTRICAL DIAGRAMS SFL 282 295HD 110 V 60 Hz ...
Page 7: ...7 SFL 282 295HD 220 V 60 Hz ...
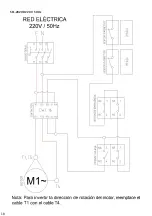
Page 8: ...8 SFL 282HD 220 V 50 Hz ...
Page 9: ...9 SFL 315HD 220 V 50 Hz ...
Page 10: ...10 SFL 315HD 220 V 60 Hz ...
Page 11: ...11 SFL 315HD 110 V 60 Hz ...
Page 16: ...16 8 DIAGRAMAS ELECTRICOS SFL 282 295HD 110 V 60 Hz ...
Page 17: ...17 SFL 282 295HD 220 V 60 Hz ...
Page 18: ...18 SFL 282HD 220 V 50 Hz ...
Page 19: ...19 SFL 315HD 220 V 50 Hz ...
Page 20: ...20 SFL 315HD 220 V 60 Hz ...
Page 21: ...21 SFL 315HD 110 V 60 Hz ...


