background image

To ensure proper operation of this appliance, please read this 

instruction manual carefully before using the appliance and 

save it for further reference.


WARNING

• This appliance must not be used on the following:

-  Children

-  People with sensitive skin

-  People with skin conditions or allergies

-  Areas such as eyelids or throat

-  Areas where epilation or plastic surgery has been 

performed

• Immediately stop using the appliance, and consult a doctor 

if you feel unwell.

• Do not place the appliance in a hot or humid environment 

for a long time.

• Do not attempt to modify, disassemble, or repair the 

appliance by yourself.


CAUTION

• If the appliance is not used for a long time, remove the 

batteries to prevent a possible leakage.

• Name: Facial Cleanser

• Item Number: LMSFC2-S

• Rated Voltage/Power: 3.0V==/1.1W

• Type of Battery: AA 1.5V x 2(not included)

• Size: 165mm x 57mm x 71mm

• Material: ABS, PBT, Silicone

• Executive Standard: Q/XMMJ1001-2015

LMSFC2-S

SAFETY INSTRUCTIONS:

PRODUCT DESCRIPTION

SERVICE

SUPPORT

SPECIFICATIONS

OPERATING INSTRUCTIONS:

CLEANING & MAINTENANCE

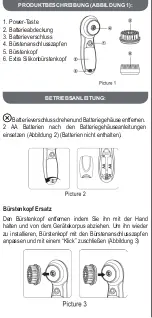
             Turn the battery lock and remove the battery cover. 

Install 2AA batteries according to the battery compartment 

instructions(picture 2) (batteries are not included).

Brush head replacement 

To remove the brush head, hold it with your hand and pull it 

from the appliance body. To install it, align the brush head with 

the brush connection pin and lock the position with a “click” 

(picture 3)

Symbol for “Manufacture Date”.

Symbol for “Environment Protection” – Waste 

electrical products should not be disposed of with 

household waste. Please recycle where facilities 

exist. Check with yourlocal Authority or retailer for 

recycling advice.

Symbol for “Complies with EU requirements”.

Model Reference.

Please feel free to contact us at: 

            +44 (0) 1483 937967

            hello@skyncare.co

            Skyn Care (Kinetik Medical Devices) 
            Unit 3, Perrywood Business Park
            Honeycrock Lane, Salfords Redhill 
            RH1 5DZ. UK

1.   Eco-friendly tips 

Batteries contain substances harmful to our environment. 

Please do not dispose of the appliance with the batteries 

inside, remove the batteries and recycle it for environmental 

protection.

2.   Trouble Shooting 

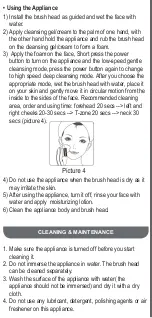
• Using the Appliance

1) Install the brush head as guided and wet the face with 

water.

2) Apply cleansing gel/cream to the palm of one hand, with 

the other hand hold the appliance and rub the brush head 

on the cleansing gel/cream to form a foam.

3)  Apply the foam on the face, Short press the power 

button to turn on the appliance and the low-speed gentle 

cleansing mode, press the power button again to change 

to high speed deep cleansing mode. After you choose the 

appropriate mode, wet the brush head with water, place it 

on your skin and gently move it in circular motion from the 

inside to the sides of the face. Recommended cleaning 

area, order and using time: forehead 20 secs --> left and 

right cheeks 20-30 secs --> T-zone 20 secs --> neck 30 

secs (picture 4).

4) Do not use the appliance when the brush head is dry as it 

may irritate the skin.

5) After using the appliance, turn it off, rinse your face with 

water and apply  moisturizing lotion.

6) Clean the appliance body and brush head.

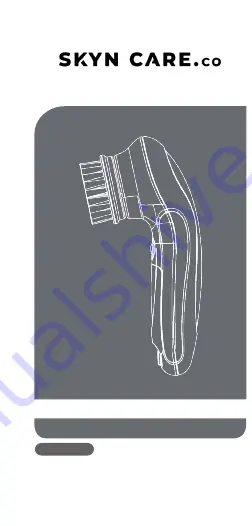
1. Power button

2. Battery cover

3. Battery lock

4. Brush connection pin 

5. Brush head

6. Extra silicone brush head

1. Make sure the appliance is turned off before you start 

cleaning it.

2. Do not immerse the appliance in water. The brush head 

can be cleaned separately.

3. Wash the surface of the appliance with water( the 

appliance should not be immersed) and dry it with a dry 

cloth.

4. Do not use any lubricant, detergent, polishing agents or air 

freshener on this appliance.

5. When cleaning the brush head, do not immerse it in hot 

water above 40°C to avoid brush head deformation.

6. After washing the brush head, place it in a ventilated place 

to dry( do not dry it in a place with direct sun light).

7. It is recommended to replace the brush head every 3 

months.

Problem

Possible cause

Solution

The appliance 

does not 

work

Batteries are 

running low

Replace the 

batteries as 

guided

Batteries are out of 

power
Batteries were 

installed incorrectly

Install the batteries 

as guided

Abnormal 

noise

The brush head 

was installed 

incorrectly

Please turn off the 

appliance, and 

install the brush 

head correctly as 

guided

Other 

problems

Contact your local 

retailer

Note: If the appliance still does not work properly after 

using above solutions, please stop using the appliance 

and contact your local retailer.

INSTRUCTION MANUAL

FACIAL CLEANSER

Summary of Contents for LMSFC2-S

Page 1: ...LMSFC2 S INSTRUCTION MANUAL FACIAL CLEANSER...

Page 2: ...erformed Immediately stop using the appliance and consult a doctor if you feel unwell Do not place the appliance in a hot or humid environment for a long time Do not attempt to modify disassemble or r...

Page 3: ...picture 2 batteries are not included Brush head replacement To remove the brush head hold it with your hand and pull it from the appliance body To install it align the brush head with the brush conne...

Page 4: ...n circular motion from the inside to the sides of the face Recommended cleaning area order and using time forehead 20 secs left and right cheeks 20 30 secs T zone 20 secs neck 30 secs picture 4 4 Do n...

Page 5: ...a place with direct sun light 7 It is recommended to replace the brush head every 3 months Problem Possible cause Solution The appliance does not work Batteries are running low Replace the batteries a...

Page 6: ...te Please recycle where facilities exist Check with yourlocal Authority or retailer for recycling advice Symbol for Complies with EU requirements Model Reference Please feel free to contact us at 44 0...

Page 7: ...LMSFC2 S GEBRAUCHSANWEISUNG GESICHTSREINIGER...

Page 8: ...hlen sollten Sie sofort aufh ren das Ger t zu verwenden und ein Arzt konsultieren Das Ger t nicht in einer hei en oder feuchten Umgebung f r eine l ngere Zeit lagern 9HUVXFKHQ 6LH QLFKW GDV HUlW VHOE...

Page 9: ...rien nicht enthalten B rstenkopf Ersatz Den B rstenkopf entfernen indem Sie ihn mit der Hand halten und von dem Ger tekorpus abziehen Um ihn wieder zu installieren B rstenkopf mit den B rstenanschluss...

Page 10: ...au en Empfehlender Reinigungsbereich Reihenfolge und Einsatzzeit Stirn 20 Sekunden linke und rechte Backe 20 30 Sekunden T Zone 20 Sekunden Hals 30 Sekunden Abbildung 4 4 Das Ger t nicht mit einem tro...

Page 11: ...onnenlicht 7 Es wird empfohlen den B rstenkopf alle 3 Monate auszuwechseln Problem M gliche Ursache L sung Das Ger t funktioniert nicht Schwache Batterien Die Batterien vorschriftsm ig auswechseln Bat...

Page 12: ...vorhanden sind Bitte erkundigen Sie sich bei Ihren zust ndigen Beh rden oder Einzelh ndler f r Hinweise zum Recycling Symbol f r Entspricht den Anforderungen der EU Modellreferenz Wir stehen Ihnen je...

Page 13: ...LMSFC2 S GEBRUIKSAANWIJZING GEZICHTSREINIGER...

Page 14: ...Stop onmiddellijk met het gebruik van het apparaat en raadpleeg een arts als u zich onwel voelt Plaats het apparaat niet voor langere tijd in een warme of vochtige omgeving 3UREHHU KHW DSSDUDDW QLHW...

Page 15: ...ijn niet inbegrepen Vervanging van de borstelkop Om de borstelkop te verwijderen houdt u deze met uw hand vast en trekt u deze van het apparaatlichaam af Om hem te installeren richt u de borstelkop op...

Page 16: ...nenkant naar de zijkanten van het gezicht Aanbevolen reinigingsgebied volgorde en gebruikstijd voorhoofd 20 seconden linker en rechter wangen 20 30 seconden T zone 20 seconden nek 30 seconden afbeeldi...

Page 17: ...7 Het is aanbevolen om de borstelkop om de 3 maanden te vervangen Probleem Mogelijke oorzaak Oplossing Het appa raat werkt niet De batterijen zijn bijna leeg Vervang de batterijen als geleide De batte...

Page 18: ...egooid Gelieve te recycleren waar faciliteiten bestaan Neem contact op met uw gemeente of winkelier voor advies over recycling Symbool voor Voldoet aan de EU eisen Modelreferentie Neem gerust contact...

Page 19: ...LMSFC2 S 16758 2 6 8 52 2 6 1 7 5...

Page 20: ...LDVW DSU HVWD X ZDQLD XU G HQLD L VNRQVXOWRZD VL OHNDU HP MH OL F XMHV VL OH 1LH QDOH XPLHV F D XU G HQLD Z JRU F FK OXE ZLOJRWQ FK SRPLHV F HQLDFK SU H G X V F DV 1LH QDOH SUyERZD VDPRG LHOQLH PRG NR...

Page 21: ...VWDZLH PLDQD J RZLF V F RWNL E GM J yZN V F RWNL SU WU PDM M U N L Z FL JQLM NRUSXVX XU G HQLD E M DPRQWRZD QDOH XVWDZL J RZLF V F RWNL Z OLQLL NR NLHP F F P V F RWN L DEORNRZD SR FM D SRPRF NOLNQL FL...

Page 22: ...L GHOLNDWQLH SRUXV DM QL RNU Q PL UXFKDPL RG ZHZQ WU QD ERNL WZDU DOHFDQ REV DU GR F V F HQLD NROHMQR L F DV X FLD F R R sekund lewe i prawe policzki 20 30 sekund strefa T VHNXQG V MD VHNXQG GM FLH 1...

Page 23: ...Z PLHMVFX QDV RQHF QLRQ P DOHFD VL Z PLDQ J yZNL V F RWNL FR PLHVL FH Problem 0R OLZD SU F QD 5R ZL DQLH 8U G HQLH QLH G LD D DWHULH V wyczerpane DWHULH QDOH Z PLHQLD zgodnie z LQVWUXNFM DWHULH V QLH...

Page 24: ...edhill RH1 5DZ UK Symbol dla Data produkcji 6 PERO 2FKURQD URGRZLVND X W FK SURGXNWyZ HOHNWU F Q FK QLH QDOH Z U XFD UD HP odpadami z gospodarstw domowych Prosimy R UHF NOLQJ Z PLHMVFDFK Z NWyU FK QDM...

Reviews: