background image

Limited Warranty Terms & Conditions

Xtreem warrants this product against defects in workmanship and material for a period of one (1) 

year from it’s original purchase date. You must present your receipt as proof of date of purchase for 

warranty validation. Any unit which proves defective during the stated period will be repaired without 

charge for parts or labour or replaced at the sole discretion of Xtreem. The end user is responsible 

for all freight charges incurred to send the product to Xtreem’s repair centres. The end user is 

responsible for all shipping costs incurred when shipping from and to any country other than the 

country of origin. 
The warranty does not cover any incidental, accidental or consequential damages arising from the use 

of or the inability to use this product. Any costs associated with the fitting or removal of this product 

by a tradesman or other person or any other costs associated with its use are the responsibility of the 

end user. This warranty applies to the original purchaser of the product only and is not transferable to 

any third party.  Unauthorized end user or third party modifications to any component or evidence of 

misuse or abuse of the device will render all warranties void.
By law some countries do not allow limitations on certain exclusions in this warranty.  Where 

applicable by local laws, regulations and legal rights will take precedence.
For Australia: Our goods come with guarantees which cannot be excluded under Australian Consumer 

Law. You are entitled to a replacement or refund for a major failure and for compensation for any 

other reasonably foreseeable loss or damage. You are also entitled to have the goods repaired or 

replaced if the goods fail to be of acceptable quality and the failure does not amount to major failure.

Extreme Fun For Everyone!

MSKYRAN180416E

© XTREEM 2016

Summary of Contents for XTREEM

Page 1: ...Sky Ranger GIANT RC QUADCOPTER SHOOTS BIG TIME 720P HD VIDEOS INSTRUCTION MANUAL...

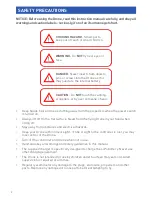
Page 2: ...ver use other charging equipment The Drone is not intended for use by children under fourteen 14 years old Adult supervision is required at all times Regularly examine for any damage to the plugs encl...

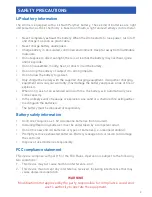
Page 3: ...uish the batteries The battery must be disposed of responsibly Controller requires 4 x 1 5V AA alkaline batteries not included Installing Replacing batteries must be undertaken by a competent adult Do...

Page 4: ...im position 2 Forward and backward trim position 3 M1 Rotation M2 Sideway trim position 4 Forward movement gauge 5 Backward movement gauge 6 Left movement gauge 7 Right movement gauge 8 Rotate left mo...

Page 5: ...TION Only charge the battery with the original charger Using other charging equipment will void your warranty may damage the battery and could result in fire or explosion Connect the white battery cha...

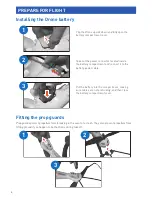
Page 6: ...you happen to tip the Drone during takeoff Flip the Drone upside down and fully open the battery compartment cover Take out the power connector located inside the battery compartment and connect it to...

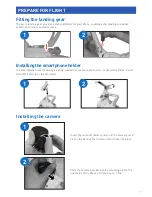
Page 7: ...ng the smartphone holder The smartphone holder featuring a spring loaded clip to secure your device conveniently slides in and out of the antenna on the controller 1 2 Insert the microSD memory card i...

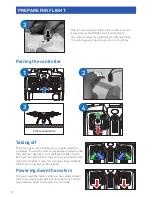
Page 8: ...once it is paired with the controller To start the motors depending on which mode the controller has been set to default is mode 1 push both left and right sticks to the positions as shown on the rig...

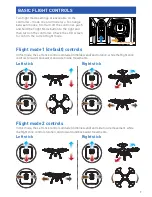
Page 9: ...ontroller Check the LCD screen to confirm the current flight mode Flight Mode button Left stick Left stick Right stick Right stick In this mode the Left stick controls altitude climb descend and rotat...

Page 10: ...eo recording time display To stop recording tap the Video button again Captured photos and videos are stored on the microSD card as well as on your smartphone memory If the camera does not contain a m...

Page 11: ...rone on the ground pointing it in the direction of where you ll be flying it toward 3 Link the controller When the Drone initially links up with the controller it remembers a reference heading that it...

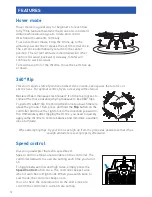
Page 12: ...indicator on the LCD screen to confirm the controller s current rate setting Hover mode is a great way for beginners to learn how to fly This feature maintains the Drone at a consistent altitude whil...

Page 13: ...rone status lights will start blinking as well Before power to the motors is cut off entirely gradually move the left stick all the way down to slow the propellers until you can land the Drone safely...

Page 14: ...the gyro sensor First place your Drone on a level ground and then hold both Left and Right sticks to the lower right corner for about 3 seconds The Drone status lights blink rapidly before turning so...

Page 15: ...15 1 3 5 7 8 6 4 2 REPLACING A DAMAGED PROPELLER...

Page 16: ...itting or removal of this product by a tradesman or other person or any other costs associated with its use are the responsibility of the end user This warranty applies to the original purchaser of th...

Reviews: