
Indoor temperature
or seconds display
Weekday or
seconds display
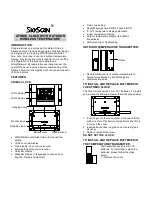
2. Insert the batteries, observing the correct polarity
(see marking).
3.
Replace the battery cover on the unit.
SETTING UP:
Do not set the clock until the
outdoor temperature is displayed.
1. Slide the battery cover open on the Skyscan Atomic
Clock as indicated above (see "
To install and
replace batteries in the Atomic Clock
“ above).
2. Checking the correct polarization, insert 2 x AA, 1.5V
batteries into the battery compartment and replace
the battery cover.
3. Once the batteries are in place, all segments of the
LCD will light up briefly. Then the indoor
temperature, the time as -:--, the date as 1.1. , and
weekday will be displayed
.
IMPORTANT
: If the indoor temperature is not
displayed after a few seconds, remove the batteries
and wait for at least 10 seconds before reinserting
them.
4.
Within 2 minutes of activating the Skyscan
Atomic Clock, place the batteries into the
transmitter (see “To install and replace batteries
in the Temperature Transmitter” above).
5. After a few seconds of inserting the batteries into the
transmitter, the Atomic Clock will start receiving data
from the transmitter. The remote temperature will
then be displayed on the Skyscan Atomic Clock.
IMPORTANT: if this does not happen after 4
minutes, the batteries will need to be removed
from both units and reset from step 1. Remove
the batteries and wait for at least 30 seconds
before reinserting them.
6.
After the clock receives the outdoor temperature,
set your time zone using the manual settings
below. The default time zone is Eastern Standard
Time.
7. After the clock receives the outdoor temperature the
WWVB time code reception will automatically start.
This reception typically takes between 5-10 minutes
in good conditions. If after 10 minutes the WWVB
time has not been received, use the SET key to
manually enter the set mode and change either the
time or date in order to activate the WWVB reception
(see manual settings below). The clock will then
automatically attempt to receive the WWVB time
from 12:00 am through 6:00 am each day (attempts
WWVB reception every full hour within this time
frame). When this is successful, the received time
will override the manually set time. The date is also
updated with the received time (Please refer to
notes on “
Radio controlled time
” and “
Manual time
setting
”).
Note
:
In the event of changing batteries of the unit ensure that
the batteries do not spring free from the contacts.
Always wait at least 30 seconds after removing the
batteries before reinserting, otherwise start up and
transmission problems may occur.
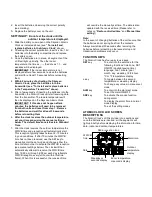
FUNCTION KEYS
The Atomic Clock has four easy to use keys:
SET
key
: To enter into the set mode for the
following functions: time zone, DST
ON/OFF (daylight saving time),
language, hour, minute, year,
month, day, weekday, 12/24 hour,
ºC or ºF temperature display
+
key
:
To toggle between the second,
temperature or weekday display
To change any values in manual set
mode
ALM
key
:
To enter into the alarm set mode
To set the alarm ON/OFF
SNZ
key
:
To activate the snooze function
during alarm
To display the alarm time in normal
mode display
To exit the setting modes
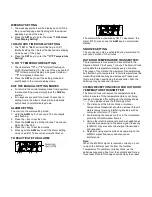
ATOMIC CLOCK LCD SCREEN
DESCRIPTIONS
The Atomic Clock's LCD is divided into 2 sections and
once the batteries are inserted, all the segments will
light up briefly before displaying the information for time,
date, indoor and outdoor temperatures.
Outdoor
temperature
display
Date
WWVB
time
Alarm icon
Radio reception icon


